Task 1- 4
Here is what I am considering for my potion on what to modelling for Included mood board’s of idea’s.
What is organic modelling?
organic modelling refers to modelling living thing this could be creature, animals, insect, humans, plants, all of these things have soft edges and not many hard edges in modelling their are relatively smooth and flow this would be also reflexes in it geometry to.
-Organic
Cherry blossom tree

An cherry blossom tree these are typical used in RPGs game such a Sekiro, Ninja Gaiden action game, maps in call of duty multiplayer or zombies. cherry blossom tree is more organic asset seen has a tree can grow in any form there is no specific look like a mechanical asset therefore I can be as creative as I want when creating some as a tree, however a tree and its features such as the trunk and root will be very detailed if I were to model this these will have to be done to great detail the cherry blossoms on the tree however can be simplistic seen as the shape of a cherry blossom is very basic as its round in might have to be a lot of tris but some can be fake, duplicated seen as their are lot of cherry blossoms on one tree. if I was to choose an organic piece like this to model I have lot of creative freedom to model it how I want and its designed.
What is props modelling ?
prop modelling is models from different objects that the character might hold or wear and is used by the character or required for a set or scene. this would be anything example classroom, could have chairs, tables, computers/ keyboard and mouse etc. These are relatively man-made but can be an environment and organic based to.
-Props
An old fashioned Anti-tank rifle.

This is an old fashioned anti tank rifle which was used in WW1 to WW2. this anti Tank rifle would probably be used in mostly in FPS game such as call of duty WW2 and black ops any or battlefield 1. Any first person shooter that is apart of that certain part of history WW1 games. the barrel of the anti tank rifle is made from steel alloy the stand to and the bolt action mechanism also and the body of the gun and the pins that keep the gun in place. The suppresser at the end of the barrel is made steel , aluminium, titanium or Inconel alloy. the grip is made of wood red wood, oak, or ash wood. the calibre bullets if I were to model them with the gun as an extra asset. The bullet are typically made out of core steel.
– Revolver (Gun)
This is a revolver which would be in an western kind of game or used in a FPS or could protentional used in in sandbox game like GTA. The revolver has a in grained patterns in it for decorative purposes the guns grip is white would be made of ivory which is harvested for tusk from elephants’, instead of wood of which is normal made of. this revolver has little to no rust meaning it just been made and has been or been well look after and polished regularly giving its shine. the barrel of the revolver of which holds the bullets in, some have 8 but this one 6 cylinder revolver that can carry sin in thee chamber. The barrel of the gun is long due it being more accurate to shoot. as a front sight, and an ejection rod which ejects the spent shell. the shine of the gun is of a chrome colour.
A Pirate Cutlass (from pirates of the Caribbean jack sparrows)

This pirate cutlass would probably be in most historical game such as assassins creed black flag which is set in the 15th to 16th century.
A pirate cutlass would be rust and worn by the blade to the handle blacken in colour probably the finish of the weapon or it is corrode over time to get it that rusted and rough texture or maybe to give it age or to look aesthetically pleasing to the eye. The handle is made typically made of brass casting of the guard and the pummel of the handle of which can age corrode along with the blade or just by usage of it a continues rate e.g. people grasping the handle will cause it to ware away the brass. the handle could also be made of silver in some parts of the handle e.g. the pummel of the handle but its mostly probably made from stainless steel. the handle itself is made from wood like oak. the scabbard or sheath is made of steel or wood and then leather warped and glued in placed or pined in place with a brass pin.
What is mechanical modelling?
-Mechanical
mechanical modelling is 3d modelling man made thing e.g. that are mechanical that have a mechanism or some kind of in it etc.. Example of this would be transport, car, motorbikes, train etc.
Konda Motorbike from Akira.

This is a futuristic motorbike this if was an asset would be used in mostly in futuristic racing games or in a post apocalyptic game where the world is try to build itself back up again.
The motorbike body would be made aluminium sheets and factories pressed to the shape of different parts of the bike. The bike is a bright red the paint is as been evenly put on to the body of the motorbike . The front of the bike wind shield is either made out of glass or plastic. These wheels frame it self is made of steel and other metal alloys, such as aluminium or magnesium. The tires are made of rubber and The mounted tire and wheel assembly is then bolted to the vehicle’s hub e.g. axle. the dash board of the motorbike would probably been made from different metal alloys, glass for the screen and dials of the bike. The handles would be made of rubber for grip for the motorbike handles. Most of the majority of the bike will be made up of metal, plastic ,and glass.
Wurlitzer jukebox.
The material that the juke box would be made out of that I would have to consider during the texture process if I choose this as my model that I am modelling. 1960s Wurlitzer juke box would be mode up of mostly wood e.g. oak, teak, cherry,plywood mahogany, are typical what the body the cabinetry of the juke box is made of and the base of the juke box is made of hard plastic or lead .the front rim of the juke box is either made of glass, or injection-moulded plastic pieces. The grills at the front of the juke box and trim are plated with copper, nickel, and polished chrome.You would general see this asset in more of a game like, maybe GTA in a bar, or any game that includes bars as a setting, or just an asset that is up into a map such as call of duty and tom Clancy rainbow six siege in the map.
What pathway are available as a 3D artist?
their are various paths, for a 3d artist to take as a 3D artist. these artistic elements such as being a character design, props character assets, mechanical assets, and more organic 3d models. These are elements that make up a games overall world in a game environment. My 3D artist focus on one of any of these aspect to model when it come to modelling for game.
How are they used to develop a full 3D environment? All of these different aspect of model are all clustered together to form one environment for example take a city, for example it need builds, skyscrapers, shops pavement, road and different form of transport to build up the city meaning all of these assets build up the overall image of an environment, one aspect will not do. you need a Variety of 3d models in the environment to make it an environment.
What are character and assets models? Character modelling is the soul focus of modelling character and asset the character wears or item used in a game that are also considered, form concept art to actually designing and 3D modelling the chosen character concept some time due this development the character design can be change slight to its concept when made into a 3D model.
–Character Assets/ characters.
Find 5 artist which inspire you?
The characters artist Daigo Ikeno who has done the character design for devil may cry game2,3,5 has inspired me due to its art style with an, anime cross western atheistic to them e.g. Dante, Vergil, lady. Under that it has a very gothic theme and feel to the character of what they wear to the item, weapons and enemies and the main characters alterative forms e.g. the devil forms to the architecture. As you can seen from the character models. This has inspired me because its variety of different aspect such as the theme that it shows thought it art style and the art style itself. other artist that inspire me is resident evil 4 characters designing and enemy’s Leon, and some of the location in the game such as Salazar castle which was designed by Shibata Hiroshi and other designers that work on the game Kouji Kakae ,Shigenori Nishikawa. Yoji Shinkawa is another artist that has inspired me the deigned of character such as Raiden in his cyborg form in Metal Gear Rising vengeance.
Raiden concept character made by Yoji Shinkawa.
Here is concept art for the characters in resident evil 4 low poly to high and textured.
Leon

Merchant character

Salazar’s castle.

-Character Assets/ characters.
Here are the example of the characters from Devil may cry Dante and Vergil and lady, 3D models in a T pose.
Final Fantasy 15 characters of which Tetsuya Nomura and Yoshitaka Amano that have work on, are very visual pleasing and the general art style overall is breath-taking with an anime style with a mixture of a more realistic look and feel of the characters, when it come into engine and, games cutscene’s. as you can see from the example below this is kind of what I want for my design and modelling of my character I want to achieve.
3D character model of Noctis

Final fantasy 7 artist Yoshitaka Amano and Tetsuya Nomura so inspired me with his surrealism and realism anime characters like cloud, sephiroth, Vincent Valentine, Zack Fair, Genesis Rhapsodos and other characters that they have designed. I have also look at their concept art design of cloud and I am producing sketch of my character similar design to final fantasy 7 art style concepts and it stylized anime/ cartoon art style. The artist that have made characters such as cloud, sephiroth and other and their concept art of the characters that have inspired me also Tetsuya Nomura the artist that design the original cast of final fantasy 7.
Here are examples of final fantasy 7 concept art.
This is the art style I am going to adopt for my concept art. I will try implement this kind of style in to my character keep close to the art style as possible. Cloud was my main inspiration for my character and the artist himself.
Research into modelling an anime character.
What is iterative design?
Iterative design is a process that designers go thought a cycle of prototype of a design, then testing to see, if will work or not, then analysing the to make changes and improvements by keep refining the design. iterative design process allows to use research gathered for informing and evolving the project, into a successful version iterative design are implemented.
What is the art style?
The art style that I want to go for is an final fantasy esc across an anime realistic art style. I have research in to character of my main thing that I want to model and this is the art style that I want my finalise character to adopted. I have look at other art style that my character cartoons, realism, anime/manga, cell shaded, photo realism, art style is how some looks visual which leaves an impression on the viewer that play a game or any game.
What is the purpose of the art piece?
The purpose of an art piece is to develop an idea visual and use the developed idea or concept art pieces as a template for 3D modelling base for the asset or character.
And discuss the importance of art style and why it is important to stick to a consistent art style?
The importance of having an consistent art style in concept art is so that the art style dose change during the 3D modelling stage of the modelling of the character or asset, having a distinct art style make sure in doesn’t change mid way though development, also that the art style dose differ to other character and asset and environment prop’s and landscape’s.
How do art professionals display their work?
professional artists promote the work either via an online portfolio of they work e.g. Art station where employers can view 2D illustration to 3D model of characters props and environment assets. Other conventional way of show off art work to protentional employers is on a blog of your art work build networks across social media site so your work can be easily by employers.
What is a professional 3D artists workflow?
The process of a 3D artist work flow is Idea generator or gather references of what are modelling if it a physical thing that all ready exists. Generating ideas is coming up with a concept and designing it yourself as an Artist. When you have gather or either designed your concept of character or asset and either draw all views of you concept. The designer start modelling the concept or the real life object looking around to add details to your model of which the real life reference. Next gather feedback from peers, colleagues, friend, family and your audience on your first model.
After that, taking the criticism from your model add to it and improve upon it with the audience’s feedback from what you have gathered. final artist repeat this process with everything that their do from texturing and when the asset is finished and ready for to put in engine that this stage their might be a few adjustments and improvements upon thought all the 3D artist process.
Complete a basic 3D asset UV unwarp and texture in substance painter.
What is colour theory?
Colour theory is the principles of mixing a combination of colours of visual effects, these are defined of these categories which is based off the colour wheel these being primary colour, secondary colour , and tertiary colour. Colour theory is used to emotion thought colour’s e.g. such as red would be rage, anger, dark blue would be grief and sadness. all the colours give off an emotion and a combination of colour will cause a mixture of emotion but normally an art pieces focus on one emotion and show it thought the use of colours.
Here is the colour wheel that show different emotions thought colours, which are used in all art forms.
Here is the colour wheel displaying with emotions that they evoke.

What will you have to consider when creating your selected genre of assets?
Project Negotiated/plan
What is your Targets Audience?
Who is your target audience? my target audience for my character asset that I will be designing and modelling will be for an older audience maybe teenagers or higher so maybe 16s but most like +18 and over. This will depend on the design of the character and his character profile that, I will eventually want to do for my design of my character.
Where will your asset be used? film/ or game? My character asset will be used in a game, an properly be the main character of the game or one of the main characters in the game. it will be used constantly due it been one of the key characters that will appear or you will see mostly thought out the game seen as it will be a main focus if it is the main character of the game. This means that it will be very high detail in the character model so I will need a high poly counter I estimate my charter to be 15,000 to 20,000 tris and this will be my poly max limit on my high poly character 20,000 tris. due to my character will mostly probably be on console so it has to be high detail e.g. PS4 displays resolution 1080p so it will have to be to a high enough standard. I have chosen an asset for my character due to time constraints, my shoulder pad Armor plate will be used for my character to wear in game.
Are you going to perform a high to low poly bake? I will before a high to low poly bake if I have time to do my high ploy to my low poly first.
Who/ What are your inspirations? The inspiration that are visual inspiring my work are Tetsuya Nomura and Yoshitaka Amano the artist that designed final fantasy 15 character Noctis and other characters Gladiolus Amicitia, Ignis ,Scientia and Prompto and others. other artist that have inspired me is character artist Daigo Ikeno who did the character design for devil may cry 3 e.g. Dante, Vergil, lady/ Mary and their gothic/dark anime designs. Additional other artistic that have inspired me are final fantasy 7 artist Yusuke Naora and Tetsuya Nomura.
Produced a page of sketches on a subject and or of your choice. Interesting design/ Self produce Artwork.


This is my reference image/ concept for my asset shoulder pad of which I was referencing and my character of which I have not model due to time constraints. but this is what I had planned for modelling my character.
Character profile
Name: Steel
Date of birth: December 17th year 1777.
Place of birth: Starlight Cross.
Height: 170cm in height
Weight: 155.3 Pounds
Age: 19
Gender: Male
Personality: calm, quite, enteric personality undertone with elements of mysteries he a silent diamine, can be a demon when something annoys my character extremely.
Occupation: Has no occupation as of yet is not employed, was still continuing with education.
Eye colour: yellow right and red eye is left.
Hair colour: Sliver white hair.
Skin type: Smooth
Hobbies: Riding motorbike.
Dreams: Dreams reach the unreachable road ride to heavens above all his gaze set to the stars.
How long will it take you? I feel like my model with take up to 4-6 weeks around 2 week of UV the asset and to bake high to low poly the model and export it in substance painter and around 2 week to texture the model in substance paint and do research modleing and Uving and texturing processes. Around 1 week to gather feedback from peers, friends, family, and the target audience for my full model, UV, baked, textured model and to see if I can make any improve from the feedback I get. 1 week to write an evaluation and make improvements.
-Consider all stages of the 3d artist process.
Here is the process and stages and developed of a 3D modelling artist has to go thought when creating their model.
-Low to high ploy modelling your asset or character.
-UV mapping the asset or character.
-Baking the model.
-Texturing the model( your asset/character you have designed) on substance painter.
-Testing the textured model in engine e.g. (unreal engine 4)
What are you making? I am making a character, I am planning to design my own character and gather inspiration from my research, to use in the modelling on my character. I have decided to go with a final fantasy art style for my character preferably the final fantasy 7 or 15 art style is my main focus for the art style for my character taken for my concept art design of my own original character. Due to the time set and dead line I have been given, I had to abandoned my character thought its mid my thought its development so now I am choosing an asset that I have designed my self and have concepts for which is shoulder pad armour piece which was going to be for my character that I have designed, this was going to be one of my characters assets but decided to model it as my main model due to time constraints.
Document and model a low poly asset.
– Reference/concept art here.
-Colour pallet why? I am go for a dark colour pallet for my character because tis will suite my character profile and will fit the final fantasy type game where some game have dark colours but are very saturated to give it vibrancy. Also my character will look cool with dark colours of the colour wheel, that supposed too bright colours.
What alternate design idea did you have for your model? My first design as you can see from the design. I only had one design in mind but it change as I modelled my pervious designed and made the Armor shoulder plates that cover the shoulder made it more sharper and the design has turned out more appealing by change this element of my design.
Gather/ produce your own reference imagery to design your asset? (Done sketch book)
What is the purpose of your asset?
The purpose of my character I was thinking that my character would either be the main focus in the game e.g. the main character of the game see as my will be high detailed due to it being the focus point t it the game and it going to be viewed from all angles, if not a main character maybe a side character where the player will see the character not as often but is essential seen he is one of the main side characters supposedly in a game and will be made for a fantasy like game such as final fantasy.
Due to time constraints I have chosen an asset for my character as an alternative to model my shoulder pad armour in steampunk style. my armours piece purpose is to be wear by my own original character seen in my concept art. Other purposes that my Armor shoulder pad could have is been use for a knights armour in games like For Honour could protentional used for one of the character to wear in the game. Could be used for a game new game set in this time period.
produce a project plan.
Put here done need to fill it in.


Discuss tools used during development ,showing understanding of different modelling techniques and tool uses.
The tools I have used when modelling in Maya for my shoulder pad armour are poly modelling allowing you to created simply shapes like squares etc. in the modelling tool kit menu where all tool are place the one I most found using when modelling my asset for my character are extruding, bevel, multi-cut, target weld and edit pivot to object or to the world, and the basic tool which are found far left hand of the screen these being rotate tool, move tool and resize tool. Also using different perspective view tool to easily work my way around different views of my modelling make it easier to model as a whole view the model at different angles simultaneously e.g. right side, left side, top, bottom, front, back views to view in the 3D modelling space. In poly modelling bar in the above the work space I use hard edge, soft edge and edge flow tools to manipulate the light of my model asset. Shift hold right click to get up a menu to select edges, vertices, face of the model. It also a tool I found using a lot to switch between the model edges, vertices and faces.
For UV my model the tools I have used is in UV tool kit are in transform menu is Texel density allow the UV of the model to all be the same when cut in to the net of the shape and so you are not texturing the model in different sizes. other tool use for UV my model cut tool allow you to cut edges of you model to build an representation of a net of my model. Sew allowing cut edges of UV to be put back together again if you accidently cut an edge you did want it also hand of when you highlight the edge you want to sew back together it know which edge that is by highlighting where it will sew too. Create UV shell make a 2d representation of a net e.g. a UV of your model. Camera-based make the UV object take them UV’s nets and put it back to 3D model form where ever you camera is it take it in that position. stitch together stitch the UV’s permanently together so you don’t cut that edge. Unfold, unfolds the UV’s shell in to a 2d net of the pervious 3D form to the UV’s shell’s Unfold long dose the same thing and fold UV shell long ways. Straighten UV’s straightens any slanted edge of the UV shell. Orient shell make the UV shell’s straight and in line with the UV space. Stack shells stack UV’s shell on top of each other and group them together. layout lays out your UV shell’s net of your model in o-1 space. Layout along dose the same thing just long the 0-1 space and don’t fill all the 0-1 space. Unstack shells un stack you UV shells and separates them. The UV editor is the space where you UV shell are.
What is pointless/ wasted geometry, and why is it bad/What is bad topology?
Pointless and a wasted of geometry is add geometry to a model when does not change the model and how it looks adding geometry will given the model more tris which is not necessary if it in some way adds to the asset or charter or add any extra detail, or if the player is not going to see the extra detail of which you the player will not see in game that they is on point in having it their.
The reason why have bad geometry is bad is that in the geometry their might be Egon which is a 5 or more side shape which could cause problems with your model in engine, that why is impotent that your high poly and low ploy must not have any Egon’s within its geometry this is why necessary geometry is bad, that and it take the game engine long to load some with more geometry than less geometry.
And models in game have to be a certain amount of tris due to hard ware limitation; the game has to load that high poly model which if it has a lot of geometry might crash the game and the model would be render useless to use in engine.
Here is an example of clean geometry model.

here is an example of a bad geometry model.

Here is an other example of a side by side comparison of bad topology.

How is your model progression?
I have finished my high to low poly model of my asset for my character which is my shoulder pad armour plate and have just finished Uving my low poly model of my armour asset. All I need to do is finish by baking my high and low poly models and get to texturing my shoulder pad armour asset for my low poly.
– compare to our negotiated brief
Are you on track for 28/06/2019 dead line? Yes I am now on track for the deadline just need to bake my high ploy model and texture my low poly model and research and blog my modelling and UV processes with screen shot.
How are you limited the amount of geometry you are using? When it come to modelling a low poly it has to be as less tris as possible. Normal in industry 3D models model a low poly then a high poly for this. The low poly has to be below the tris count of which you client has set due to it will be used in game and the more geometry you add to the model the long it would take to load and render in game so the geometry for low poly has to meet the tri count. If it dose not then the low poly will turn into a high poly and can take up space in game and also take the game engine more time to load or could crash due to the model has that much geometry it has to rend in and load and convert the model into tris. this can cause the model to be useless if it was to be used in game and for the industry meaning you would have to start over again. that is why it is important to keep the geometry amount to it bear minimum.
Why is it important to be efficient with your use of geometry? It is important when adding geometry to your model due to adding unneeded geometry to your model increases your tris count, the more geometry you add to a model the more the tris that model will be thus add more unneeded geometry.
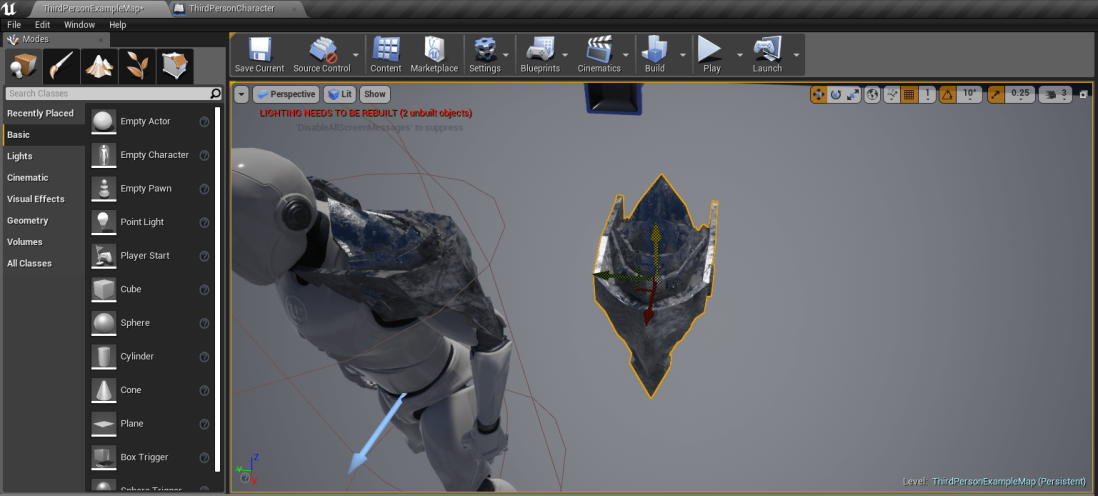
Document testing your chosen asset in unreal engine 4?
(Step 2)

After dropping and dragging the exported textures and mode into unreal engine 4 double click on the textures on the bottom tab where they are displayed and this texture menu should come up now you must match the textured names to the right link on the textured names such as roughness,
(Step 1)

Drag and drop the exported file to unreal in the bottom bar the model and the exported texture from substance painter in to unreal engine along with the model. drooping and dragging the exported in he bottom tab that will show up in the tab as what you have saved it.
(Step 3)

to switch in real time mode and switch it on and off it is the left hand corner arrow key an drop down menu will drop down click once real time to turn on and again to turn it off, I used this to test if my armour is in the right position when on the test dummy and it is doing its idle animation. this is in the top tab which displays third person view, to look at the character and add my asset on to him using the E rotate tool, W move tool, and the R on keyboard to resize the object selected. to move around in the unreal environment it is A for left, D for right, W is up, S is down, will holding right click to mover around the unreal engine environment. these are also the controls found on a pc in general when playing pc games so it is customary.
(Step 6)

Here in me in the third person perspective tab trying to get my shoulder armour pad on to the test dummy shoulder in unreal engine lining it up with the shoulder using move tool, rotate tool and resize tool to get it just right and to scale for the test dummy in unreal.
(Step 4)

To get the model asset in to third person perspective view you must go to the left and side in third person view tab go to static mesh and select or search for your asset you want to be displayed in the third person perspective mode/ tab as seen in the image above.
(Step 5)

To attached the shoulder pad armour to the shoulder you need to look to the right hand side in third person perspective tab of the menu box you need to click on parent socket with the model selected and find the shoulder or another part of the body you want to pin the asset to in my example seen above. I pin it to the clavicle which is a bone which connect the shoulder together of the human body anatomy. l selected it, and it pined the selected asset to the shoulder and stayed on when putting in it real time mode and the shoulder pad armour stick to the selected spot when put it in real time mode it moves with the motion of the idle animation.
(Step 7)
Here is my asset e.g. shoulder armour pad in engine during play testing.

This is me testing my asset in unreal playing about with unreal. While testing my character asset.
Is it to scale? My shoulder pad/armour piece is to the of the averaged Hight of a test dummy in unreal engine and fit on the test dummy shoulder with no problems the test dummy is around 6 foot in Hight so the scale of my piece of amour is to scale with a 6 foot man, however seen as my amour asset was intended for my own character original charter, and my character had more a an slim/ slender physic I feel that I might need to make some adjustments in size and so it fits to my character shoulder when my 3D model of my character is done due to time constrains I could not model my own character .
Are there any Ngon’s? flipped normal? N-gons are a shape side more sides, which is bad when it come to a model having Ngon’s in its geometry. Due to a ngon being an uneven shape unlike a quad which is even when you put a model with ngon in to a engine it will struggle convert you model in to tris due to a uneven amount of geometry that models has e.g. the Ngon’s with in the model. This can cause you problems when being put in to engine due to the engine will not be able to make the uneven shape in tris which by default the all engine read the model in tris. Flipped normal is when the models geometry has been turned inside out and in model software such as Maya and 3D’S Max. The mode will appear black instead of the grey mesh, this is an indicate of flipped normal mean flipped geometry of the model.
Is your asset appropriately smoother? My shoulder pad amour character asset I used the tool soft edge and harden edged tools to soft edges to smooth unwanted edges and the harden edged tool at the edges of the plates to make the edges more visible and look sharp in its designed following the concept art pieces of the deigned. Bar from the edges that need to be see the amour asset is completely smooth.
Icon for the soft edged and harden edge tools.

What tools have you used to model your asset? I have used these lit of tool in modelling tool kit. perspective views, resize, move and rotate tools, extrude, bevel, multi- cut, target weld, bridge, connect, combine and poly modelling tab for creating basic shapes.
Are you on schedule? considering Uving, texturing and testing? I have just finished Uving for my armour asset, all I need to do now is texture my low poly and do some testing in unreal engine. I should be on schedule to finished next week or the Monday after at the latest.
What challenges have you faced so far? When modelling my asset/ shoulder pad armour, I had occurring challenges thought-out my modelling process. I found that I had intercepting vertices over bits of my model and inside geometry within my model and over lapping faces with the parts of the model.
How you fix/overcome the problem you’ve encounter? How I overcome these obstacles is for the overlapping vertexes I selected all verts, shift right click an menu go came up selected the option merge verts. The select merge verts. This make all duplicates of verts merge into one causing not to have any duplicates of verts in the 3D model. How I tackled inside geometry faces I had to look inside the model and check areas of the model by deleting faces within the model to, try and distinguish which faces were inside the model. After that I deleted the inside face making sure that I did not delete any face apart of the model surface and fix put the topology via target weld verts together. Checking the geometry multiple times. For over lapping faces I selected all the model when to edit mesh and merge make all overlapping face merge still keeping the clean topology my changing distance threshold menu.
Who are the target audience for your product? My demographic for my product is for an older audience maybe teenage or higher due to my the texture of my asset coming to have blood splatted on the shoulder armour piece suggesting violence and gory.
Is it fit for the audience? I believe that it is a good fit for my audience and demographic that I intend my asset for my character and my character itself for and that type of game it would be in. e.g. violent and gory game.
Is it appropriate for its use in game/tv/film/game/advertising? I feel like it would be appropriate for game a perhaps film I could see it in a film but more in a game I feel. I don’t see it being used for advertisement or tv I feel the general purpose is for games. Seen as it going to be an asset for a my character and the character itself would be in a game.
Test and apply models and textured (doing now)
Why is testing before deadline important? Testing is vitally especial in 3D model and exporting you model to engine like unreal 4 engine for example it could look different in unreal to what you have in Maya. The overall aesthetic could be manipulate in the way that you don’t want when be put into engine. it all way impotent to refine something a and making it look aesthetically pleasing to the eye when in engine; allowing you to test them before hand will provide you with an window to make adjustments to the model and fix any problems you are having with the model weather that be in engine or thought out the development process. testing allow the asset or character in this case to be polished before it can be put in game and function properly.
Mention the tools.
Tool I used in substance to texture my model are the add new layer tool icon to creating layer for my texturing. the shelf I used a lot were all the texturing tool are to texturing the an asset/ character. These tool are material to apply the steel texture and smart martials to get a rusted layer over the steel marital. Other tool used are in tool drop down menu e.g. bullet holes and screws. Different types of brushes to get the different scratches texture to the armour piece and the nut that are attached separately to the shoulder pad.
What tools help the most? The tools that I found most helpful when texturing my armour asset is add new layer tool being able to add layer of texture to applied more detail comes in handy and is good to organise layers and know what is on that layer. Other tool at was most helpful were the shading setting been able to manipulate the shading of the model in different places allow the model to have depth and look realistic.
Add materials to the model tool to test and see what works with the model and what would suit it for the basic of the models texture. and other textures like screw, bullet holes and the many kind of brushes you can used for adding in-depth detail to a model weather it be mine detail or detail that is noticeable.
What are UV and texture sets? UV’s are essential a process of projecting a 2D image on to a 3D object or this case a 3D model The image is called a UV texture map. this allows the 3D model to be mapped and allow texture to that model in software like substance painter. The UV mapping process involves assigning pixels in the image to surface mappings on the polygon, usually done by “programmatically” copying a triangular piece of the image map and pasting it onto a triangle on the object. UV texturing is an alternative to projection mapping. An texture sets are simply a material, we create textures for the materials that can be applied to the 3D model this is why the are called a texture set due to multiple textures can be layered over the same model For example, if you create a brick wall and want to layer spray paint on top, you can use one texture for the bricks and one texture for the paint using a layered texture. Can create multiple arrangements of UV texture coordinates for a surface mesh using UV sets. In substance painter your model can be two separate materials you can select between the two and applied different textures set to each of them. you can applied smart materials in materials default menu has a selection, it own texture set settings, as well as it own dedicate layers stack. in substance paint the materials are separate so you can’t paint across materials.
How are UV/texture sets useful? UV are essential allowing you to texture the model an add texture sets to that model, without UV’s you can not texture. Texture set are useful due to they allow multiple to be put on the same model make them layered over one another this can add more detail and realism to an 3D model like a brick wall which I mention earlier.
Hyperlink for research in to what is texture sets.
Test your asset in unreal engine 4.
Are there any issues? Their were no issue when testing my character asset it in unreal engine,it run smoothly I did not encounter any problems atoll when play testing in unreal.
Document any changes or errors you need to make? When putting the asset in to engine I found that the pivot should have been in the centre to make it easier to place the asset in engine so I had to go make to Maya get in pivot in the centre of the grid using the move tool the export that back into unreal engine.

This is the pivot not in the centre of the model making it hard to place accurately where you want it.
This is the pivot in the centre making it easier to minovery, place the chosen asset accurately in engine,e.g. in unreal engine 4.
-Screen shot/ in engine render.
How have you fixed it or improved upon your asset? I currently have not need to make any fixes with my model my geometry was clean and sight for my low poly and my high poly.
Described 3 difficulties you have faced during production.
-I had problems with inside face in my model with when it came to Uving the UV’s would not detach when using the cut tool.
-I also had problem with overlapping face during model./ multiply verts.
-For some reason when I exported my FBX file of my full model and UV model it would not load in to substance painter.
How did you over come it? (inside faces in my model)I had to look inside my model and identify which were the inside face and which one that were apart of the surface, I check the geometry as I deleted geometry to see if I have effective the model’s geometry will try to find the face that are inside my model that was keep them together when try to UV the model. It took a lot of trial and error to find the inside face.
(Overlapping face and multiply vertex’s in my model)The over lapping face were a constant problem for my model I had to look careful at the geometry and used the tool target weld the vertex’s to get rid of the face. I discovered that if you highlight all verts on your model then shift right click to merge all verts get rid of the overlapping face and verts that I was having with my model.
What have you learned from your experience? I have learnt how to effective UV an model properly and the basics of substance painter and how it functions. and the baking process and what it in tales and that it add fake detail to a model so it dose not have to be model in Maya or 3D’s max its just a flat 2D texture that looks 3D.
Compare initial idea and sketches with current iteration.
Here is a side by side comparison of the sketch and the 3D model version
Is your asset similar to your initial idea? Yes I have keep very close to the initial concept art of my shoulder armour pad, I have only made the minor of changes in it designed when I came to modelling it. These change are the change in the plates is I, made then more spiked that their intimal concept art to make in more prominent and so it can be recognized.
Have you made any change or sacrifices?-Why? I had to drop my charter modelling and choose one of his asset to model due to time constraints and being a few weeks away from the deadline this is the biggest sacrifice I have made choose to model an asset for my character. I intend of modelling my character that I have come up with concepts and designed myself. However modelling my character would consume much of my time of the that I had left and I would still not have finished modelling the character never mind Uving it and texturing my character.
Health and safety at work act 1974.
health and safety work act is a UK government agency responsible for the encouragement, regulation and enforcement of workplace health, safety and welfare ,as well as others on their premises, including temps, casual workers, the self-employed, clients, visitors and the general public. For research into occupational risk in Great Britain.
In the gaming industry their are multiple health and safety risk’s to consider when being the industry these range from
-Repetitive strain injury (RSI).
-stroke/ hart disease.
-back pains/ eye strain.
-Diabetes.
-Depression.
These are serious heathy consider when working in the industry seating down to long especial for extended amounts of time can lead to thing like diabetes back pain and strain eye look at the screen all day , sitting down all also can lead to hart disease and then can lead to depression if you in a work environment all day 24 seven, 7 days a week and can lead to stress to meet a dead line that their clients have set them can increase level amount of stress. This is a main considered when working in the industry and the other health conditions.
Modelling process of my chosen asset e.g. character asset armour shoulder pad.
(Step 1)
I start with a cube I used the scale tool to form it in to a rectangle ,then I used the multi-cut tool to put in the front plates of my armour shoulder pad, and shift and right click to and geometry all around the rectangle I did this to get the desired shape of the plate. I used the extruded tool to get the top plates after I had put in the geometry in to the shape and used the bevel tool to get the that extra detail where the shoulder plates go over the shoulder I connected all the shoulder plates together and bevelled inside the internals sections where the plates all join together. I used the move tool so that the geometry did not entwine with each other. I did a basic building blocks of my shoulder pad referring to my concept art as I structured the basics of my 3D low poly model.
(Step 2)

I started to refine the shape of my armour shoulder pad using the target weld tool to get rid of the out side geometry and merge in to a single point to get my spear head shape. I added more geometry for the second plate down on the front of the shoulder pad when I get the spear head shape roughly model out.
(Step 3)

I extruded the front plate face and the sides to give the armour plate depth and to show that it the front plate of the armour I also did this with the second plate down of with connect end spear head piece.
(Step 4)

To get the top of the shoulder plates I added geometry to the elongated rectangle which was attach to the top bit of the front shoulder plate and get an the stretch triangle shape plate as seen in the image above. I extruded the geometry to get the plate like shape which I mirrored the front design and the plate got further the shape changed slightly for the end plate I had to used target weld to merge this shape due to when I extruded my plates they intertwined with each over. I had to move the vertex of the geometry with the move tool to they did not intersect with each other and move the geometry around so it is level and not slanted, to get the right shape by move the top vertex at a angle as the plate in my concept art top faces are slanted back to get that sharp and jagged design.
(Step 5)

Here is my progress a view of the front of my shoulder pad. I fix up some of the geometry and N-gon’s that I had with my model some geometry of my model are triangulated to fix the n gon’s I had with my model, and merged vertexes due to I had multiple that overlapped with my geometry of my actually model. I had to target weld the vertex to fix the add geometry.
(Step 6)

I started doing the sided of the shoulder pad, I extruded the sides a bit because it was at an angle and the geometry would intersect and not be straight so I had to break down it in parts. I extruded the basic first and make the geometry straight and square and fix some N-gons in the geometry.
(Step 7)

I extruded again further that before to get the design size referring to my concept art for the size.
(Step 8)

extruded to get the right size so it looked like my concept art and fix intercepting geometry used multi cut tool to add geometry to make that curve and used target weld to get rid of the N-gon’s which I made I triangulated. I also did this near the top and got rid of any N-gons.
(Step 9)

I model the nut to start with I got a cylinder and lowed the subs division to 6. used offset to add the same geometry of the shape and centred it in the middle and extruded in, in ways and deleted the leftover faces and used the tool bridge to bridge the edges to created faces. I bevelled the edges around and inside the nut to make it more mechanical. I copy and paste for the other side of the model.
(Step 10)

I copy the low poly of my model when to mesh and smoothed the mode for my high poly. Here is a side by side comparison of my low ploy to my high poly.
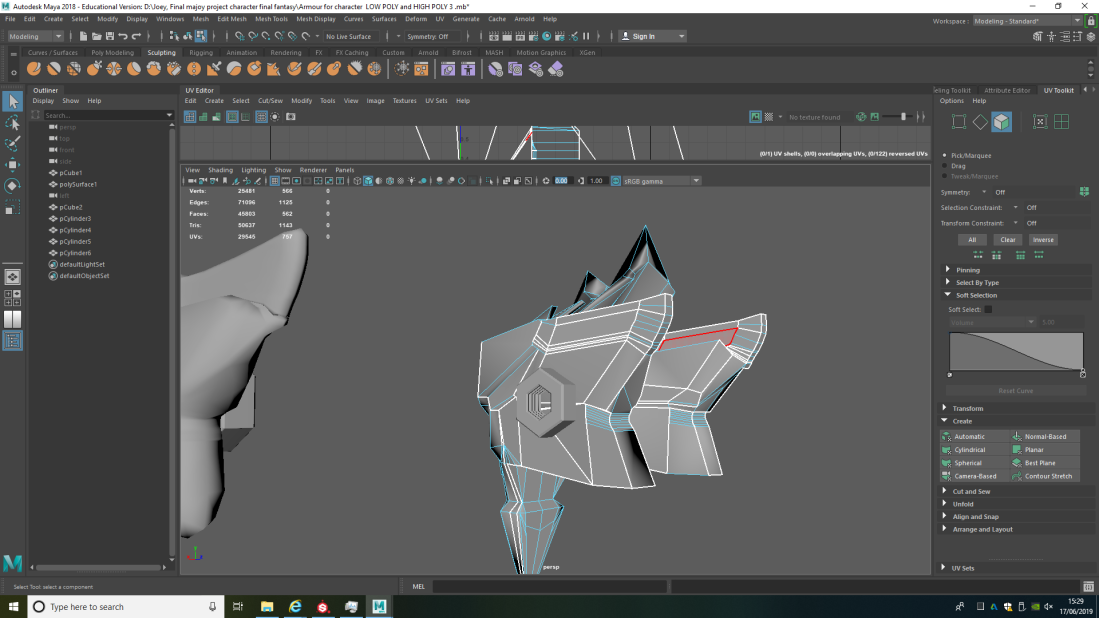
Uving process of my chosen asset e.g. character asset armour shoulder pad.
Documenting the UV unwrap process.
(Step 1)

I opened up the UV option in the top menu to open up UV editor work space and the UV tool kit to start UV my asset. to start with I used camera based to capture a exact position I want, a in appears as a 3D object in UV editor work space. I did this for my model of nut to, read for Uving.
(Step 2)
Then I started using the cut tool found in UV tool kit to break up my shoulder pad armour using the views to navigate around my model and perspective mode. Using the cutting tool I had to consider when the shims would be so I had to put them cuts in a place where the player of the game cant see any shims, and try make all my UV’s a straight a square as possible the UV checker helped with this alto when Uving and checking if my UV was straight and square.
(Step 3)
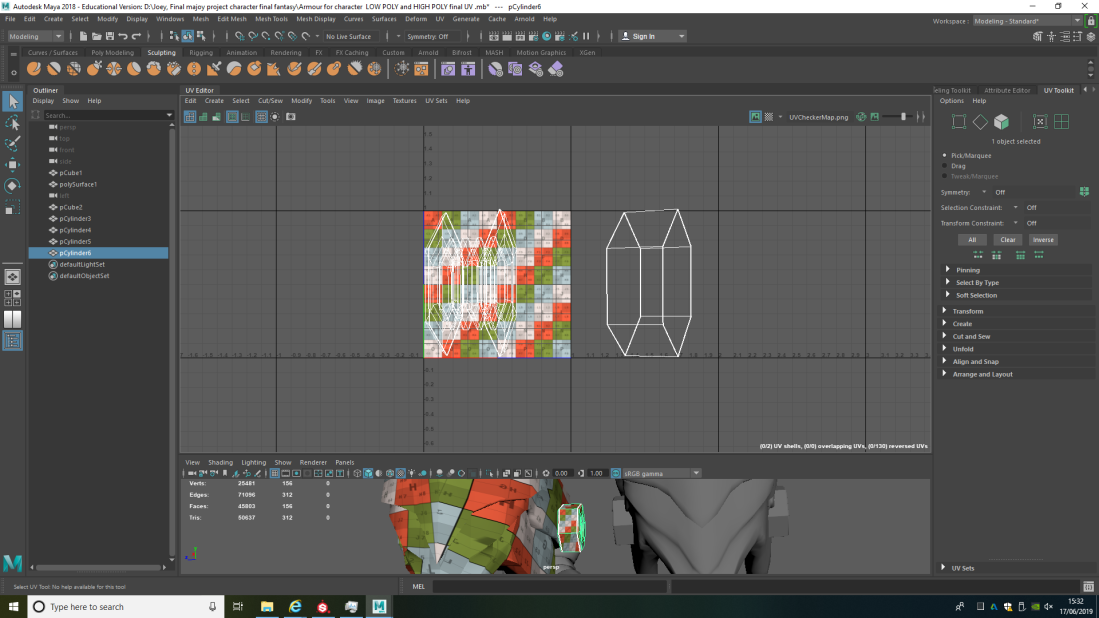
I started also cutting the model of my nut after cutting my shoulder pad into it separate pieces, I cut around the nut and the front faces of the nut and in side of it in to 3 separate pieces and use sew to so ant thing that could be sew together and still keep it square when it get un folded.
(Step 4)

Here is the nut unfolded using unfold tool in the UV tool kit or fold along , orient shell tool to get the UV straight using the UV checker to make sure they were no skewing or distorted. I occasional used fold along to see if the unfold would look better and un fold and to make the UV’s a square as possible and not distorted in anyway.
(Step 5)

This in my armour asset being cut up a separated, I decide to cut up the model via it faces then sew bit to each other with the move to sew tool. I cut it up the front faces the side faces, back, and the armour plates that lies on top, I broken then down to basis shapes, and started to unfold/ fold along and orient the UV in the UV editor.
(Step 6)

this is all the shoulder armour pad pieces folded out using fold along and un fold tools and orient tool. next was to get them all to the same pixel density, click on one go to UV tool kit click transform go down to pixel density and click set with will change the pixel density each of the UV have different pixel density to it is perceptive that they are all the same or the UV will have different size texture on the model and the texture itself will look distorted and out of place on the model and each UV will have different size texture on it. after you get the pixel density of one UV select all UV in the UV editor and click set making all the UV the same pixel density as that one.
(Step 7)

After I had all my UV’s to the same pixel density left click hold shift on layout tool in UV’s tool kit to open up a sub menu. when the sub menu appears make sure you have shell padding at 5,0000 in layout settings have rotation shell off, and translate shells on and the padding unit at pixels and shell distributed in tiles U and V should be set to one the region where it will go select full square option in pack region and the scale made should be set to uniform. fix non main fold geometry should be put on and the method change to unfold3D. After I applied these option click apply click layout out UV which should layout in the square space out no UV’s were overlapping each other seen in the screen shot above of this process.
The UV process was done that I had to high to low bake my low poly and high poly model of my asset. The baking process is go to selection import in file save to a folder that is easily accessible, save the file as FBX export and save the file. do the same with the high poly model.
How to export file to substance painter for baking.
(Step 1)

Go to file and go to the option export selection, an sub menu should open up to save your exported file.
(Step 2)

make sure you export save file as FBX export and save the file were you can easily find and access.
The texturing process of my chosen asset e.g. character asset armour shoulder pad.
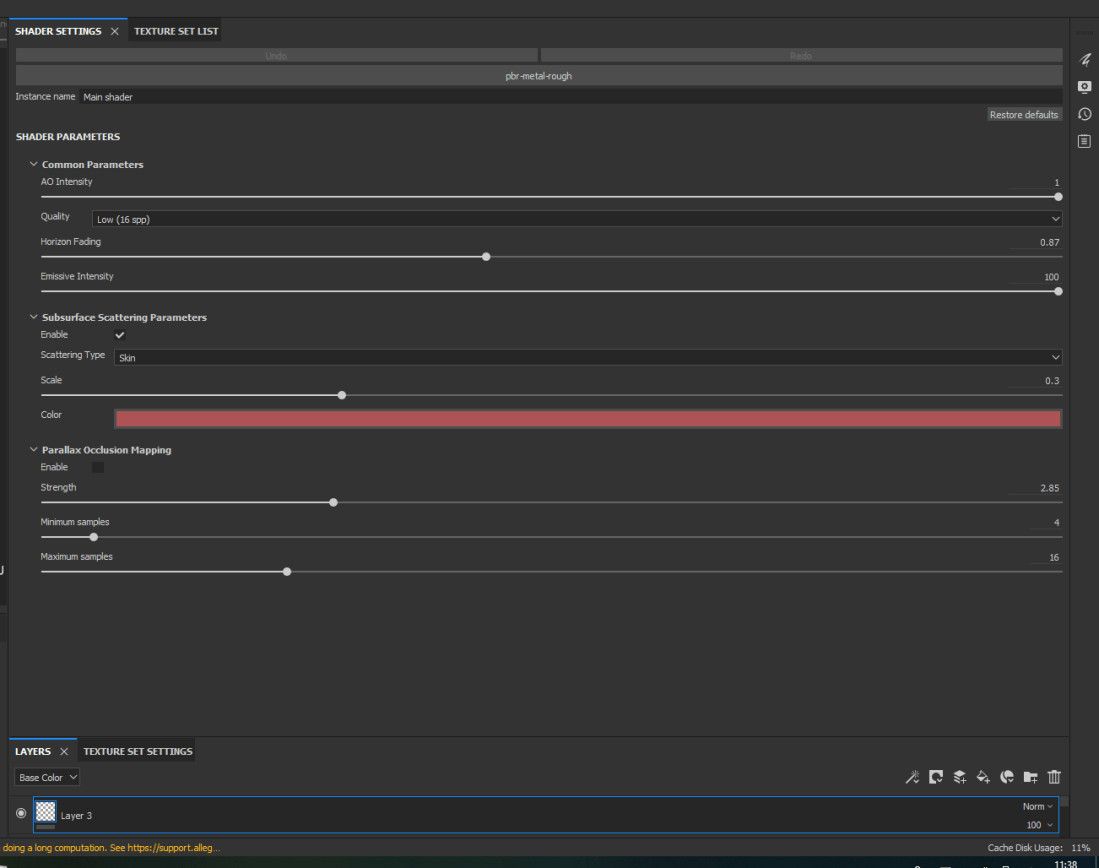
Here is me adding the rusted metal texture, adding the smart material rust to it to give it a warn look to it. The add texture of scratch’s using brush tool in the shelf to extenuate that it’s been thought a war’s and has aged.

During my texturing process of my asset e.g. shoulder pad, I added a rusted steel material texture over my nuts and the shoulder pad armour from the shelf of substance paints materials menu option for the basic of my texture I started adding rust to it and dirt via the texturing layers making a gradient in the layer to get that dirt and grim all over the armour.
I add smart mask materials to it for the rust in another layer. I sharpen the texture to give it more clarity and clear to see. I when to shading setting in substance and change the AO intensity to change the shading of the model I made it darker to contrast with the rusted steel texture I did this more the nuts to make then dark around the shoulder pad due to the nuts are attached to the amour shoulder pad side and would be dark in some places casting shadows in side the nut of where bolt would go.
Here is me Appling extra detail and adding bolts/ screws to my model to make it that impression that its been assembled in pieces what real armour is made.

I add new layer via the add new layer icon to and click the paint brush tool left hand side on the brush icon, to add scratches by the selected a different brush in brush in the shelf and in tools I add screws to the back of my model to look like it screwed in and fit together and bullets holes at the top to look like it mean in battle and been warn and used. And where the edges of the model are easy seen make it look unrealistic and break the emersion I decided to used the a tool in shelf menu in the sub menu tool where you can applied a welding like texture to break up the crease line in the model to making it more believable even thought the player will not see the armour asset that way due to the character wear it on this shoulder .
here is me applying the bullet hole texture tool to my armour asset.

Here is the texture list to navigate thought the different model’s for texturing e.g. (lambert). Under that is the layer setting display all layer created; what layer have what martials on them and smart materials that have been added to that specific layer. As you see layer where you see a base colour for that smart material e.g. the colour of the rust which I have applied to that layer.

This is the shading setting that allowed me to get a darker shade around the nuts that connect to my armour shoulder pad. other setting where you can change the strength ,maximum sample and minimum and the colour of shading and the quality of the shading. I test with this setting to get the best result for my model.
Here is my full texture shoulder pad armour low poly asset for my character.
Evaluation
What would I do next time? I would managed my time better the next time to be able to set out what I was supposed to model e.g. my original character as I planned the concept art for my character and outfit he wore and other asset that make up the character e.g. his accessories, I feel managing my time better next time or don’t set to much work I will be unable to reach the deadline.
Evaluate your progress in Maya and substance painter. I feel I have kept good topology for my model making it straight and inline geometry getting rid of any n-gons from the geometry that I had and overlapping faces, and multiple vertex’s. In substance paint my first I time using the software, my texture when pretty well for my first texture for my shoulder pad armour asset for my character. I think the texture really suit the model getting a realistic look to it for my low poly model, if my texture for my low poly is that good I would like to see my high poly with the same texture on it the rusted steel texture.
Where did you feel that you did/didn’t do well? I feel I did well on my concept art and convert that in to a 3D model sticking closes to its designed, the UV was challenged for me to grasp it took long that I fought to UV my character asset. I found it hard to cut such a complex model in it a net base I encountered many problems more that my modelling, baking, textures, and putting it into unreal engine stages.
Why is it important to meet deadline in the game industry? It is important because handing in a half done asset or character during development which can hold up the development of a game a push the deadline for the game release back due to unfinished asset in game.
What new tool I used in Maya? I used orient shell to make the UV’s sight and the UV checker in my to seen any skewing or stretching these came in handy and often found using it during the UV process.
I feel the finalised model, UV, baked, and textured when better that anticipated I was expecting to model such a complex yet appealing designed with a texturing that further emphasised this, the complex designed and work so well together.
Recording feedback.
Gather feedback from peers, friends, family.
Rodrigo: the best thing about the design is everything. the prop is very unique, I have never seen something like this before. the prop’s texture is really good, which make the asset look realistic and attractive to gaze at. I would like to see this in a character in the future it would be very interesting.
Ollie: I love the detail on the shoulder piece, especially the scratches on the outside and the screws/rivets on both inside and out. I would also like to see a full armour set/piece but you did mention that you would manage you’re time better but for the time you did this in, I think you did brilliant.
Recently added new work.
For my character I talk about that I started my modelling of my character very late in development which caused me to drop the project mid in production, due to time constraints and the work load was heavy, I model a asset instead e.g. my shoulder pad/ armour piece. I feel like in development, if I was industry I would have to get another college to help do the modelling of the character. I would model an asset of that character that goes towards the character my college would model. a part of my I could do my character in my concept is potential the lack of experienced I have at modelling a character and may take me or time in the modelling process of modelling probably about 5-6 weeks and 3 week UV and bake, and 1 week to texture and get into engine leaving me 3 day of testing time left. I feel like model the character with my inexperienced. This would cause me to fall behind in the development process of the characters modelling that is why I had to drop the character when I did, and do a prop relating to that character instead this is the reason why I did a armour piece because it is still related to my character and make up the character as a whole.
If we were to do a new brief the purpose of my armour would go towards my character or perhaps be in a fantasy game it also could be used for another characters armour. The reason why I have limited my myself to the armour pieces is because of obviously the time constrains of not being able to create my character to begin with. But additional is I like modelling an aspect of a character more that an environments due to the appeal of a character in more intriguing to my interested and to model some that is going to be used a lot more and see constantly that and environment pieces which the player may not even notice and appreciate it , unlike a character however which is a main focus point in a game and the game is revolve around that character thought the story give more depth to what you have created that a basic 3D environment asset such as a tree.
Also filled in my work at the top of the blog and in the middle referring the feedback to get D2,D1,P2,M3,M4.
