Research
Explain how 3D modelling has allowed the media industry to create visual effects,animation, props, characters etc? Over the decades 3D modelling has evolved and come along way from basic 3D low poly models of characters, props and modelling has even moved into other forms of media like films, and animation and has played a role in them mediums.
Modelling has played an important role in shape the media visuals and it consent evolution of technology and industry. For example back in the day when star-fox came out with it low-poly 3D model of Fox McCloud star-fighter was very high standers back in the very early 1990’s. However now it is considered low quality and can be improved upon with more advanced technology that is capable of rendering more and textures allowing for more high poly model and texture in stead of base colours for the textures.

Here is the first Star Fox game as you can see the 3D model are in is most basic form only using max 30 tri’s to create the start-fighter due to hardware limitation at the time so it had to be basic low poly as possible.

This is the more up to date of version of the previous star-fox as you can clear see the visual has improved allowing more tri’s and higher resolution image of the star fighter compared to its predecessor which was a basic low poly. Due to advancement in technology the CPU has more processing power allowing you to render in a more high poly model with more detail textures. While in its predecessor use less tri’s so it can be rendered by the engine in real time if you were to stick the high poly model into the old games it would struggle to render that model in real time as you can move the star fighter around.
Discuss how 3D modelling software and how has it changed over the last decade or two?
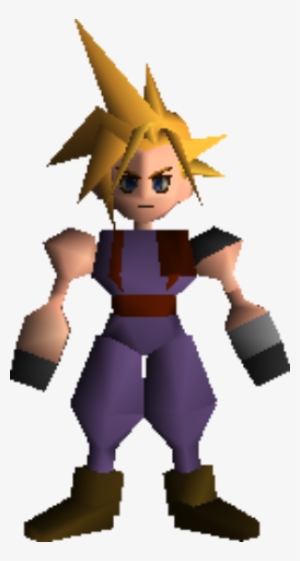
-How has this changed in the last decade or more? In the last decade modelling was at its basic form with poly poly asset for game and characters example being final fantasy 7 being made in the late 1990’s had some technical draw backs when making game back then due to hardware limitation but a 3D model of a character at a time was a technical marvel at the time seen how 3D was just starting to be implemented in to video games and other mediums. But as 3D modelling software got more accessible with in the industry and hardware limitation were being push to new lengths and bound slow over the courser from mid 1990’s to 2000’s 3D modelling has become more refined allowing high polygon count with in a model and more detail textures in stead of block colours like clouds character model.
Character model of cloud from final fantasy 7 (low poly) compare this to the remake version of clouds current character model in the upcoming FF7 Remake.
Remake version of current clouds character model with high polygon count and more detail high resolution textures compared to the 1990’s charter model of cloud. :no_upscale()/cdn.vox-cdn.com/uploads/chorus_asset/file/16334171/CloudRender.png)
Find 5 3D Artist and discuss their work?
-Are they prop, mechanical, organic etc. artist? most of the prop artist that I have chosen to discuss are mostly props that a character would wear or a asset laying around an environment and suit to fit around a character e.g. like clothing/ weapons. One of the props is mechanical e.g. the revolver as an mechanical mechanism in it to bale able it to fire.
–How has the advancement of 3D modelling software allowed for better 3D assets? As 3D modelling software has progressed their 3D models have become more increasing detailed with software like Maya, Mudbox, Autodesk 3DS-Max, ZBrush, have allowed for this achievement. Original these software interface were very basic and the tool that the software had were less versatility and had very little shortcut tool allowing for quick and efficient model like we have now with hour current version of these software.
But Back then software did not have even half the tools of which 3D modelling software had back then tools of these software were slow implemented as well as the interface being espalier to navigate thought. Update to the 3D modelling software and the inclusion of additional new added tools, and multiply function to do the same thing but in different ways has made modelling any 3D asset much easier.
These being for example heads-up display, allowing you to navigate thought menus and drop down menus making much easier to read the layout and format. The inclusion of icon with captions stating what they do, when you hover your curse over the icon. and tools like extruded, bridged,multi-cut, connect to name a few of which helps model asset faster and more efficiently making it easier to model the shape you want. increasing high standard of models in less time with feature of the 3D software like add new tool, shortcuts, better heads-up display.
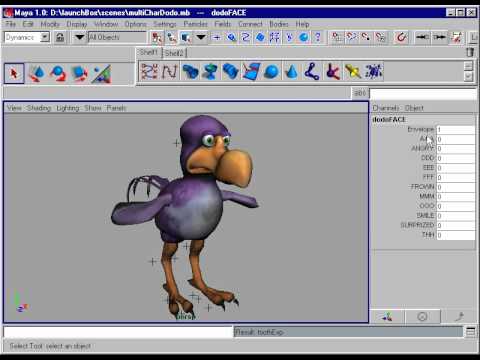
here is a past example of what Maya used to look like and the capacity of models it could produce then as the highest stranded.
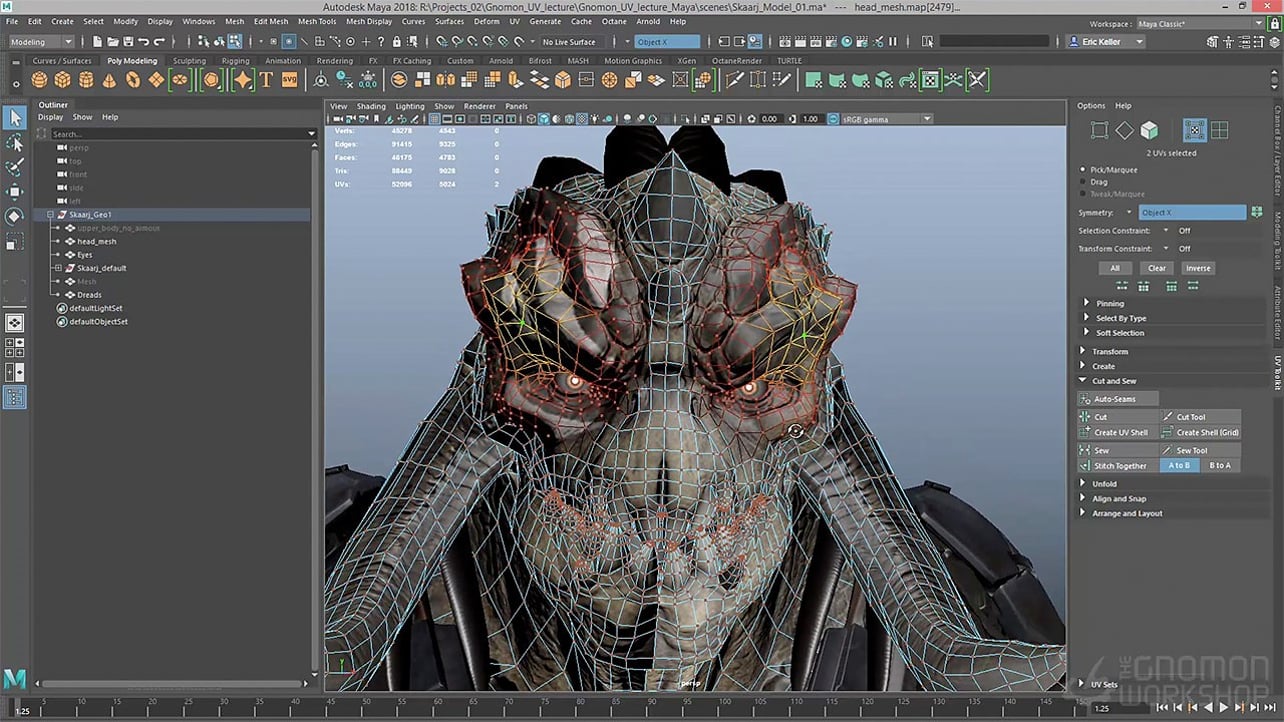
Compared to Maya now with a lot of added new feature, and update heads-up display.
-What dose higher quality 3D models mean for the games industry and other medias? this can allow game industry and film to add more detail into their asset weather that be character, prop, environment, asset of any of these. adding more geometry to model in either industry will develop a higher quality of an over all product e.g. games and films. However due to the limitation for games are less so due to game have to have consistence overall rather that have a lot of detail that, if you had to high poly models in game it would take a considerable amount of time to load in a few assets never mind if it was lushes environment with characters in the game. it would crash due to how much it has to load and the capacity of what you can do in game and the amount of acts the play can take seen as it is an interactive from of media.
Analyse the differences needed to produce 3D asset for the films/TV/Animation or Games industry.
Consider film and TV limitations compared to games.
The different needs to produce a 3D model in games compared to films is that one of the obvious differences between the two is the ever present polygon budget witch is found in any game development process. However when it come to modelling for movies like Toy Story or CGI film like Pacific Rim, there are no limits on the amount of polygons that can be given to the model. The only constraints that movie have is time and an deadline of which the 3D should be done so they have free range to included as much detail in the model seen as it is pre render unlike games where the 3D modelling is rendered in real time making it hard to render in a high poly models on screen at once. The limitation that games have to considered that movies don’t is the power of its game engine and its hardware that game is played on. Therefore more console hardware is advancing like PS4 and Xbox with it graphics but with every generation of Consoles their is a strict polygon budget. Considering this is film better that game or games better that film when it come to 3D modelling if fair to say that both industry has its limitation but what dose the future hold for both industry and 3D modelling.
-How do props, mechanical, organic and environment models differ from one another? organic things like character, creatures, plants anything live is consider organic modelling. Normal organic modelling consists of a more smooth and curved geometry compared to mechanical props which have more angled geometry and straight edges like for example a car which has mechanical components in it, which would used more straight and hard edges rather that a charter would use smooth edges in the topology of the model.
-What software may be used within the Games or Film/TV Animation industry e.g. Autodesk 3DS Max, Maya, blender, ZBrush etc. With in the films industry the software their are more like to used would be 3D modelling software’s likely to use blender, sketch-up, Zbrush, Cinema 4D, are all software that are used within the film industry which crosses over to games as well also use some of the software like Zbrush, Maya, Blender. Other software that the game industry used as well auto desk 3Ds Max and Auto-CAD.
Discover 5 Prop artist- Analyse their work.
What 3D modelling tools may have they used to develop their work? I feel that most of the artist i have pick would have used the basic tool to develop their work when it come to modelling e.g. move tool, resize tool, rotate tool. and tool found in the modelling tool kit these being Combine, Separate, Extrude, Bevel, Bridge, Multi-cut , Connect, Target weld, mostly for the modelling process of their models these will be the basic functions of which they have used to model their assets. Other tool would included is UV tool kit to these tool being to unfold the choose asset in the UV process are Texel Density Set& Get , Camera- Based, Cut, Sew, Unfold & Unfold Along U,V, Orient shells , gather shells, Layout, Layout Along , Stack shells. they may have used these tool in similar 3D modelling software in software such as Maya, 3DsMax, Mud-box, Houdini, z brush, blender etc. Are the software’s and tool they could have used to develop their work.
Give thought to what techniques, tools and skills are used to develop each asset.
I have search on Art Station 5 prop artistic that i find interesting. Here are the links to the artist and their work that i will be analysing.
Devil May Cry Nero’s jacket (wearable prop clothes main character) link: https://www.artstation.com/artwork/XBDwbR
1) This artist that made a fan made jacket of the video game devil may cry 5 character Nero. The artist has broken down the jacket and model pieces individual from each other as show is example, just how a tailor would when making a suit is how the artist has constructed the jacket in the software blender using plans for the jacket in the 3D software. His texture are at professional standards using many different texture map for different materials and parts of the model e.g. the marital on the shoulder w is shine in effect when the light hit it meaning he has used a gloss map to make that marital more shiny and gloss in look give it a realistic look as well has layering maps and materials to get a warn look on the shoulder material pieces with an diffusing map mix in with the other gloss map and secular maps to create that one consistent texture when in game/ engine.
Other maps used to create these materials like the zips buckles and locks are more shine that anything which a secular maps would be good for metallic thing and metal which is what this artist has used to get more of a metallic texture with anything that is made out of metal on the jacket. With detail of the jacket like stitching and sew he would have used a bake map to bake the details of his high poly on to his low poly model to give it that depth mix with normal maps to get the jean kind of marital which most of the majority of the jacket is made out of so it look like it has bumps and dents, scratches, engravings and behaviours like clothes would giving an realistic look and feel, that instead of being flat and bland 2D texture making the texture look like it has this detail in the model.
The variety of texture map they used to get different effects of different materials of the roughness map given the leather jacket that wear, and worn look to the leather and look rough of the jackets shoulder pieces and the rip sleeve of the jacket . All these texture map layered and build up one another to form an realist asset of which a character would wear even in real life seen as the 3D artist based his model of a scanned in model of the jacket for the game devil may cry 5. The accuracy of the texture which brings the model to life and makes it look realist.
The model its self is good and basic design with few notable detail like the zip and the button probably individual model separately and applied metallic texture map. The model of the jacket itself is modelled in pieces and then put together using basic shapes like a tailor would make a suit. The geometry is clean and he has used simple shapes to model the basic of the jacket. the software use for make this jacket and is used to make most clothing in games is Marvellous Designer.
12 Barrel Revolver (old western weapon prop) link: https://www.artstation.com/artwork/w8AY1Y
2) The artist has model an western Revolver the low poly model itself is inter cut from the barrel to the hammer of the revolver and the trigger and it trigger guard with is curves especial the stock of the revolver. As what i can seen from the model itself is very clean topology thought out and no sign of N-gons with the model with straight and no messy geometry all geometry is quads the artist as included a checker map to show that they is no distortion in his model or mess geometry.
The artist texture for the revolver look realistic as included his UV maps of the textures. The types of maps he has used to get the texture is a normal maps, roughness to get the scurf marks and scratches and that worn look and dirt that you would see on the barrel.
The barrel anything that is applied the metallic texture has little details like that in the model. The stock of the gun/ grip is a wooded material texture with a bit of roughness to it as the grip has dotted patter going around it, the texture map he has used for this is opacity map as the because the texture seem to blend in with the wood and look transparent or it could have been baked on but mostly like he used opacity form this effect for the grip of the revolver.
Other notable detail is the engraving of the revolvers serial number which could have been baked on to the low poly asset but would be much easier to texture that kind of detail on but it would have made in more realistic if the artist were to do the model a high poly with these detail then bake these detail in LIKE engraving serial number and other engraving like the bolt and pins on the grip of the revolver. But the texture overall is at high resolution probably 2k or even 4k to get that much detail in the texture maps of the model. The artist has model other things separately like the pin near the barrel of the revolver and the sight.
Genesis sword final fantasy fan made. (prop) link:
https://www.artstation.com/artwork/rODWe
3) The artist modelling processes is quite simple for the bladed i imagine he extruded a cube and maybe used target weld to get the point of the blade and bevel the edge to get the edge of the blade. The real detail lie it is handle and guard of the sword. with its complex wing design for the guard of the sword ad the guard for the handle also in the design of a wing similar to a cutlass guard which fits over the handle to protect the back of the hand. for the guards on the blade the tool he must of used to get the intricate angelic wing design was properly done with the tool booleans allowing you to cut shape into opposite mesh kind of like a tensile.
The 3D Artist properly used the booleans and the cutlass guard the most seen it has a lot of intricate shape cut out of the guard to get its unique design. The texture of the model is done to professional standers and look realist but at the same time stylised due to the detail such as the scratches and the chosen materials (e.g. metal/ steel, aluminium, silver used for both guards of the sword. This would be a high poly model by the looks of it or it his low poly with baked detail on the low poly. Noticeable detail near the guard of the sword that runs up a apart of the spine of the blade with an pattern engraving i would also believe that the 3D artist has bake the detail on the blade with this a well which look close to the model it is baked on their.
Other detail for the model and the texture is that a gem which is engraved and place in the main guard of the sword and the pommel of the sword ,the Texture of the gem is a bit bland with just one colour, the artist could of made the gem stone transparent in substance and had a play around with a light generator in substance to get different effects with the gem stone making it stand out more given it more detail. The texture overall is very good semi realist and stylish asset with a probably resolution of a 1K texture which would be suited for a game so the model with is intricate wing design.
Dekogon revolver (prop weapon.) link:
https://www.artstation.com/artwork/bamGwo
4)
Devil May Cry 5 Nero’s Red Queen (fan prop) link: https://www.artstation.com/artwork/yb2Jl9
5) The artist has model an existed asset which is used in game but has done an alternate version of the sword from devil may cry 4 Red Queen which looks realistic but also stylised prop which is what the atheistic of this types of prop is going for.
The artist has model separate elements and have brought them together e.g. like the jets that are on the back of the sword, bolts, screws pipes, guard ,handle and the blade and it’s metal plating and it’s intricate details. The geometry is clean and straight and topology of the modelling is also up to professional slandered especial how much detail he has put in to the modelling process this then the 3D artist would have made a much high poly/ Tri’s count and baked the detail in like the pin that pin the metal plating in place but as not decided to do that has model the bolts heads as apart of the metal plating leaving the screw part of the bolt out seen as it will not be seen. All have been modelled separate from each other and combined together in one prop.
The artist has included a complex UV map to show that part of the process, in relation to the texture that he has used which as used a various texture like metallic for the metal elements of the sword like the bladed, metal plating pipes, jets, guard etc. Additional texture maps are normal maps he has normal map his his low poly to make it look like it has more detail in the model as seen from his high poly model of his screen shorts the topology is more curve and smoother.
Planning Annotate and discuss your concepts.
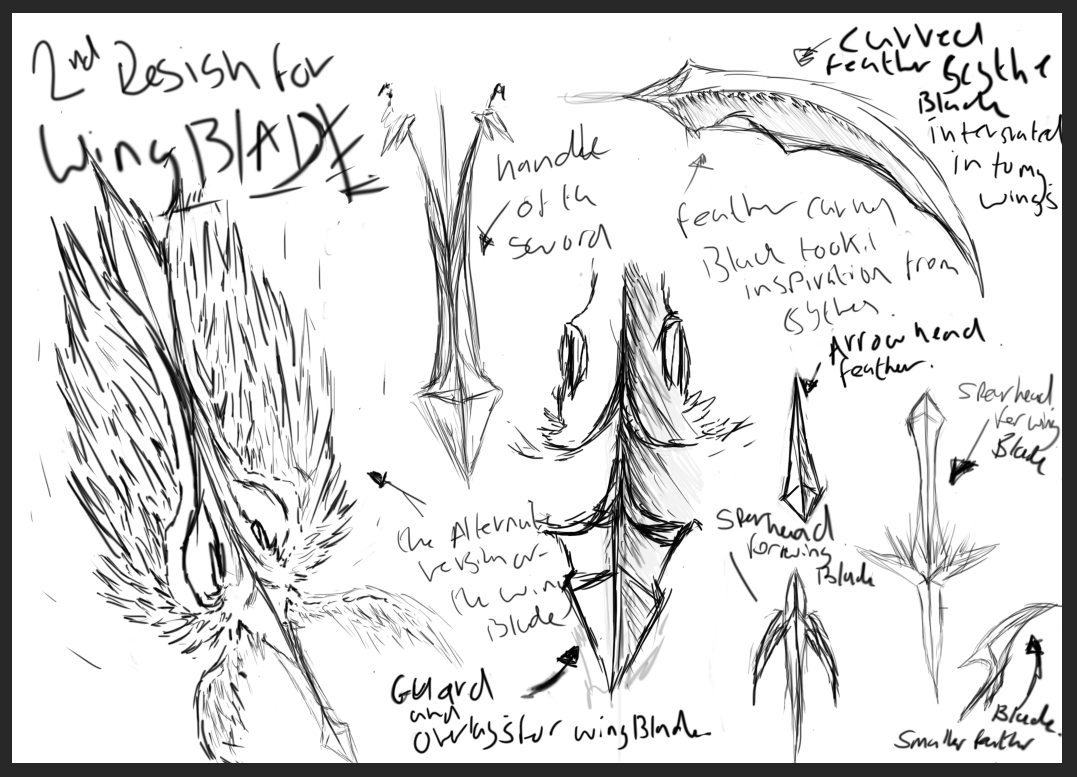
How have your designs/concepts evolved from the start? I have done variations of the same idea/ concept e.g. My wing blade my initial design was just an Claymore great sword with wings attached but decided that the wing due to their design would make a good shield in the shape of a heart. Which would fit on to the guard of the sword making the sword versatile which can be used for attack and defence and well and being bale to fire projectiles from it wings.
My 2nd idea concept still keep with the initial concept of wing blade I decided to do a very different variation, by the wing itself would be the blade combine that with a jet engine as seen in my mood board. give the concept a mechanical variant and merging that in to the wing blade. allowing you to rev-up the engine to make the wing blade vibrate and cut things.
The 3rd concept consisted of an standard Great Sword but the angle wing are the blades with a fancy guard and little wings near the hilt of the sword as well as I diamond shape pommel. this was original my first concept idea but gradually evolved into this has I visualised different place where the wing would be implemented into the blade and part of the great sword/ Claymore.
I did another variation idea of a wing blade as I was model I made a bulk version of my wing blades, centre blade the guard, handle, and pommel was considerable more thick than intended which give me the idea of a sword that attaches to a character arm via a leather gauntlet with metal plating. And the wing would go around the body of the character over the shoulder around the back also acting as a tall shield similar to Roman shield but a more curved shield but except a wing curved around the side of the body.
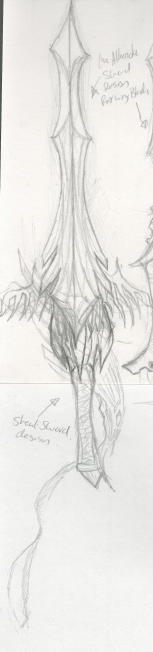
while coming up concept for which blade I was going to included in my wing blade I decide a blade similar to long-sword stretching to be a Claymore with a fantasy esc. design to it and would be better suited as a sword. Due to having that many idea and concept an assets which is used to create my wing blade can be a standalone sword due to the shape of the design of the blade would fit a sword as well as my wing blade which was previous intended for. I fell like it would also make a stylised sword cross between fantasy and steampunk sword a lot like Nero’s sword from devil may cry 4.
What inspirations have you used? I have used a range of various weapons that i was going to implement into my angle wing e.g. like arrows heads, and spears would be the feathers. I have research different cultural weapons like kunai, shurikens, scythes. I have used links shield from Zelda it basic shape to form the shield from of my weapon as well as the shield from kingdom hearts and it heart emblem because if you put two wings together it looks like a heart which you form the basics of my shield for my wing blade.
Other inspiration i have took is from an extincting weapon from monster hunter world the charge blade with is a sword which morphs into a shield i mostly took inspiration of how it look and transforms into a shield from a sword. This change my concept design for my wing blade.
What is the function of your prop?The function of my Wing-Blade is that it will act a one of the main props for the main character and will be used as a the main weapon for the character, and will typical used in game as well as in cut scenes.
Where will your prop be used? My prop or wing blade will be used by the main character, so you will see the prop a lot see it will be centred around that character and see in battles and in game too when the character will be using the prop/ weapon and will appear in cut-scenes and while character is walking around environment in the game.
Use 3D modelling software to produce a prototype 3D concept.
Discuss which idea you are going to produce and Why? I have decided to go with the first version/variation of my wing blade, I have adapted my designs by taking other design from my other concepts and implementing it in to one. Like for example my 2 design for my wing blade I have take the design for the guard and the pommel of the sword due to its design fit the angelic design of the bladed and the wings of the wing blade. I have also gathered different blades from e.g. spear, arrowhead, scythe, Claymore sword and combined that into my wing seen as the wing is made up of multiple blades itself.
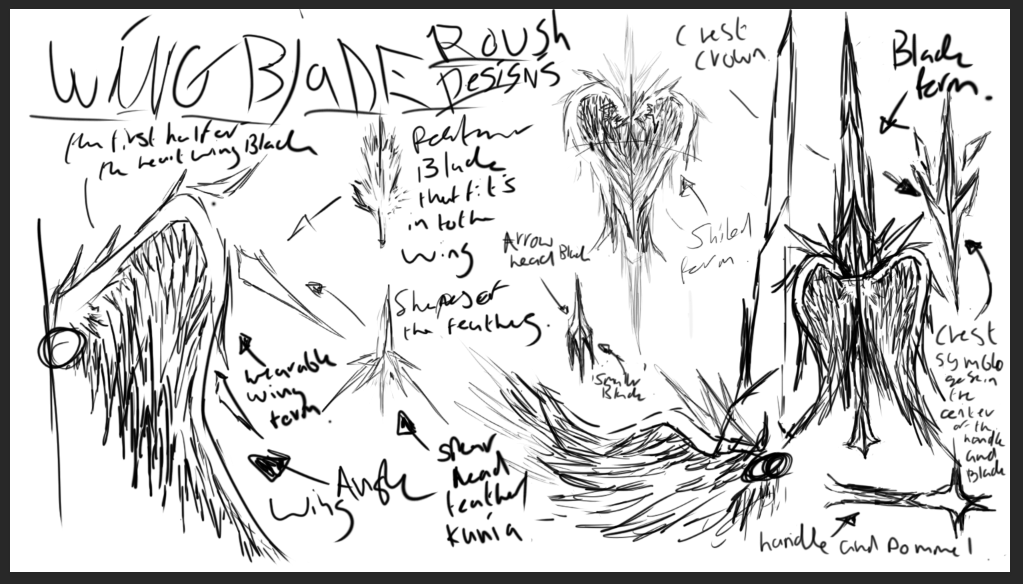
My Mood broad of ideas for my stylised 3D asset.

Here is my ideas and initial thought process for what i was planning to 3D model. An images displaying my ideas for my asset i would like to model.
My ideas/concept of ideas for my stylised asset.
Idea Concept Wing Blade.
Original idea Wing blade multi uses as a shield and a sword inspired by monster hunter charge blade.
Idea Concept wing blade alternative design great-sword 2.
Wing blade alternative concept, the wings are the blade of the great sword as seen in concept.
Idea Concept 3 EX Engine Wing Blade Concept.

Idea Concept 4 Alternative Concept Wing Blade Armour Gauntlet.


Idea Concept 5 Cool Blade Design for a Claymore Fantasy Sword.

Guard of the sword.


Idea Concept 6. Wing Blade.

Here is my final colour piece of my wing blade colour version.

This is my colour version of wing blade want a realist look as seen in the concept art here, but is different from my texture model one due to it had to be a stylised asset.
Practical
Document your modelling process.
Here is my modelling process for my chosen stylistic asset i decided to model out of my concepts ideas.(Wing Blade)
To start my Wing blade i started with a cube i extruded that in to a rectangle and also used Multi-cut and Connect tool to shape the blade and move tool and resize to get the thickness of the blade adding 4 edged loops down the centre to get the desired shape of the second blade.
screen shot
Then i used the extruded tool to drag the face out and position them to a point which overlaps the other blade like so then making the edges of the blade thick as it got closer towards the third blade body. I did the same process with the third blade just made it a lot wide using the move tool and the resize tool for thickness and adding connect/ edged loops of the point to match up with my concept art of the blade wing and it shape of the back and front faces of the blade so the match the concept art with some slit changes made due to i had N-gons with my model so all my geometry was quads.
screen shot
By the time i got to the swords guard i decide i would need a lot of edge loop/ connect tool to get the the arcing shape of the guard. I extrude the bottom 4 face to a good length for what i need of the arc shape forks of the guard the used the connect tool and multi-cut to add edged loops, i used to move tool manual to get it to that arc fork shape.
screen shot
To get the two little forks i added an additional 4 edged loops on eve side of the sword using the Connect and Multi-cut tool to make so their were eight face on the bottom of the sword then i extruded the two face on either side out first the top to ta desired length then the same with the other two. I decided that the two forks shape that make up the guard on my concept art were curved and arced so i use the move tool to move on each vertices to make them arc and added geometry using multi-cut tool the make it rounded at the edge of the fork.
screen shot
For the guard of which the wings will be attached.I extruded the 4 bottom faces of the sword into the main body of the guard using extruded tool then resize tool to get it to a decent size.Then i extruded front and back faces of the main guard to get the lip where the guard meets the blade. I used the move tool on the vertex of the main guard and the resize tool to get the shape of the guard matching my concept art or as close to that as possible.
screen shot
For the joint the guard where it meets the handle i extruded the two middle faces out and move the vertices into a point to form an even smaller mid guard of which connect to the handle. I extruded the front and back of the sword and used multi-cut to the front and back of the mid guard and added three equal sections of geometry as seen in the screen shot below. This will help with my high poly model or adding the geometry in to the mid guard and up main guard to get the curves for added detail in high poly.
screen shot
I extruded for the mid guard bottom two face, and using the move tool on the vertices and sculpt it to a rectangle shape to form the handle. I added more geometry to the handle to match my concept and its overall design and the shape of the handle.
screen shot
For the pommel of my sword i used connect tool towards the bottom of the handle to form an edge loop around the handle then i extruded the two side faces then used target weld tool to merge the vertex into a single point on each side of the pommel then i extruded the bottom and did the same process as before using Target weld tool.
screen shot
I had a few problems i had inside geometry in my model the two ways i dealt with this is used the tool target weld the vertices to get rid of the extra geometry. The other way i solved this problem was to selected all vertices with in the model shift left click to merge all vertices also get rid of any unwanted geometry.
screen shot
Another problem i faced when modelling sword part of my wing blade is when i was modelling it i realised that he model was not straight and was slight crooked and the geometry was veered off.I used the size tool Y,Z axis, Manual go thought out the modelling to try and to get the the edges straight and use the move tool to line it up so that section is straight or as straight as i could get it.
screen shot
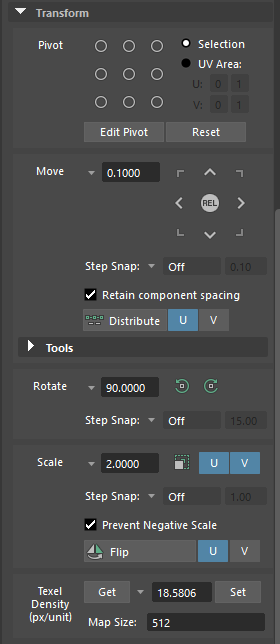
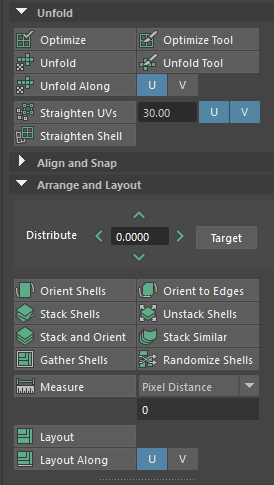
What tools did you use? The 3D modelling tool i have used in my modelling process of a stylistic asset of what i have design and tool i have used to model that are, extruded, bridge, bevel, Target weld, connect, combine, separate, move, seize, rotate…. And for the UV process i used cut,orient shell, Unfold, Unfold Along,UV shell, Texel Density/ Get and Set,Camera Based, Sew, layout, Layout Along, Stack Shells, Stack and Orient.
For the frame of my wing i started with a cube and extrude into the rough shape i want from the wing’s fame the using the move tool move the geometry around and angle the the extruded cubes/ rectangle around to get the design/ shape for the wings frame.
screen shot
After doing the rough layout i decide to define the wing frame shape and decided to use the connect tool to add 4 edge loop down the centre evenly space out from one another to give the top of the wing frame more of a wing like structure. This also help with hid each blade into the wings frame as they need to slot in to the wing frame without each blade piercing thought the wings frame.
screen shot
I decide obviously they need to be space to insert the blade into the wing frame, so with the edge loop all ready in place with the connect tool. I decide to make that space in side the frame by selecting all the centre faces all the way down the wings frame and used the move tool to move them inward and gradually move the other edge loop face inward to structure inside the frame to make room for the blades to be fitted in to the wings frame.
screen shot
I decided to add more to the wing by add a blade at the bottom which is attracted to the frame so it dose not look to plan. I extruded the bottom face of of where it will connect to the sword then using the connect tool to form edged loops around the rectangle width way and length ways to put it into segment, using the move tool and resize tool. I manipulated the faces of the shape to model the curved it slightly. changing the width of the blade and slanted the edge loops to put then into an edge for the blade then selected the blade edge face and used the resize X,Y axis to change thickness of the edge.
screen shot
I had 4 different blade design ranging from spear head, arrow head, scythe and a clay-more sword with two alternative designs. I model all this blade’s in a similar fashion.
With my arrow head i start with a base cube and using connect tool i added 2 edge loop one down either centre of the cube splinting it into 4.
screen shot
With the move tool i move the vertex into an arrow shape then i selected the edge and double click to select all the edge around then bevel the edge on for two of the same edge all around on each side the using the resize tool X,Y, axis on the centre face i change the thickness of the arrow head causing the bladed edge of the arrow head.
screen shot
With the scythe i did i similar process to making the wing frame where i used extruded to get the rough shape of the scythe.
screen shot
I also used connect to to get the complex design of the scythe with thing like make the scythe arc in its shape and the jagged edges. I also used multi-cut to form some of these parts of the jagged edges of the scythe.
screen shot
I bevel the edge of the scythe to give the scythe an edge and and flat surface on top and the back of the scythe. I did same process as i have used with the arrow head , the clay-more blade and the spear head.
screen shot
With the spear head i have done a the same process with a more complex design also goes for my clay-more blade.
Discuss the UV unwrapping process.
The UV process for my stylistic asset Wing Blade.
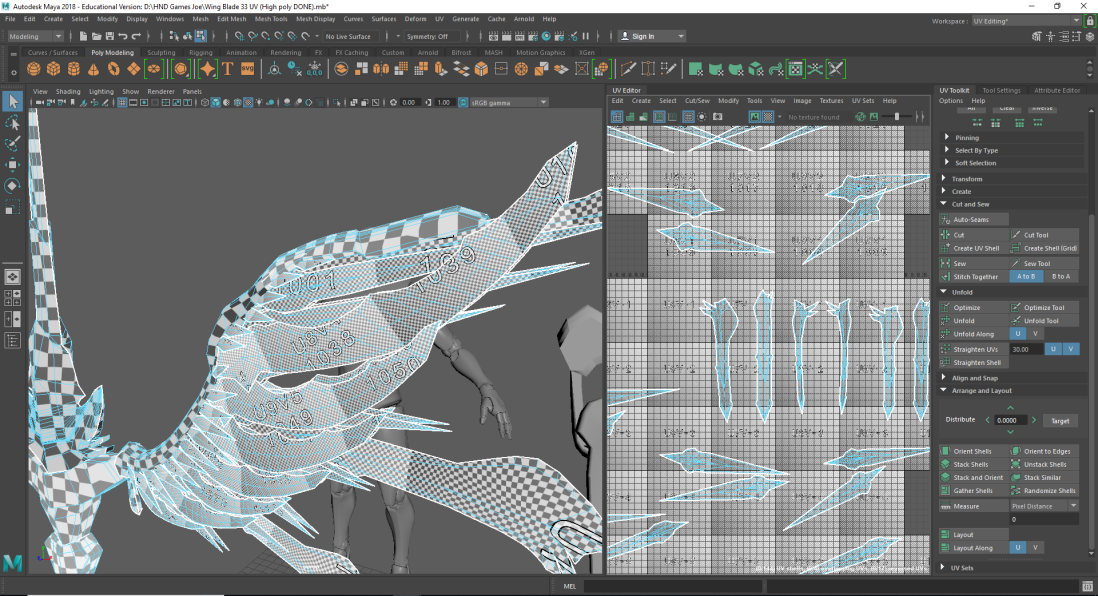
I made sure i Camera Based my models e.g. wing frame sword, and the 4 blades different blades at a side view on so their are easier for me to unwrap them in the UV editor space.


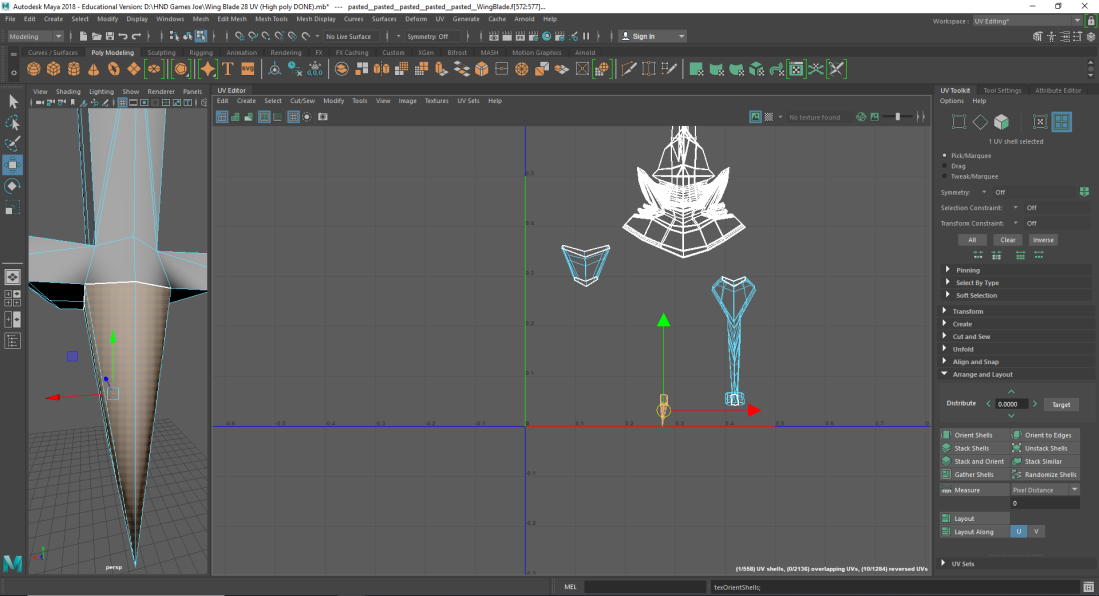
For my sword part of my wing blade seen as it was model using extruded so it was all one model i for the UV’s i decided to cut the handle and the guard from the blade so i had three separate UV shells of the main sword in the UV editor. Once i broken down the section of the sword of the wing blade i decide to cut the blade in half seen as you will not see the seem on the bladed edged as seen in this screens shot.
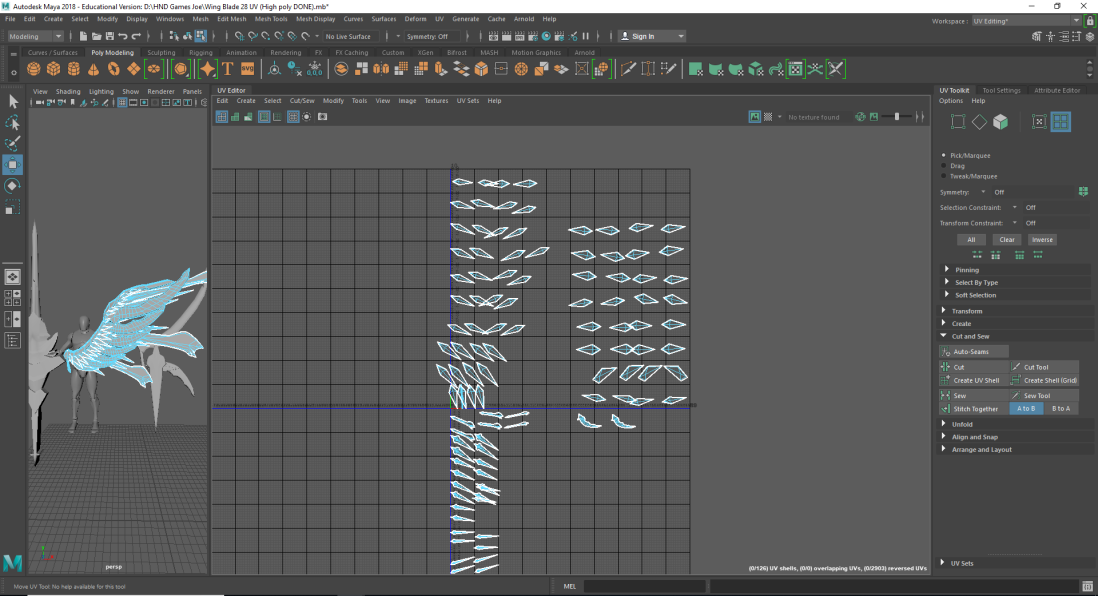
When i unfold/unfold along with U,V to get the desired and clean unfolding so when you click the checked map icon to seen if their is an distortion to the UV or skewing of the UV’s. I orient shell the UV shell to get them straight and square on the UV editor space this was the same for my other separate UV like the handle, guard, and pommel of the sword.
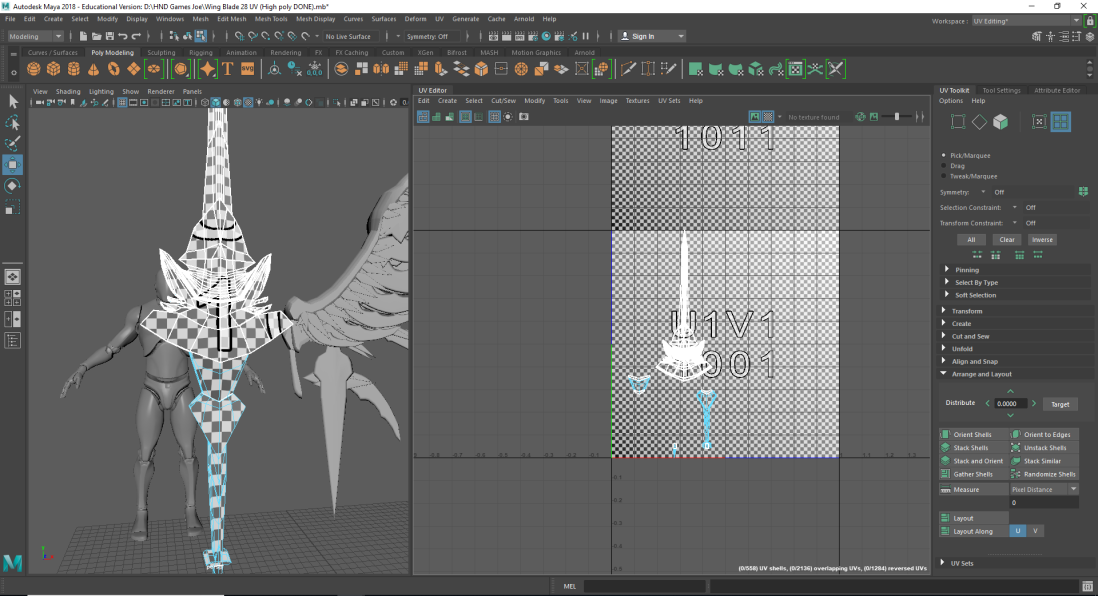
I also made sure that the sword, and the wing frame and the 4 different type of blades were Texel density was all set the same so we don’t have any low resolution texture on the model when it comes to texturing the model.As seen in the screen shot below.
As for the guard and handle and pommel of the sword i cut the side edge of the sword to then unfold/unfold along with U,V so the fold out from that one seem i have cut trying not to add to many seems to the model if necessary. As seen in the screen
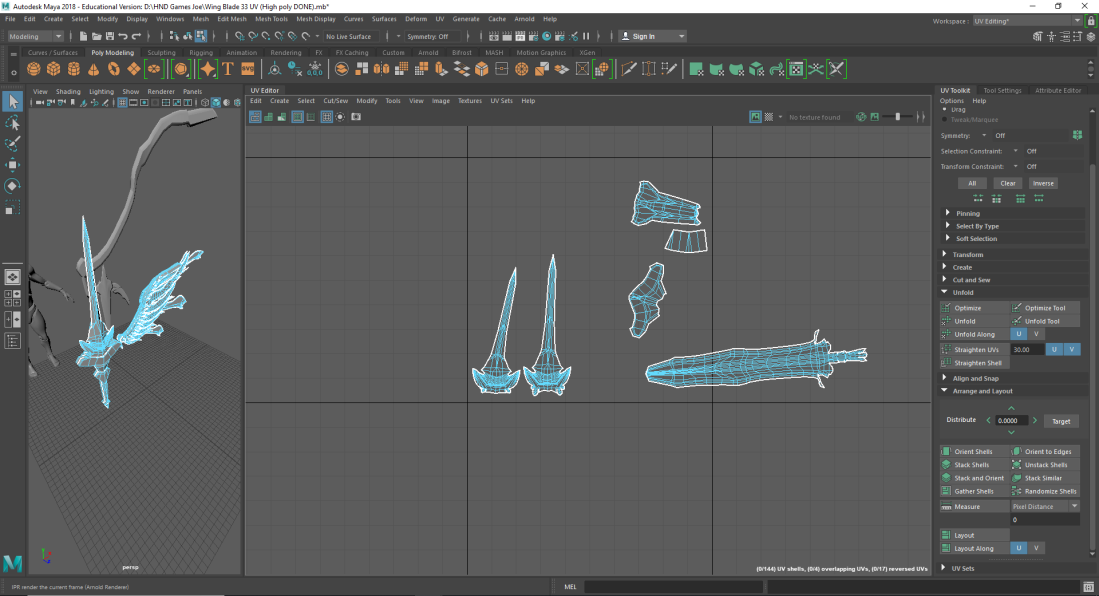
For my wings 4 individual different blades i planned to cut them in half and unfold them seen and you will not seen the seems on the blades edge and you will mostly seen the back or front of the wing so the seems will not be seen, then it was a simply task of orient shell and unfolding/ unfold along U,V of the cut in half 4 different type of blades and get their Texel density and set it so it is all the same Texel density.
For the frame of the Wing of which the blades sit in i cut it in half in between inside if the frames so i could hid the seem with the blades.

When i orient shell unfolded/ unfold along with U or V their was a bit distortion when checking on checker map, so i had to use UV tool cut further to cut the end of the wings UV’s to get the checked map checker sight so my wing frame has no distortion within the UV”s.
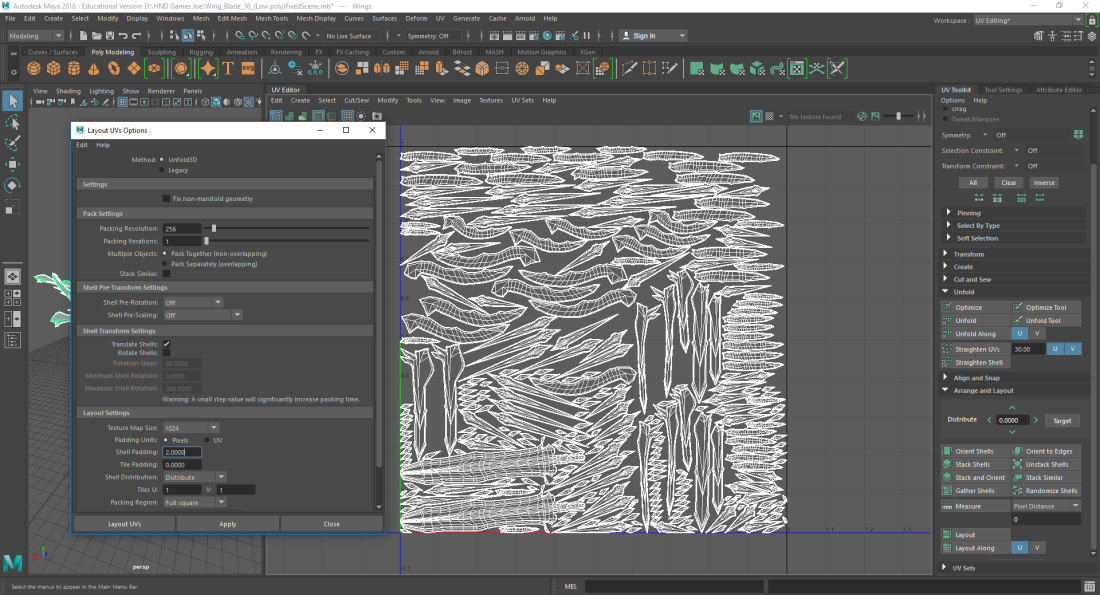
After unfolding everything and check my models for skewing or any distortion using the checked map i had to use tool layout to lay all UV’s in the 0-1 space in the grid. left click shift on Layout to open up a sub menu to change shell padding to 2 to give space in between the UV’s so they don’t overlap. Seen in the screen shot below.


Upload.
Define what you 3D model will be use for? My 3D model will be use in game and will be used as a main weapon for a character for my previous project. And might be included in cut scenes thought out the game and have its own cut scene of where the weapon is introduced.
Will it be used for games? if so, what genre and style of game? mobile, console or PC? i feel like my stylised asset/ prop will be use for games rather that films. the type of genre of game that this blade would be seen in is fantasy, Dystonia, Action, game i can image it being in. the style of game it would be in is game is JRPG’S like final fantasy and share it style to and platform it would be on console and PC respectively.e.g. PS4, X Box one the current generation of consoles.
Could it be used for animation or within the film or TV industry?
What style is reflected in your asset designs? The art style direction that it has taken in the 3D model is that of final fantasy art style with their models. Due to the detail and how sophisticated the design was from my initial concept art. Also the fact that it has a angle wing as it in implemented into the sword which give off a fantasy tone.
–Give example of games with a similar art style. These example of what game have a similar art style compared to my stylised 3D asset final fantasy 13, 7, 8, 9, Castlevania, kingdom hearts, Dark Souls, Skyrim.
What changes, if any would be needed to be made for use of animation?
If your asset will be used in a game, what platform will it be used on? My asset would mostly like be used for a game could also potentially, be used for film seen their is that much detail in my model especial the wings. The platform i would be used on is consoles like PS4, Xbox one, and PC.
Why are games more limited than a pre-rendered Film/Animation/TV show (or Advert)? game are limited to the amount of detail that can be put in to them due to any game is render in real time making it hard to render in a detail asset of a character, or environment so a tri’s limit is put in place to keep in the boundary for the hard ware and within game engine limits of how much it can render in real time. However film on the other hand are pre rendered meaning very time you watch a film it will be the same, which allowing for more and intricate detail models in films than in games. film can added lot of detail because it is all ready a pre render modelling and is not interactive media unlike game and a game has a 3D environment and film and a 2D image made to look 3D. this is also another fact why games are so limited compared to films.
Embed you SkechFab link within blog page.
Render your 3D model,prior to finalisation, to test geometry,textures, shades and lighting.
Dose the render look as expected? The rendering was what are expected i seen no sign of bleeding in the model when viewing it in unreal engine. Are they any errors? Their were no errors for the textures for the model of my wing blade sword.
Discuss how you tweak your 3D model or fix (if any) errors? Their were n errors when getting it into unreal engine no tweak to the texture or the model were required.
Here are my PNG’s of your texture maps. (e.g. colour, normal, metallic, roughness, Emissive, opacity, )
Roughness Map.

Base Colour Map.

Metallic Map.

Ambient Occlusion map.

Normal Map.

Included any Unreal engine 4 renders in your upload section in your blog.


Gather and record feedback from peers, family, colleagues or friends.
Feedback from colleagues.
pros
- planned very well practical and research work.
- use of nice screen shoot in work e.g. the practical sided and the research side.
- lots of good info on research in to the differences between modelling for films and modelling for games.
- CONS
1)Just finish work.
Modelling process/UV’S and texturing processes.
- Very detail model and well design i can see it being in a fantasy game.
- UV’s are very good.
- Amazing design, definitely inspired.
- cons
- Texture ?
Evaluate your initial intentions and concepts with your finished piece.
What went well? My concept art design translated very well into the 3D asset of my wing blade/ sword and really suit the term of the brief making a fantasy stylised asset. What didn’t go to plan? Is that for the texturing my sword i original had envision an realistic texture one with high detail with thing like moss, scratches and rust. However the brief stated i had to do a stylised asset in stead a realistic one so i had to improvise with the texture with the sword for the wing blade.
What have you managed to produce, with the time you were given? I have managed to model a low poly asset of my sword and a high poly version and UV my low poly of the sword. Texturing my low poly asset of my sword and putting it in unreal engine 4 i also did high poly wings for my sword additional, this was all done within 12 weeks.
I really did not like the texture for my wing blade see as i a vision of a more realist asset of the sword rather than a stylised if any i think i could improve my texture a lot and that i still am not used to substance yet, to get a good high quality stylish texture for my wing blade i feel personal i could have done better, i rush it due to deadline was coming up so really didn’t have time to come up with a stylised texture.
Is your 3D asset fit for it’s intended purpose- which you conceptualised? I feel that my 3D asset is fits for its purpose which was to be put in a game for console or PC.
Embed you SkechFab link within blog page.
