Research
Explaining difference between organic and prop modeling.
- How is modelling an organic form different from modelling a prop or a mechanical object? Modeling an organic prop dose require more detail that a mechanical model as organic model is imitating life which can be tricky as it would require more gemonerty to get a smoother and more ergonomic shape as living organic life such as plants, animals, humans have soft and curvature edges to them and flows throughout the mesh model. On the other hand mechanical models have hard surface and prominent and defining edges that can be seen clearly from a far in a model, mostly man made thing such as building with architectural elements , transport, weapons are more of a mechanical due hard surface and edges these are the characteristics of a mechanical model compared to orgain.
- What software might be better fitted for creating organic assets? most industry standard software used when making and organic asset such as characters or an environment or animals will probably be either Zbrus, mud box will be most suited to modeling organic assets as general most organic assets are highly detail polyed and are a focal point when it come to the detail of a character perhaps as an example.as softwares like zbrush and mudbox are for highly rendered ploy assets which would be used a lot throughout the game production on thing like cutscenes and if the player for example will be look at the model most of the time during gameplay. these are the best software to do the detail you would not get on other software like Maya as maya is used for low poly assets and sometime can be taxing to modeler something that highly detail on that software that why sculpting software like zbrush are good a refined intricate detailed 3D models of organic life.
Analyse, discuss the geometric detail of a least 5 prop references.
Ideas for modeling
Guns /weapons most like based of a real life gun model.and other weapons like kunai throwing starts. Smith and Wesson 500 50 caliber revolver.
The revolver handgun which is based off a Smith and Wesson 500, 50 cal the geometric detail i need to put in this model is mostly with its cylinder bullet chamber as their are indentation and groves around the cylindrical bullet chamber. Additional geometric detail will be need to place the bullet in the cylinder chamber as to make it accurate and close to real life reference as possible. Other fine detail are the hammer mechanism for when reloading the revolver and the ergonomic design of the grip of the revolver. The entieria of the frame which fit the cylinder along with the mechanism that pulls the cylinder when the revolver needs loading as it sing open and the barrel revolvers allowing for the gun to be reloaded this is where if i were to model this revolver this is where most of the geometric detail would be in the 3D model of the gun. Unless if i wanted to change the designs for the revolver as to make it more custom for a personal use as it might be used during game play where it will be used a lot. As for the rest of the gun other geometric detail i would consider change is the design of the barrel and sight and basic them off my own 2D concept design for the weapon or maybe make iteration of the gun perhaps one will be an exact geometric replica that of the real life version and one custom one but over exaggerated but still keep the geometric detail of the basic design. I will consider going on to 3D Model the real life smith and wesson revolver.

katana look at ghost of tsushima for reference and ninja gaiden and real life sword.
The geometric detail of the katana will be mostly in its TSUKA the handle as they is a lot of interlacing fabric and material e.g. SAME rayskin to get that diamond pattern as seen in most katanas and samurai sword along with the SAYA the scabered of the sword of which the blade is sheathed from the exterior of that meaning SAEGO the cord and the KURIKATA THE knob of which the SAEGO is interlaced a tied to the scarbered. The SUBA the guard and KASHIRA the butt cap of the sword will also have geometric details of engravings and patterns and overall shape especially the guard as it can be a preflea of shapes to them most using a traditional japanese patterns and mythological monster and demons or oni or plant based design/ patterns, as they are referred as depicted on them or something relating to the time era of future japan and culture. I feel like i would be able to 2D concept design most of the engraives of both guard and buttcap and interlacing pattern around the handle and the interlacing and tie cord for the scabbed as i would find some to based the design for all of these features off like cherry blossoms (fruit cherry) and the moon for example and gather primary references of these thing and add them to the basic design of the katana. For clarity i could take the crescent moon shape and make it into a the guard for the katana or make a charm as a cherry fruit as some katanas have charms dangle of them. This is siming more like i would model this as i have already come up with a concept for my katana design just need to do some concept art for it as well as find basic a real life reference.
bruce lee statue in hong kong model in Z brush or mud box.
The bruce lee statue in hong kong is extremely geometric detail as it is based of a person and an organic living being there’s the general body structure and physique of the muscular mass are highly detailed as if i were to 3D model this statute it would have to be an accurate representation on the human anatomy, as a lot of geometric detail would be thought out the body like main muscles and the wrinkles of the trosands and how it fit around the body as well as the face and the expression and the pose of which the statue has being put in very aspect is geometric detail i feel this would be the most unlikely thing i would model as due to the amount of detail i would have to put in and the time i have been given to model, unwrap, and texture the model besides i would have to know how to used Zbrush or mudbox as i have bearly and experience in any of these softwares.
(Kitsune)Traditional japanese Fox mask. The kitsune japanese fox mask geometrical their are not may detail with in the mask however the overall shape of the design is where the most of the geometric detail will come in as seen in the reference images of the mask has a nose which stick out to show the feature of the fox animal as it has pointed nose. This shape of the mask and eye hole is where most of the geometric detail will reside within the 3D model as i will have to start with a flat cylinder shape then extruded out to get the nose of the mask. Mask will most of the rest of it will be in its texturing. I feel like this prop is a go to model to go on to create as it in not that detailed and intricate and is manageable with the time given for the project. I could potential make this within in barely any time atoll then make the katana and put both in to a scene together as my finalized piece.
Sony cassette player walkman WM-R55 model colour silver. With the sony cassette player most of its geometric intricate detail are in it interior and exterior as the prop has a prefla of button on the top of the cassette, knobs and switch on the back that slide back a forth, headphone jack and MIC port on the right hand side of the cassette player and additional slider wheel volume button and knobs to and jake ports for a number for other devices to be plugged into. Around the back of the cassette player they is a plate that look lifted up from the cassette player itself with in the lifted up plate their are circular indentation which deepen as the get toward the speaker of the cassette as it look like i may have to exstuded a plate up then add geometry for the small circles for the speaker which will vary in depth as some are indentation and not completely holes, going in to the prop.Their is also the battery compartment on the back of the cassette with an different texture compared to the rest of the cassette and imprinted letter that say open that has been worn down over time and has developed an under coat of plastic which is slightly back in colour, the back also look less saturated that the front as the front is bright in colour due to the light hitting that surface more that the back. their is a tattered warren label slight yellow in colour with a rectangular indentation around the label itself. near both edges are round head phillips screw with further indentation round the screws as to hold the back plate to the cassette. Additional geometric detail are the embossing of the brand name SONY on the metallic front rim of the cassette, and further rectangular indentation on the back with a health and safety warning broided letter warn scruff revealing an underlayer of slight black plastic the speaker holes also have this similar ware too.
- Which you may go on to 3D model? Out of my 5 real life prop reference i will most like to model the katana, japanese kitsune mask, the smith and wesson 500 revolver or the SONY cassette player WM-R55 model. As i feel that it is not beyond my skill level to model and can get any of these model to look realistic in the time given to model, unwrap and texture anyone one of the models. However i am compelled and pushed to model the katana and kitsune mask as i could make iteration of both of them and make a scene out of these props.
- Where the asset may be used in a game? My 3D model prop katana and kitsune mask assets will be used during game play and to look at in the menu screen when the player is selecting a weapon or customizing a character thought cosmetics at the start, or thought the game within the character creation menu.
- Geometric shape is it most similar to Cube, Cylinder, Sphere ect? The basic geometric shapes of the katana would most elongated cylinders for the handle, end cap. The guard of the sword would be cylindrical shape while the blade would be an elongated cuboid. This would be the basic geometric shapes of a standard katana/ traditional samurai sword and will be the basic form i will start from when modeling a katana. Other geometric detail such as cherry charm is a sphere with an elongate cuboid for the stark of the cherry charm. The kitsune mask is essentially a cylinder with cube shape for its ears and for the nose of the mask is an elongated cube or cylinder, this would be the geometric shape for the basis of the kitsune mask 3D model.
Suggest what you would have to consider while sculpting an organic form, compared to 3D modelling a prop.
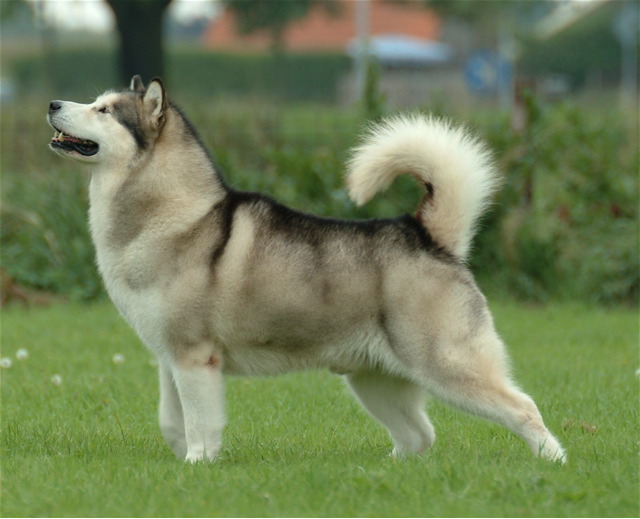
(+)The key aspects you would have to consider while sculpting some of an organic form that compares to 3D models prop are if we look close at something living organic such as alaskan husky for example you will see you have to take into consideration the muscle structure and characteristics of the animal such as the Alaskan husky resembles wolf species in their characteristics as their are a particular wild creature and the husky muscle structure is very defined especially around the neck and legs as it is very thick probably a husky would normal push cargo though the Alaskan wilderness and thought the rough terrain as an vehicle would struggle as a husky muscle structure as very big proportions this would be to pull the slate and the guide meaning it skeletal structure would be heavy and dense as it is probably a male would have more a dense and heavy skeleton structure as most male species and would have to have this skeletal structure as to support the weight the have to carry not just the cargo but how they are build and with that big muscle proportions. You therefore would have to take is characteristics such as it wolf like feature it thick coat for the cold climate and its very defined muscle definition and proportions when sculpting some this organic as to stick to the likeness of the real life reference. If you were to model something organic using Maya let’s say the organic form will look like a hard surface modeling with less defined features that if it was model via sculpting methods meaning would be less detail overall if it was hard surface modeling and feature of the animal would be less defined such as it proportions and muscle definition and their wolf like features.
- look closely at details of an animal e.g. Take pictures of my cat as reference horse, bruce lee, , alaskan husky/ garther.
- What kind of muscle definition does it have ?( think proportions, its anatomy and skeletal structure)
How you would use reference to help you to model a prop asset? (Think Blueprints) if I was to model some more on the mechanical side or electronic, with move parts or has been put together in a way that you could take it apart and then put back together again with a layered blue print depicting each characteristic of the supposed mechanical or electronic prop in intricate detail like for example an explosion drawing of a jet engine. This type of reference would help you 3D model the complexity of the model allowing you get get as much possible detail and intricacies in to the model the blueprint will act as a 3D guide to the 3D model as it would be like have the real life reference to look around except in an technical drawn fo the real model.
Compare techniques you would use modeling organic creatures to a cube shaped prop.
which would take longer?- why? modeling something organic would take longer than modeling some man made or mechanical as the topology of an manmade and mechanical model are more straight and angled geometry while organic modeling geometry and overall topology of something living as more flow geometric curvature, modeling organic asset would come with it own challenges in it self as the topology need to be square to prevent skewing when it come to the UV unwrapping process as this then can lead the texture to look distorted and warped that why it so difficult to model something organic or you will uncounted these problems and it hard to model and mimic,imitate organic life as the geometric shapes are more convoluted in design and how the link together to form organic assets or people.
What software and tools would be better for sculpting? ZBrush, Digital Drawing Tablet and pen. I would believe that digital drawing tablet would ideal for sculpting an 3D model as you have more freedom and control over the sculpting process this also for Zbrush and it’s variety of brush sculpting tools which would allow for refined detail in the the sculpted module and the fact you can resize the brush to get these finer details on the sculpted model this would be useful with the polymesh 3D tool which is essentially a mesh comprised of polygon’s this allow you to make basic shape similar to Maya as a based to the sculpted anything you want out of the polygonmesh this tool is one main tool that would be used as a start point along with a variety of brush tool which can be download to Zbrush itself make the sculpting process that more viable and better for sculpting 3D asset organic or otherwise hard surface module but mostly for organic forms of modeling.
Analyse 5 anatomy references, animal or human.
- Anatomy of my cat The domestic cat has many defining anatomy features such as their pointed ear that can rotated 180 degrees and are more concave in shape as to pick up sound from a far and behind them. an cats skeletal structure are general lightweight and fragile however an cats skeletal system are unique as they have no collarbone and are incredibly flexible backbone with over 30 vertebrae this is partly the reason why cats always land on their feet. An cat foot or paw is outline feature and apart of their genetic makeup as the paw of the cat consist of a large heart shape pad or metacarpal or parlmar pas as there are referred to this is an both the cat forelimb and rear limbs respectively. The paw themselves contrat using their disitalflexar muscle in their paws which is innervated by median or the ulnar nerve. An cats skull is a strange oval shape that’s what gives a cat its pointed face when their change their expression it is very noticable.Other anatomy feature in the face of the an cat are its distinct mouth and nose as they extruded out from the face similar to an fox facial structure however less pronounced and far more point in wards as the distinct mouth extends to the jaw up to the elongated nose in an M shape going to to the nose of the cat. An domestic cat muscular mass is general not as defined as males cat as in the reference this cat is female but cat in general do not have such an defined muscular physique besides their are generally quite slender in physique like in the reference this cat is female an its muscle definition is less pronounced and the fact that cats have a thick coat of fur breaks up their muscular form more. An cat muscle proportions are small and compact as their are light on their feet and are quick, creature. by their small physique in relation to their quite small body and skeletal structure. Other anatomy features of the cat are they whiskers that grow out of their extruded pointed face. these whiskers allow the cat to estimate if their body can fit in certain gaps as an cat whiskers are quite sensitive an act like sensor giving the domestic cat scene of feeling as they use this for the environment around them.
Put Reference image here of my Cat.
- bruce lee as you can see for the reference images the Physique is more of a fighter and the muscular structure is very defined especially around torso and triceps and the forearms of the top half of the body as the muscle definition around these areas of the body wa are torque when they contract and flex give it refined shape even more so with even by its muscle definition as shown in the fighter’s Physique.The muscle mass of males is more prominent and bigger and more defined that in an female as female are more slender in shape with less muscular structure than that of males.This mean that males also have an more heavy skeletal structure as have to carry the weight of a larger muscle mass.An female on the other hand has more curved features and less defined muscular proportions, compared to that of a male meaning females are more flexible this because the curvature take place in the lower spine, or the lumber region over 3 vertebrae in women. Compared to two in men have.Also an female joints are also larger and flare out further down the spine than those of men – improving their spine’s strength.in relation to my reference their are other fact that contribute towards the Physique like age as in my reference Bruce Lee look in his mid 30s meaning that this would affect the anatomy form in the reference thought he look at his prime another factor that contribute towards the anatomy Physique is strength of the body and just analysis the subject in the reference I can concluded that he got a strong form and intact is at the peak of human fitness.

- (Fox) An Fox as very defined features of these features a fox has an pointed nose that extruded for the dog like flattened skull, their slightly upturned snout and it long bushy tail. an fox has two types of colour fur coats one is white and red which is normale females foxes, while the black tip tail foxes are normal male and white tail tip foxes are the females as seen in the reference image of the fox. also you can tell age of a fox can be telled by the colour of its coat. if its grey then they are a young cubs if the coat is an sandy colour then they are no longer cubs probably a few month old, only when their fur coat turns they have reacheds fully grown adult any older than that their coats get more saturated with the redist colour. foxe are more less defined thought their muscular proportions compared to that of a wolf or any other dog like species as their are quite thin in physique. Their back legs have more muscular mass that the front pair of the legs. the back muscles are large in proportion to the body as a fox is more of an agile predator and needs quite muscular back legs to generate the power need to catch prey fast than them. fox also have quite muslar propration leg is due to how a fox catch their prey the normal jump on the ground or pounce to root out the prey as the tend to hunt smaller and quicker creature their strong muscular back leg help with this hunting technique especially in certain climate of where the terrain has changed like snow as settled on the ground. the the anatomy of the back leg muscular proportion is structured in a way where the joint of the leg contract inwards while they run or pounce on prey using their hunting technique this allows them to generate the power and speed or hunting. an foxes skeletal structure is very light as to be more light on their feet. foxes are small to medium sized omnivorous mammals. foxes are not that strong in physique and overall muscular structure this is also shown in female a lot less as their are more slender and less muscular to that of the male fox.

- Alaskan Malamute husky dog breed. (The Analysis of the Alaskan husky dog ia above with + symbol.)
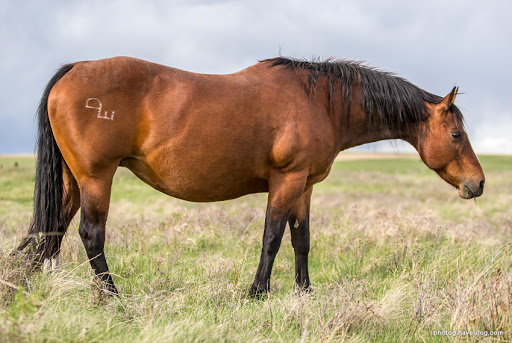
- Horses An horse is fairly bulky in it size and its muscular proportions with arching long neck and elongated head with its mane running from forlock (hair of the forehead)the forehead down from the poll of the head down the neck and stops around the back of the shoulder blades the mane disperse around the neck of the horse that grows over the nape of the neck. The horse elongated head as pointed ears at the top of the forlock where the mane hair sits on top of the forehead. further down the horses long face is a distinctive face feature such as it nostrils and the muzzle with its chin and jaw line leading back into the throat latch then continuing down to the thick muscular neck base. where the jugular grove that leads down to the breast and then to the front fore legs of the horse , where their based of the horse hoof is and the bulb of the heel. up from the horse hoof is the cannon bone which connects to the fore arm of the horse leg and the tends of where the muscular proportions give that bulky body proportion especial around the shoulder to the fore arm just above the fetlock of the foot where it meets the coronet then the hoof. its upper arm where it shoulders are is where most of the muscle definition can be seen and the horse turso other muscle definition can be seen on the back leg where the muscular structure is in it leg which allows the tendons in the leg to contract and stretch. This is a factor that gives it is fairly bulky physique and feature in is neck legs base and turso of the body of the horse as these have large muscular proportions. other distinguish anatomy feature of the horse is its lased tail and the withers which is the ridged on its back between the shoulder blades of the horse. the reason for a horse large muscular proportions is because of how their are breed as some horse are build for race and have been tamed and ridden by people for countless generations.
Are they: Male or Female?young or old?strong or weak? – is the character (or animal) a fighter? what genre of game is it being made for?
How would the muscular structure of a reference effect the shape of sculpt?
Why is it important to understand a reference’s anatomy? Realism is difficult to replicate especially organic life, using anatomy accurately recreate the proper shape and details is needed as to get an accurate representation of its anatomy when it come to 3D model the asset. As for example it is no good 3D modeling human not based on is body structure or it basic anatomy. Furthermore it will be no good to replicating some that dose not have a basics of anatomy reference what’s more if you have no reference to basic your model or drawing off then a lot of it would have on premise as it was not basic no concrete evidence of the reference additional the anatomy of the animal or human being would have uneven proportions, skeleton structure and muscle structure. So is always essential to follow the anatomy reference.
Explain how each reference would be modelled differently in reference to; Shape, size, facial and body features, Hair/Fur, bone structure, muscle formation, skin colour and texture AND gender.
Planning
Assess what 3D Prop, or 3D sculpt of an animal, you will create.
- Discuss which of your references, chosen in Task 1, are appropriate for your personal skill level. I would feel like either the kitsune mask or the katana would be around about my modeling skill level as geometric shapes of each reference are quite simple however the detail of the katana for example is where most of the complicated detail lies as for the mask the organic shape of it will be the most challenging to get the shape and organic structure of the shape of the mask and to make it look like the real life reference.Fortunately with my previous modeling projects like my fantasy weapon which was quite complex in design so i feel model something that is more Distinct is their design, Moreover I would be able to model both of these chosen reference as both are two different types of model further expand my skills as the kitsune is more of an organic model as is more change to model as it has that organic element to it however the katana is more of an technical manmade model. Model both of these would further expand my modeling skill in both type of 3D modeling and it me use to modeling something organic.
- Suggest which would be more complex to model, or sculpt, and settle on final reference piece. I would believe that the katana would be more complex in its intricate design in the pommel the guard, the wrap around the hand and an engraving found upon the katanas blade or the guard or pommel or the ornament found on the handle this is where all detail would go in the 3D model. However Spence as I am also model the mask in a scene the mask would bring it’s own challenges as to get the organic shape of the mask which what would be most challenging in this module and make the topology clean and square.
Produce draft 3D models, designs and concepts.
Here is my design concept exploring the details of the 3D models of which i will produce.

- Produce a minimum of 3 drawings of your reference, carefully exploring even its smallest details.
Where might your asset be used within a game. I feel like the kitsune mask you been scene mostly on the character either side or main character and in cutscenes as you would see a close up of a character taken off the mask and throw aside then the mask would break when it hit the grounds and shatter in the fragments in the cutscene or during gameplay, it could also be used as a background prop as well as an main set piece, and used in an taunt animation during gameplay. These are a few things the asset might be used in. The other asset on the other hand the katana would be used constantly during cutscene and gameplay so would need to be model to an high standards as the main character would be used in all the time.
Produce a development blog of your 3D project.
Are you hard surface modelling, or sculpting etc. I have chosen to hard surface model as i have used sculpting software like Zbrush to try and sculpt one of my chosen reference e.g. the bruce lee statue in Kong kong and little avail, due to how time consuming it is to sculpt something, never mind something of an organic form would take me longer and i only have around 2 mouth before deadline and the sculpted model would take me long than the time given for deadline. This is what i mange to do it a few sessions within Zbrush.
3D Modeling Process.
How i 3D modeled my Traditional Japanese Kitsune mask (Fox mask).

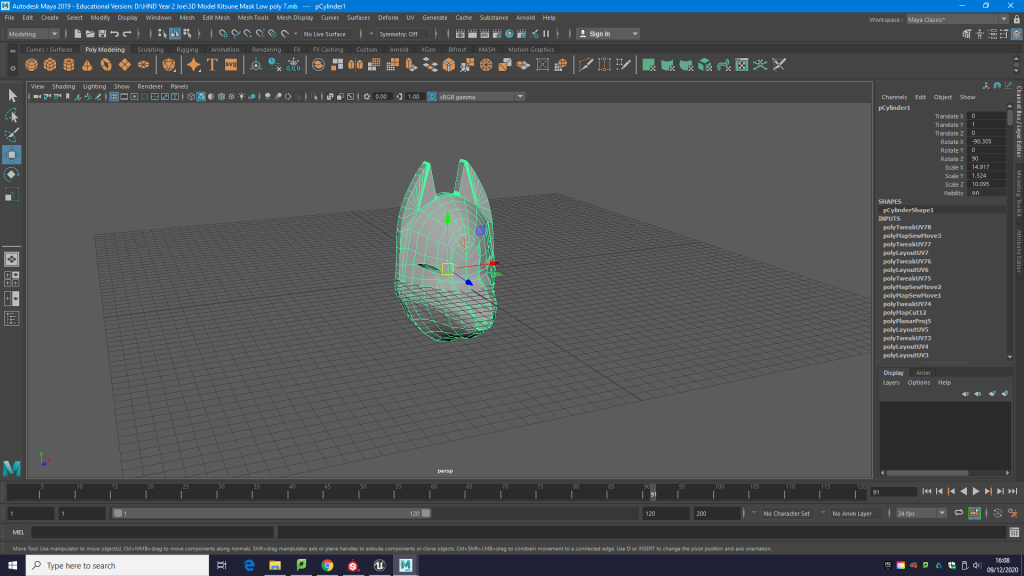
I started with a simple cylinder, using the scale tool (by press R on keyboard) i scaled with X,Y,X axis the cylinder to the shape using reference images as a guide. Also i made sure that it is scale so it fits character, inserted i used the scale man had a rough indication how how big i wanted the mask to be.

After getting the rough shape of the mask and getting the mask to a life size scale, i started blocking out the ears. I selected face on the top base of the cylinder and using the extrude tool found in the modeling tool kit under components, i extruded the 4 selected face outwards to form the base for the japanese fox mask ears.

In addition to getting the rough shape of the ears i used the target weld tool to weld the vertices to get the triangle shape for the japanese fox mask pointed ears.

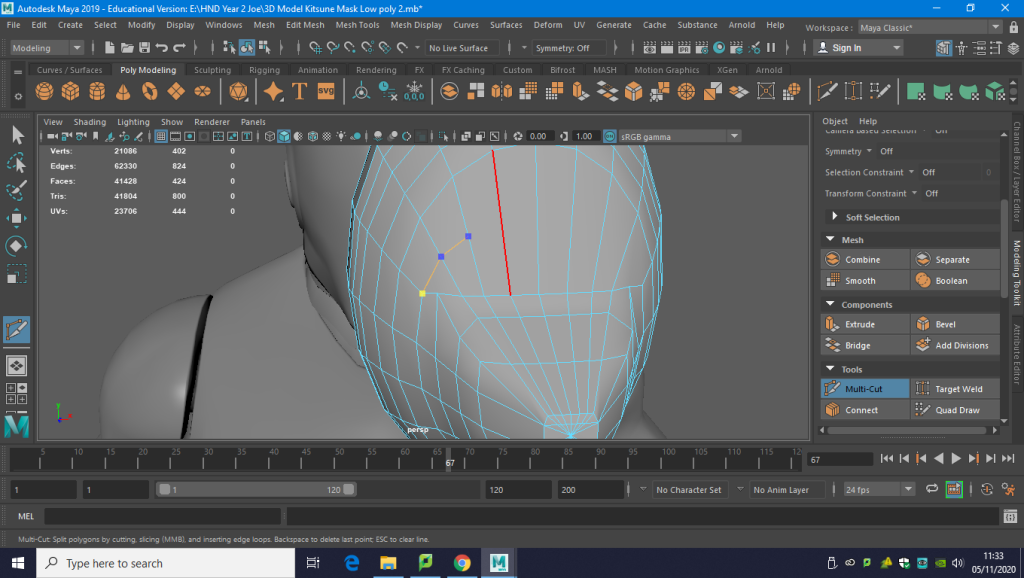
Next i started to block out the facial structure of the Kitsune (Fox) mask. I made an edge loop using the multi-cut tool in the middle of the cylinder and the same with the other side of the cylinder as you see above in the screen shot this will be the front face of the mask and the other side will be the back where the mask goes in to it can be wear, so the geometry need to be the same on both sides of the face. I used the move tool ( by press on keyboard W for the move tool) to drag the selected face of the edged loop down and out to form the basis nose of the fox mask. i then selected the other edge loop face on the back of the mask and using the move tool pull the circular edge loop in wards form the inside of the mask.
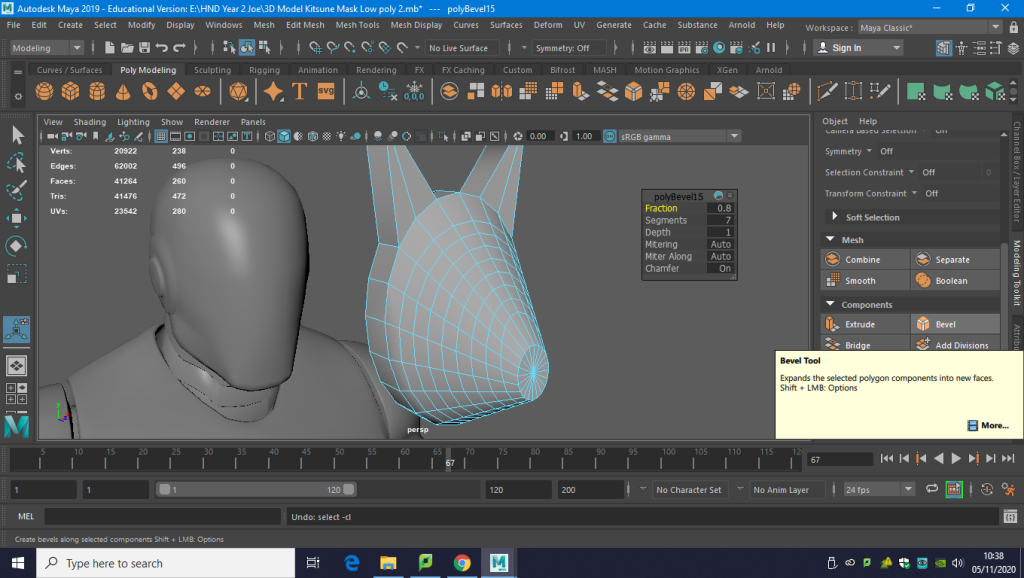
subsequently as i got the basis of the structure of the mask face, i started on defining the feature of the fox mask i used the bevel tool found in components in the modeling toolkit to add edge loop all round the front, using the sub menus to add more segments of edge loops to front of the mask and using the fraction to make them even spaced out for each of the other segment/edge loops as you seen above in the screenshot.
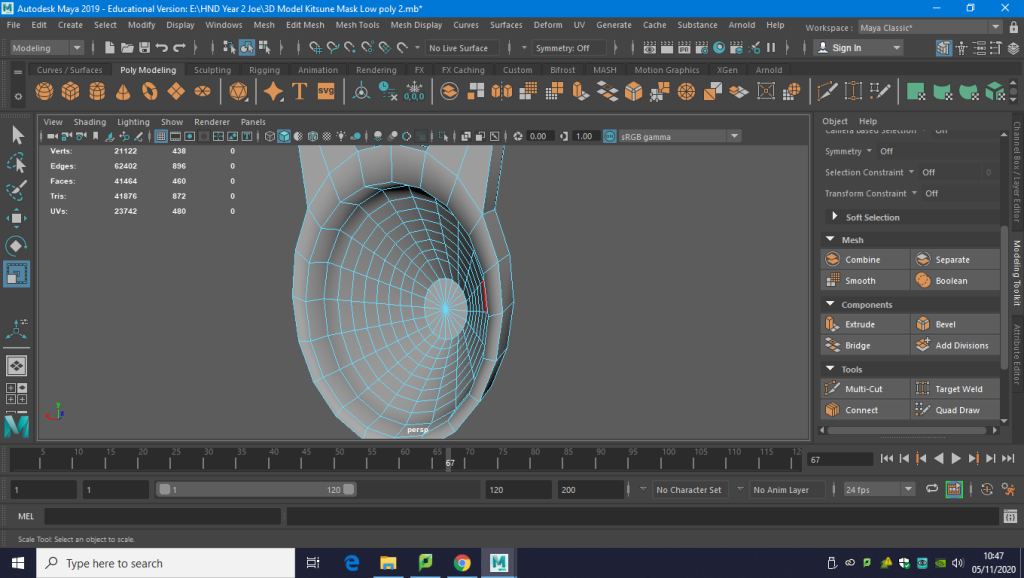
I did the same thing for the inside of the mask using bevel tool made the same amount of edges loops to mimic the frontand made sure they were the evenly spaced out using the sub menu and toggling the fraction as to space them and so that they match each other as i will need the inside mask geometry to do the eye slits in the mask so when the prop is used in game by a character you can see their eye’s. though the mask.

I used the scale tool X,Y,Z axis to adjust the edged loops to get a more defined structured shape of the mask and its feature of the mask, try to keep that organic flowing shape throughout the mask while sticking closely to the reference of which my 3D model is based off. using the scale to to flesh out the geometry and giving it less of a blocky form make sure to stick to the overall design of the mask.
Using the move tool and sculpted the snot of the mask and added extras geometry with Multi-cut to add the other edge loop for the base for the eyes and where the will be on the mask.

After sculpting with the move tool for the desired shape of the snout , forehead , lower bottom of the snout of the mask and the mask base, using the multi-cut tool i added geometry for the shape of the eye hole for the mask as you can see above.

Following the block out the eye hole and where they would go on the mask i selected the face of the eye on the front of the mask and using the extrude tool i extruded inwards to get the eye hole of the mask.

Following that i used the target weld tool to merge the vertice in to the right position similar to how it is on the front. Ensuing that and target weld the vertices to a similar shape to the front i deleted the face that was over the extrusion as see above as i model the inside first before i did the eye hole for the model. as you can see from the screenshot i encountered overlapping geometry which i clean up via select all vercies thought out the model then going to edit then merge setting the threshold to 0.01 which get rid of any overlapping geometry within the model.

I noticed on my reference that the ear on the outside where the meet in the middle of the mask were slight cured in the reference so using the bevel tool i added this extra detail and geometry to the masks base of the ears where the ear meet the main part of the mask giving the curve as seen in the screenshot above.
I also notice that the point of the ear were not pointed and were more round a curved too. So using the multi-cut tool i manual added the curve of the ear in as beveling it would not give the desired shape i wanted for the tips of the ears.

I realized that the ears themself were rounded until the reach the base of the mask where it would vear off, i had to use the multi cut tool and move tool to get the curve of both the outside ears and connect them the the point of where the base of the mask meets the front.This is to prevent any Ngons which would have been cause both using multi-cut tool and the bevel tool respectively. Joining it to the vertice where the all meet was to avoid any ngon that i would have created via the multi-cut tool so i found a way around it this way.

This is the finalized version of my model of the traditional kitsune mask that i will be Unwrapping and then exporting into substance painter ready to start texturing.
UV Unwrapping Process.

i moved on to UV wrapping Process. I open up UV editor in the top shelf of Maya to get the UV sub unwrapping tool kit and the 0 to 1 space to unwrap on 3D object. I started by camera basic the mask which was under the sub menu drop down create. I clicked the camera basic button to get an good angle view in the UV editor view port as see in the above screen shot.

After getting an good angle in the UV editor view port I then went to the 3D view port to select the edge s to cut I cut around the base of the mask with both sides to split the mask UV shells into 3 separate bits front of the mask the base of the mask and the inside of the mask.
i cut the eye as I could not detached it into the three sepreate UV shells and the eye hole was still joined to the inside the mask so I had to cut to separate it into the 3 UV shells as shown in the screen shot above.
i finally sepreate it into the 3 UV shells so that the front and inside of the mask unfolds properly I cut down the snout of the fox mask to break up so that it look UV shells Look less distorted when I turn on the checked texture. As you can see below and the above screen shots I cut in inside and out mask snots so that the snot looks less distorted when it come to texturing. I close cut the base of the mask so that would unfold in a rectangle UV shell in the UV editor view port.


i finally sepreate the UV shells in the UV editor view port by shift right clicking the going to UV shell and using the move tool to separate then in the UV view port.
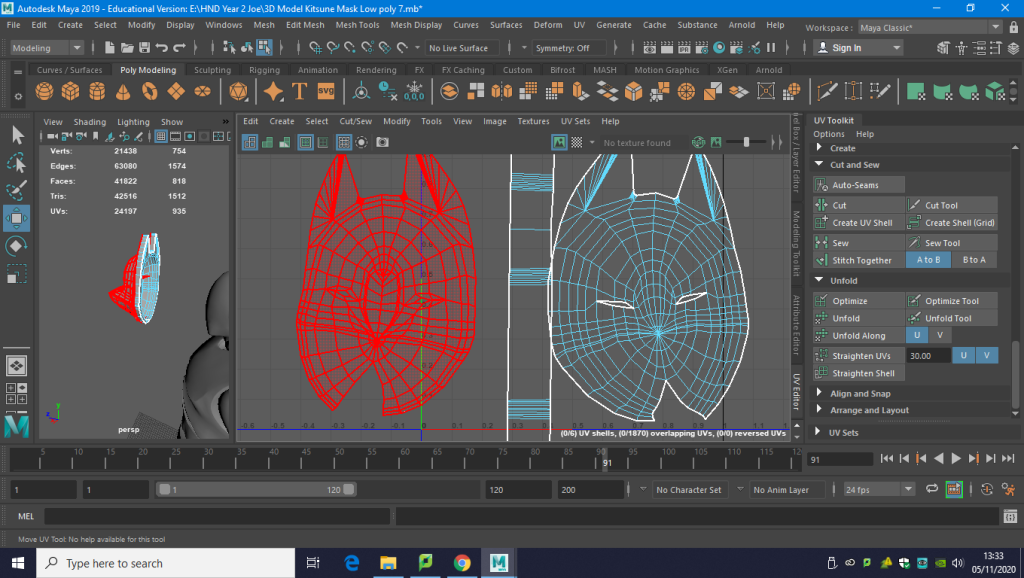
Therefore after separate the UV shell in the UV editor view port I click the drop down sub menu Unfold then in the UV editor view port I selected and highlight all the UV shells of the mask and in the unfold mein drop down I click unfold or Along and test unfolding with U and V button in the unfold drop down menu to get the UV she’ll as square as I could get them this required some adjustments in how unfold them as I can click the unfold button or unfold along and also selected the U and V buttons respectively to get the desired unfold for my UV shells.

Next to get so that the texture of the UV unwarpping don’t look distorted I must go to the sub menu then scroll down to texel density, first selecting one of the UV shells then click get the texel density of that UV shell which will make the UV she’ll big in the UV editor view port after select that highlight the rest of the UV shells and making sure all the rest of the UV she’ll are the same texel density as when it comes to texture the model it dose not have a bigger texture density in the middle with would result in the texture being different size and distorted so it is important that all the UV she’ll are the same texel density.
In conclusion by click the checked icon in the top shelf of the UV editor view port, I looked around in the 3D view port to see if there were any scewing on the middle of so I would do some tweaking by doing the unwarpping process over again until very was square thought the UV shells and too get rid of an scewing in the UV shells.as you can tell by the screen shot above there were no further scewing as looking with the checkerd texture turned on the unwrap was as square as I could get it.
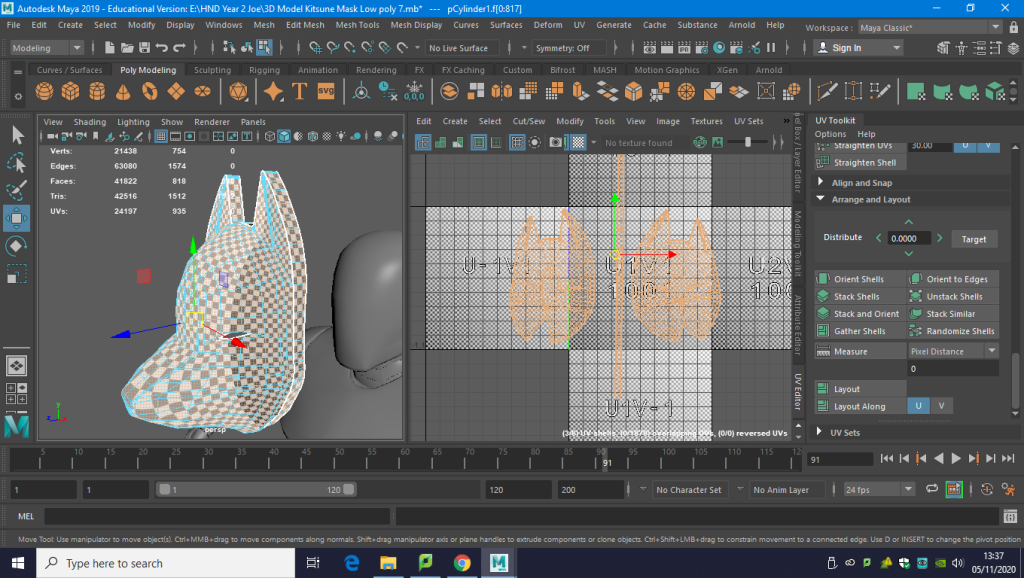
Finally in succession with get the Unwarpping process finish I need to layout the UV in the 0 to 1 space/ grid to do this I went to the Unwarpping tool kit then under the sub menu arrange and layout I click the layout button which put the UV in the 0 to 1 UV grid automatically.

With the UV layout I made some finally adjustments to the layout process. By right clicking layout button in the UV unwarpping tool kit a sub menu will open up; I felt like the UVs were to close to one another so with the sub menu I open up I went to shell padding option and change it to an spacing of 5 which will make the UV shells in the 0 to 1 space not touch each other then apply it by click the apply button and layout the UVs again with this spacing between them.

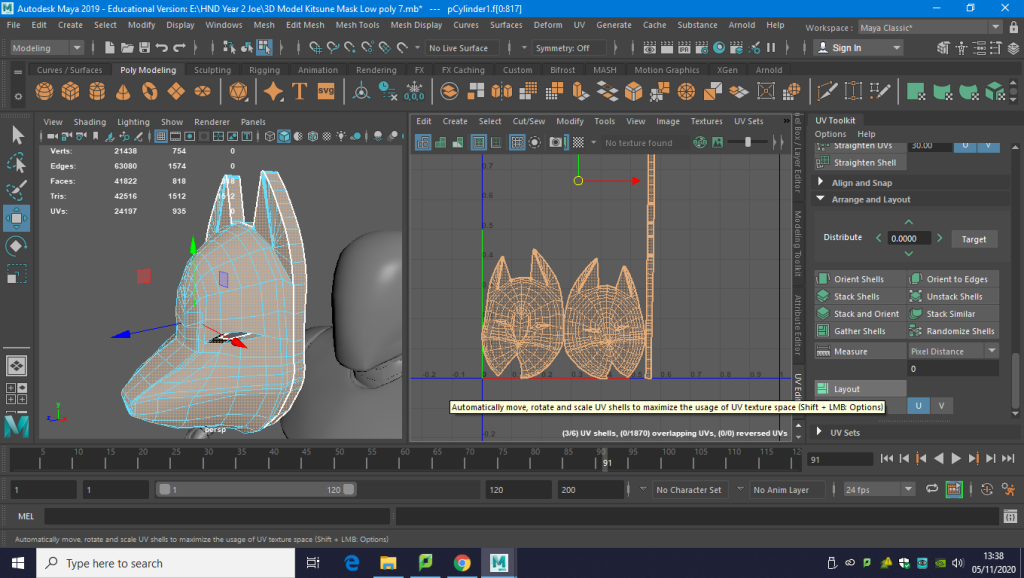
I made some alternative adjustments to my UV process as I realise I could get rid of alot of semes by reaching the base of the mask to the front by using the see tool or for shortcut shift left click to move and sew the UV she’ll together so instead of having 3 separate individual UV I would have 2 UVs and less seames on my model while still keep all the detail in the model via its texel density and without an further issues such as scewing. After doing the same process I finally got an even better UV and Un warp as you can see in the above screen shot I then realised like how you could unwarp a character module face you can join the to up side by side by using the move and sew tool to get one complete UV as see above in the screen shot.
Texturing Process.

After importing My Mask into Substance painter i looked closely at my reference images of the mask to mimic the supposed material it is made out of. Thought research i found what a traditional kitsune mask is made out of here is a link of where i found out what materials a traditional mask was made from. The materials that the mask is most commonly made from material such as clay, dry lacquer, cloth, paper and wood but now days plastic. I obviously had to take into consideration which materials the mask would be made of as i try to mimic and get a high resolution texture as possible to get the realism of the prop as its like in the reference images. i could not find a good substitute material that fit the research i found so i had to go with a plastic material as my basis of my masks main material as shown in the above screenshot. Please note that there were two types of reference images with change to the material that the kitsune mask was made for one being a Glossy plastic.
Here is a link to research into what material a traditional kitsune mask is made from: http://halimk.iics-k12.com/2013/05/20/masks-of-the-shinto-religion/#:~:text=Kitsune%20masks%20can%20be%20made,and%20exaggerated%20eyes%20and%20pupils.)

Choosing the desired base material for my mask i had to get the colour of the mask. to change the colour i went into Brush option on the selected layer of the plastic matte pure layer scrolled down to the base colour and change it to a shaded white.

To see what my mask would look like with the patterns on it and as a rough guide like of where i want my pattern to be, i made another new layer with the same base material and colour. in the layers submenu i added a paint layer to paint on a rough outline of the patterns of the mask as this will help me place and paint the alphas.

I want my mask to look hand crafty as it like in the reference material and painted by hand so to get this desired look i used Alphas to mimic the patterns of the mask found in the reference. i experiment with some of the alpha already available but none of the alpha match the look or pattern i wanted the mask to have so i decided to create my own Alphas in photoshop.

Here is me create my own resource in PhotoShop to get the alphas pattern i wanted then print them on to my kitsune mask. before get them into substance i had to import them as PNG File them added them as Alphas in my current project in substance painter to then access them via the shelf in Alpha sub menu.

i also experiment with the brush setting and change the metalic, roughness, and height of the Alpha to get the desired effect of the Alphas being painted on instead of stamped . using these setting i strike a balance between them to get the painted look for the patterns i used the height setting to make it either look like it going in or popping out in detail however this is purely the illusion of detail it is all painted on to the model itself.

To used the Alphas in substance i have to go to the selected layer i want the alpha on go to the brush setting in the lower sub menu scroll down until you see alphas with the black and white icon of an alpha click the selected alpha you want in the shelf under the sub menu Alphas the drag the alpha you want it to the alpha icon. you can change the colour of the alpha in brush setting under base colour.

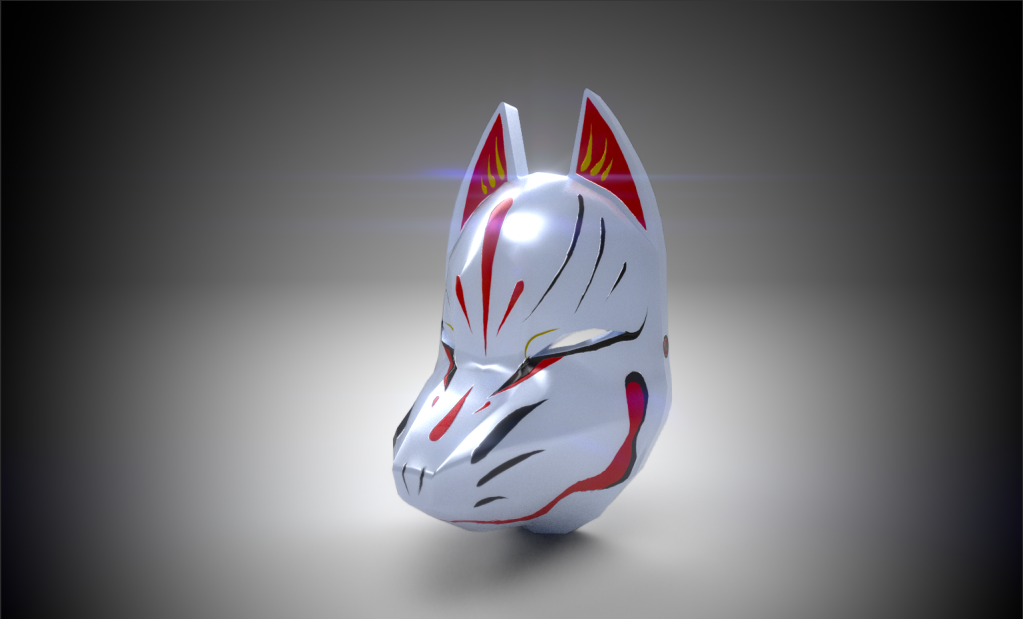
Here is my finalized modeled rendered in Substance Painter.
Modeling Wooden Katana Low Poly model.

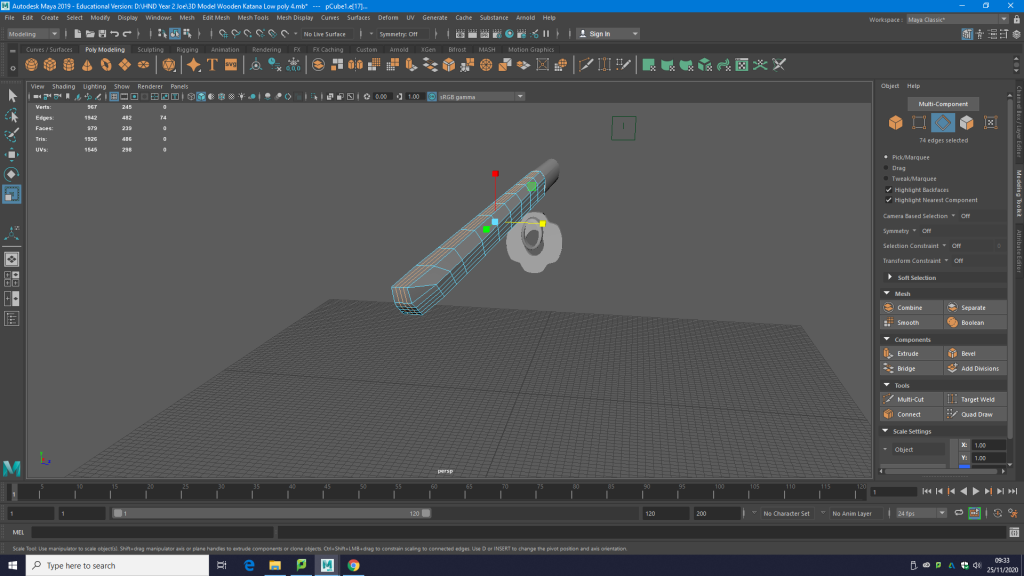
I used a cube and a cylinder to block out the base of the Katana, using the move and resize tool i shape the basic form of the katana as an starting base the cube is the blade and the cylinder the handle of the katana.
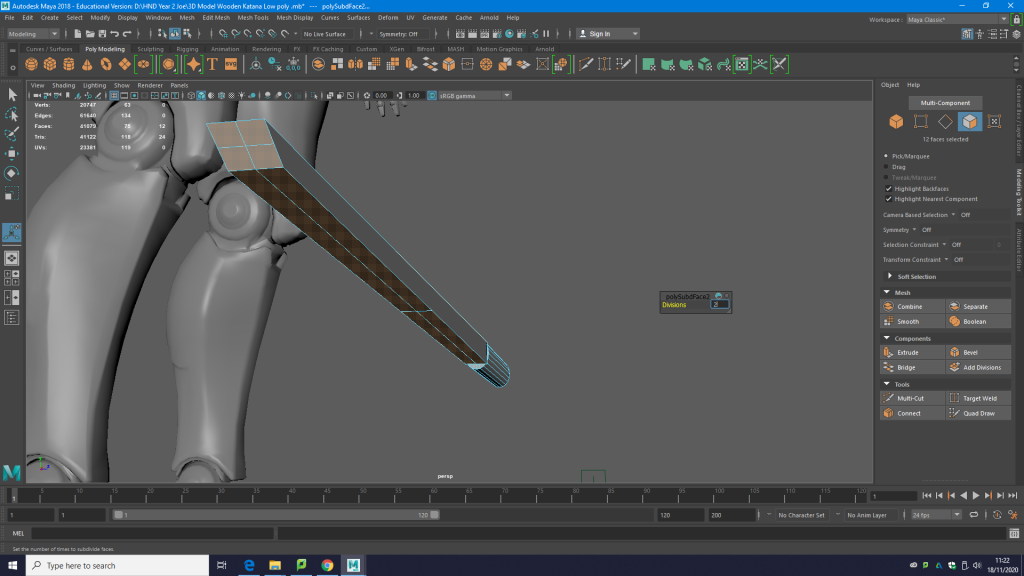
After getting a basic shape of the Katana i started sculpting it out. I selected the faces of the elongated cube which will eventually be the Blade, and using the Add Division Tool i created more geometry on the surface of the elongated cube, using the sub menu division decide how many divisions i need on the cube surface which i added 2 sub divisions.
Using the multi- cut tool i added more geometry manual to get the desired shape of which the katana will take on.
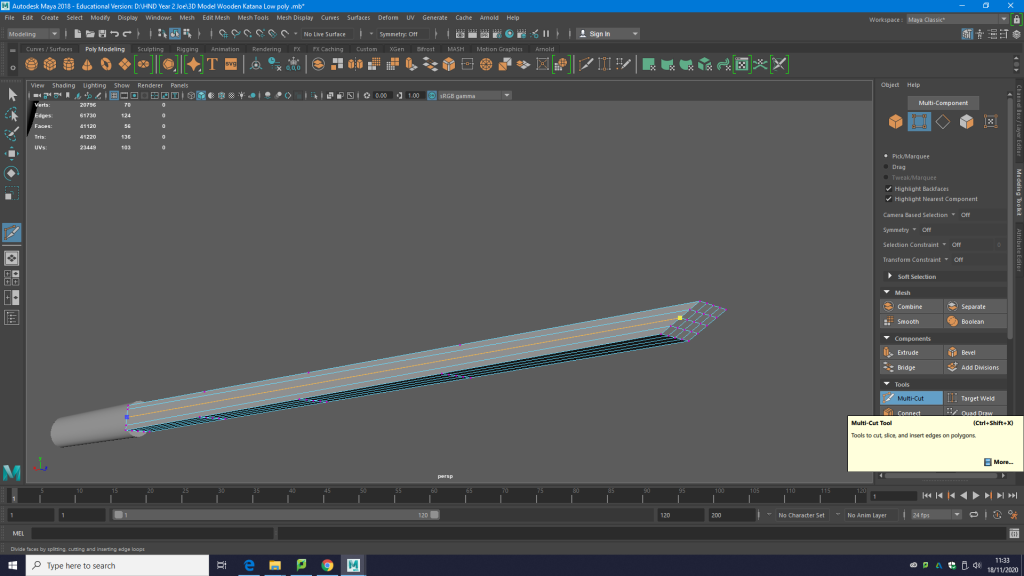
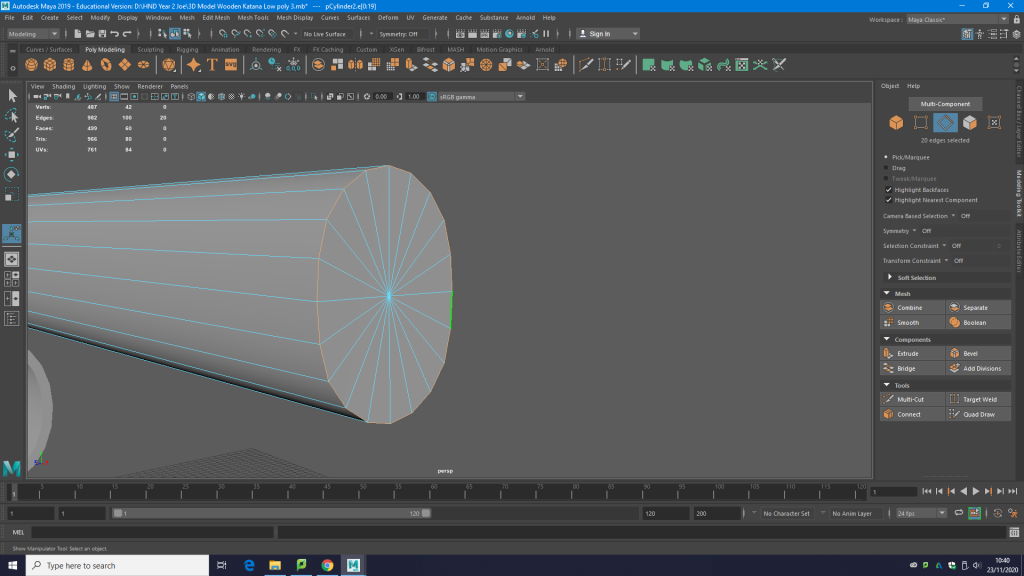
I also used the multi-cut tool to added additional edge loop around the blade part of the model as i will be sculpting the curve or arch in the blade of the katana.
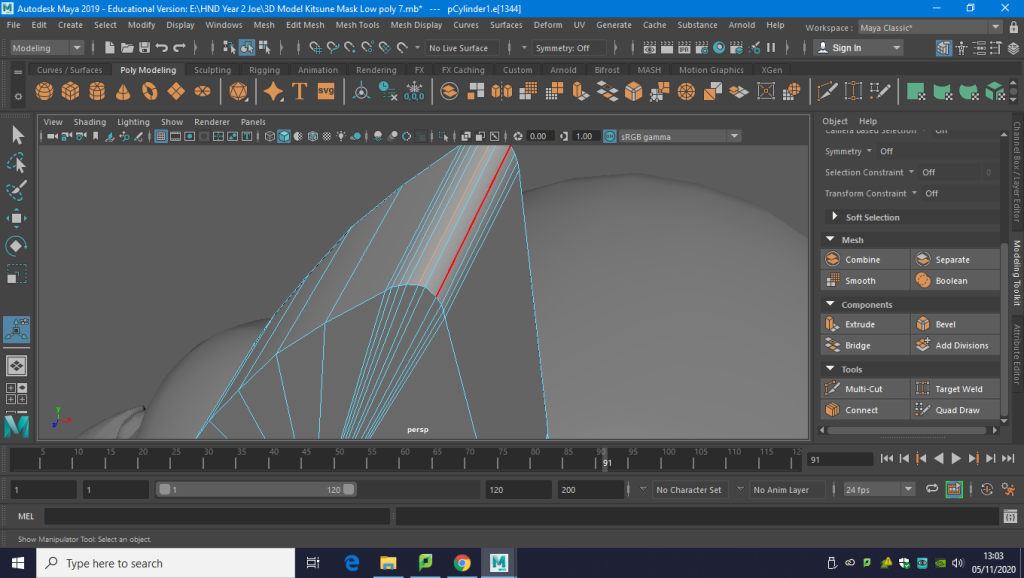
Finally getting the block layout of my katanas shape i stared refining the shape of the model and the blade of the katana. I started by selecting the edge loop around the center of the model of the blade of the katana.
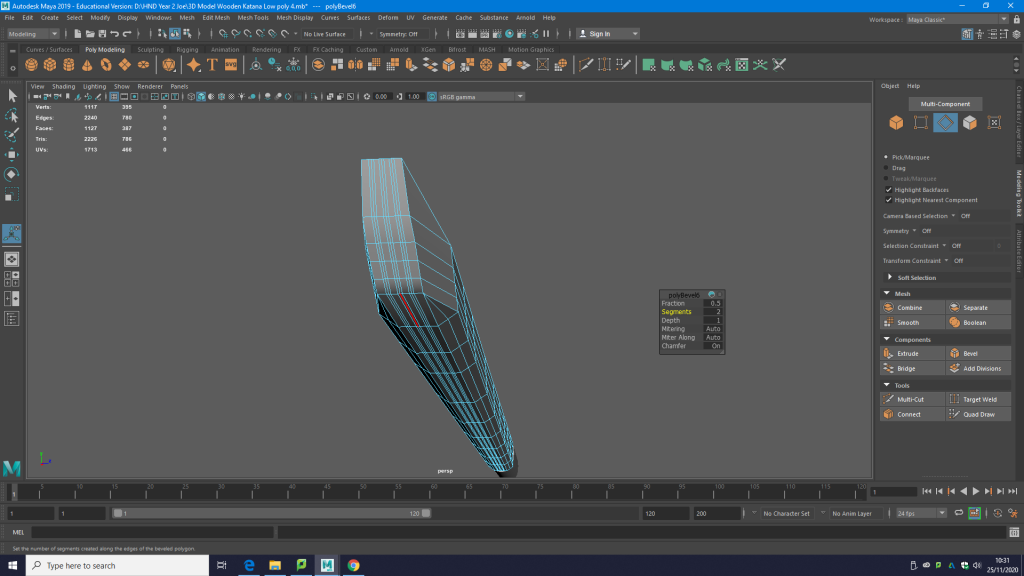
Then using the bevel tool i beveled edge loops around the center of the blade.

I used the multi-cut tool i add more sub division to the center of the blade as i need these edge loop to get the curved shape of the bladed edge of the blade as it is curved in the reference images.

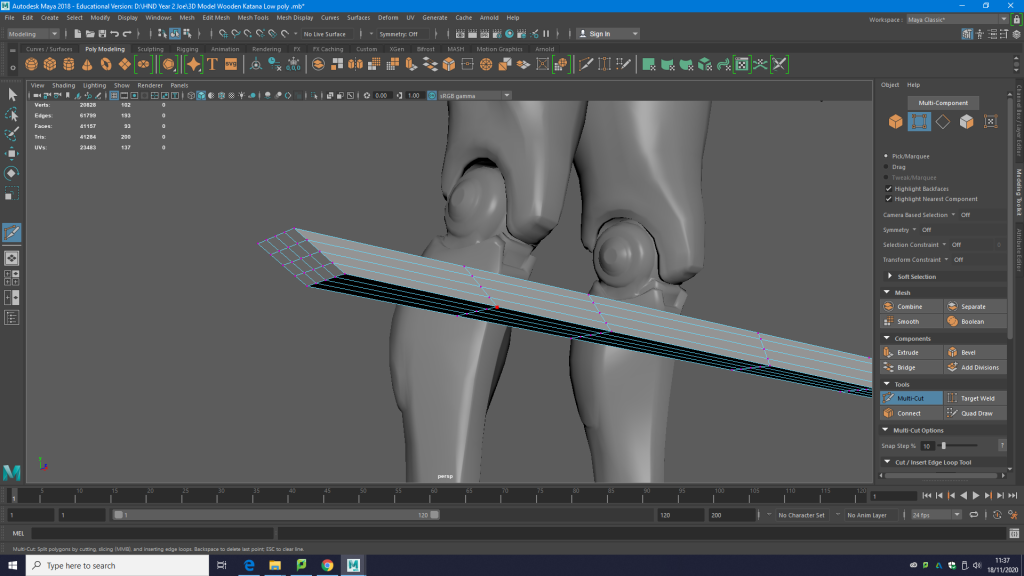
Here i manually selected the edge loop of the center of the blade and using the move tool move the edges at the bottom of the model to get the curved arc shape of the wooden katana bladed edge.

Here is the blade edge curved after manual move the edge loop to get curve shape of the bladed edge.

I used the multi-cut tool and holding shift and ctrl key to make a edge loop around the model going to down the sword as i will need them to make the blade curved.

As i was going to attaching the cylinder handle to my cubed bladed i realized that the geometry did not match so using the multi-cut tool i added the necessary geometry to that geometry would line up with the blade and the handle.

I then selected both the blade and handle of my sword using Tab key and highlighted them and selected the Blade and handle.

Next i selected the combine tool which combine the two object so that their are together when you select them as shown above screenshot.

I then when to vertice mode and target weld the vertices of the blade to the handle to for the sword and so that they are not separate from each other.

This is me manual trying to get the curve of the blade of the katana using the move tool. i did not like the shape of how it turned out and doesn’t mimic my references curvature, so i decided to started over again from a previous save file.

I selected the Face of the back of the Handle,as i need to add a slight scuttle detail to the back of the blade where the blade as a lip peeking out which separates the handle and the blade.
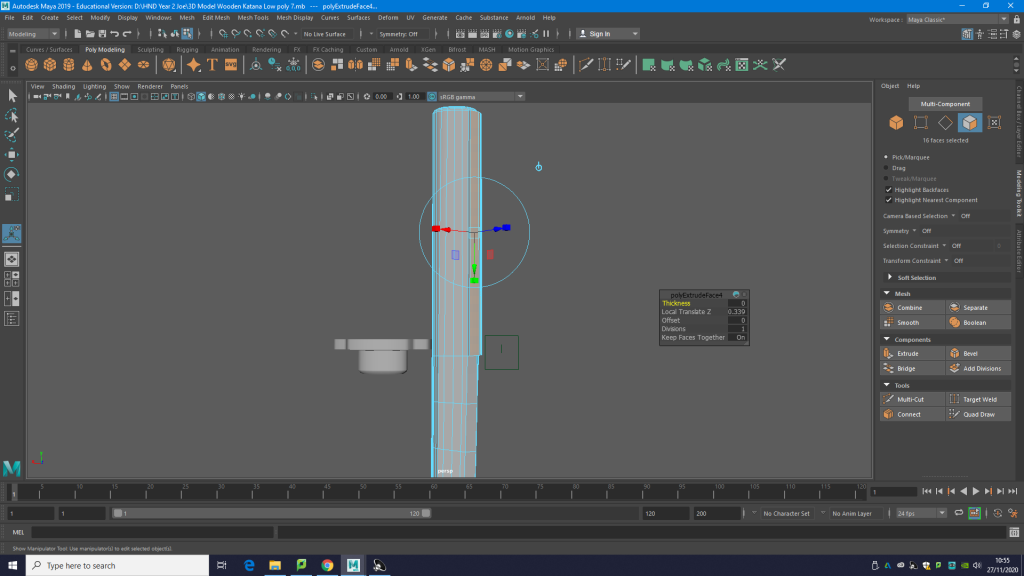
Next i extruded the face of the back of the handle the form the lip where the handle meets the blade as shown in my in my reference image.
I used the Target weld tool in vertex mode to get rid of the unneeded geometry and keep the hanging extruded lip where the back of the blade meets the back of the handle of the Katana.
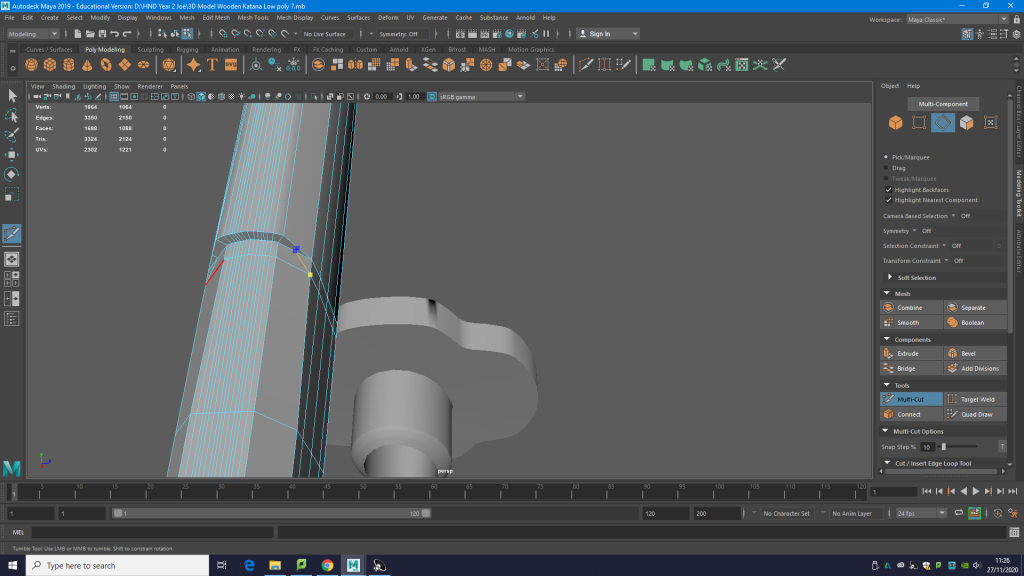
Were i used the multi-cut tool to get the slanted edged which connects to the lip where the handle meet the blade as shown in the reference image. i made sure that no Ngons were created in the process of using the multi-cut tool. making sure that the geometry quarded and the topology was clean on the model.

Here is me make sure that the multi added geometry did not make any N gons within my model by joining the multi-cut added geometry up the hande and connecting to center of the handles geometry.
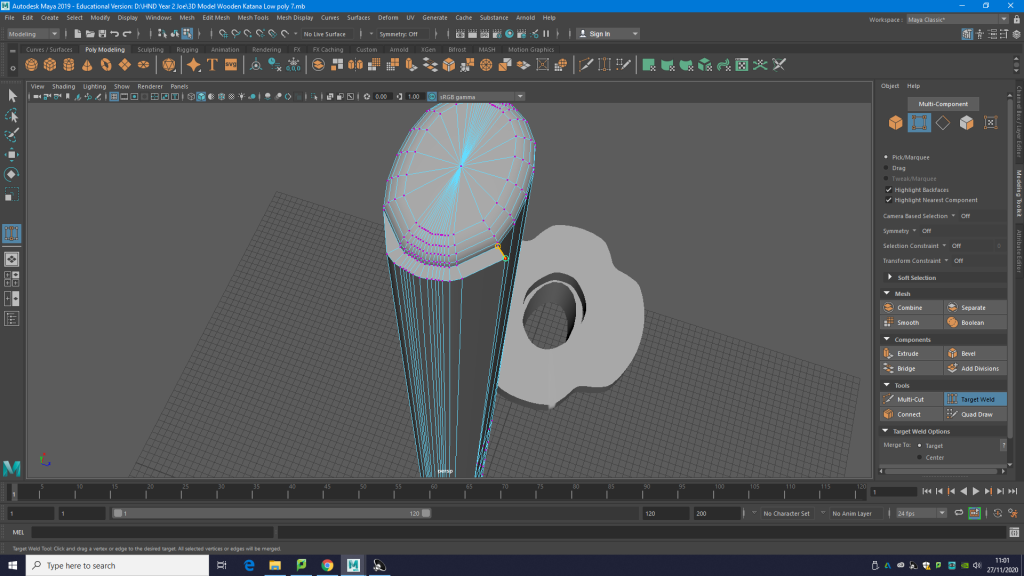
I then went into face mode and selected the triangulated face of which i created with the multi-cut tool.

I extrude the triangulated face with the extruded tool as depicted above.

i went into vertex mode and target weld the extruded triangulated face back to the main part of the model. Making the lip of the slanted edge, where the hanging extruded lip meet the edge of the blade.

Selecting the edges of the handle where in meets the slanted extruded edge lip and going into mesh display i hardened the edge to get the hard edge on the model.
Then going into edge mode i selected the edge of the lip of the handle going down to the back of the blades spine.

Then using the bevel tool i bevel the selected edge of the lip and down the back of the blade spine until the bladed point, i proceed to add 4 segment of geometry to get the desired look and curvature of the supposed edge.

I notice i made a few ngons when i bevel so i clean them up with the multi-cut tool. The selected highlighted face are where the N gons are, this is for both side of the model.

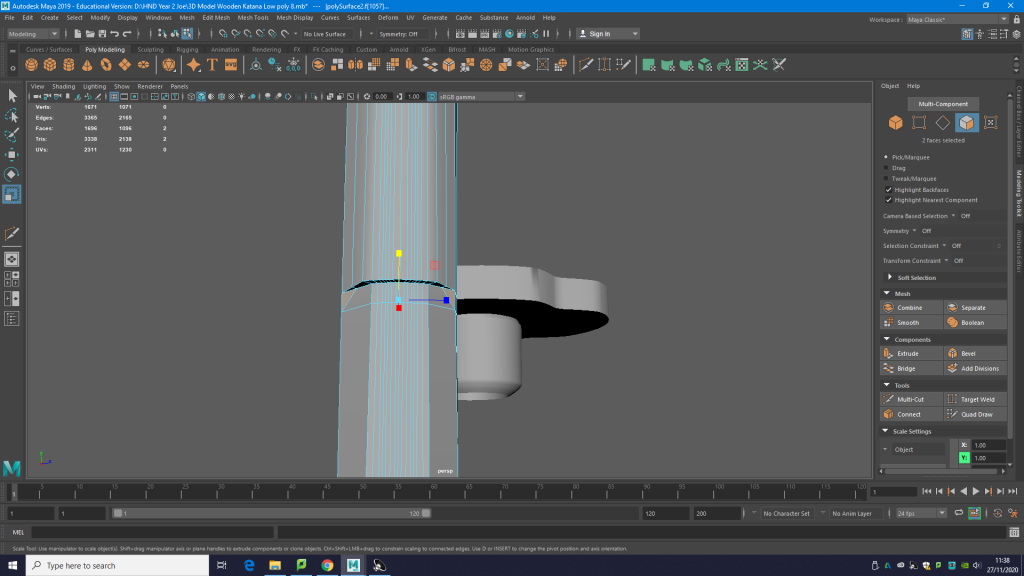
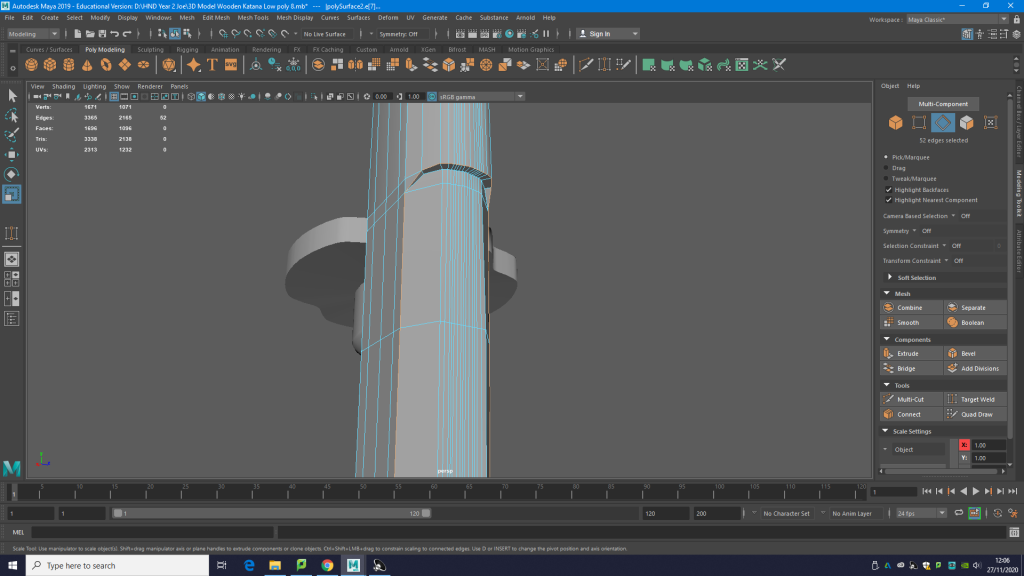
I realized the the blade of the wooden katana was slightly bent, so i manual selected the edge loop going around the model. Using the move tool on the selected edge loop and looking through the side view port (in screenshot Below) i managed to manual get the blade of the katana straight.

Screenshot of the side view port perspective of my model of my katana.
To get the image up in Maya so that i can copy and get the shape of wooden katana i selected the view all port icon which can be found bottom left under the resize tool icon.

This icon is to view all viewport for Maya.

Then go it to the side view port which is the biggest viewport seen on the screenshot above.

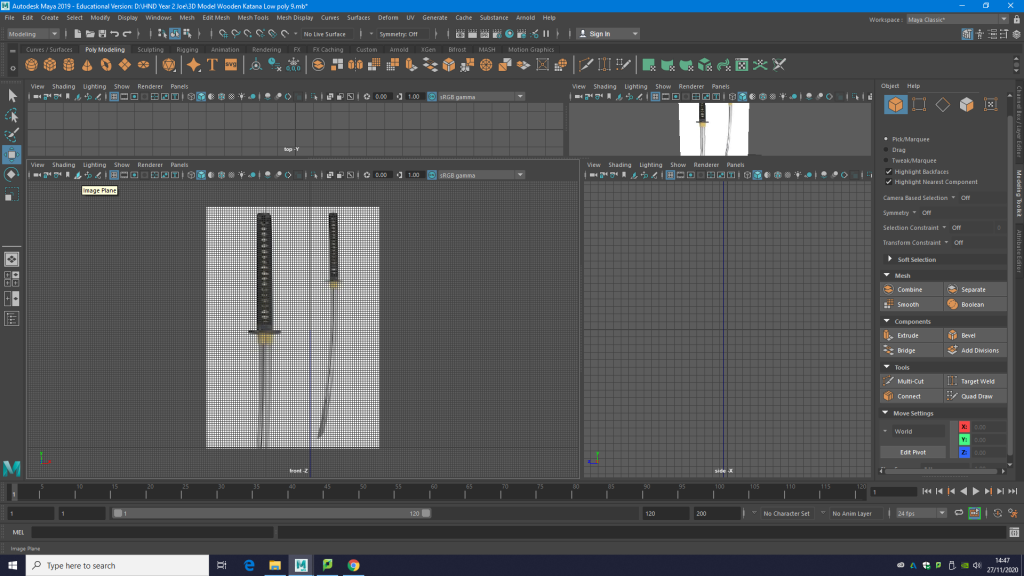
After move to the left hand side on the side on viewport of my model i click this icon image plane. when click this icon a sub menu should open up to go through any file where i have save my reference image.

Here is the sub menu open up allowing me to select the chosen image form where i have save it and opening it in maya and will appear as a plan. after get the image up i used the scale tool for the image plane to get it to the size of my model katana to then start on curving the blade as i will need the image plan as reference to where the blade starts to curve.

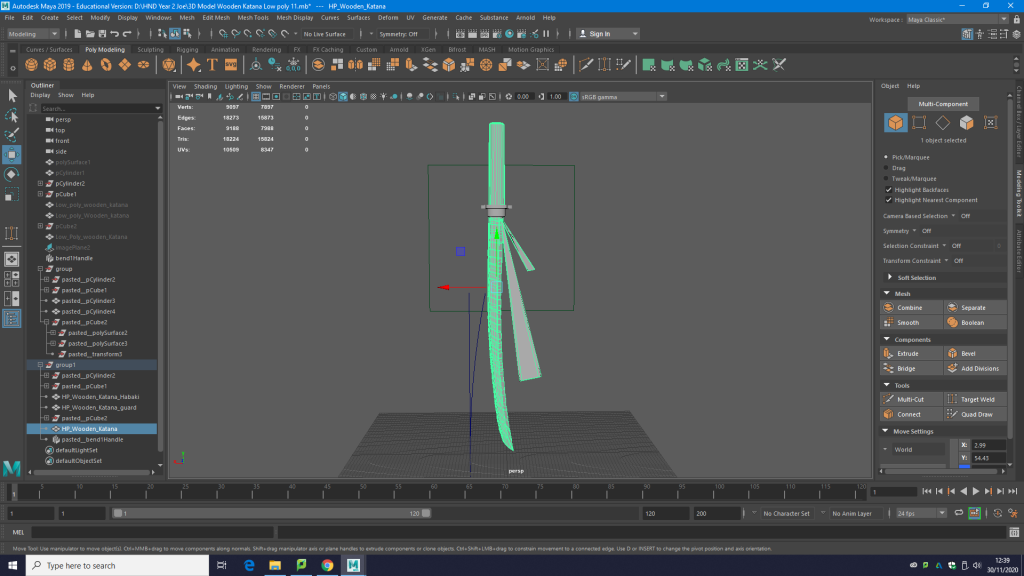
Instead of manual bending the geometry of the blade into a curve i learn a new technique to make the curvature of the blade i wanted. I went into deform which is a the top of maya interface under the shelf. When going to deform a drop down menu appear i scroll down to find nonlinear option and from their a small sub menu open up on the right, i selected the bend option found in their.

When selecting the bend option in deform setting it bring a line in the 3D viewport, by going on to the attribute editor and selecting the bend Tab and under the submenu nonlinear deform attributes they is option of curvature which allow wherever the line is place within the 3D object gives it curvature. I used this new found tool to get the curvature of the blade as shown in the below screenshot.


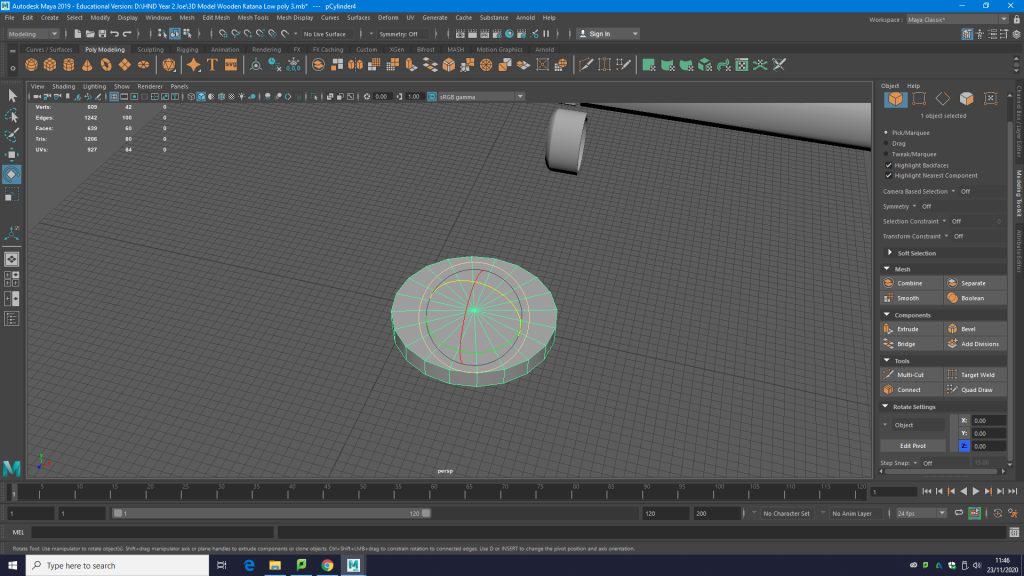
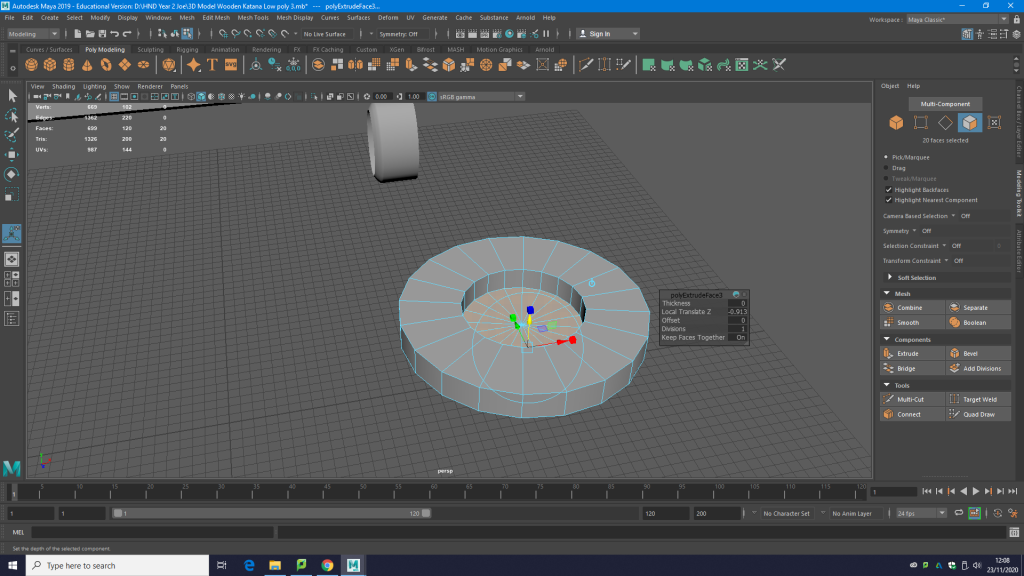
Getting the rough shape of the wooden katana i started on model the basis of the Habaki where the guard sits under and keep the guard inplace. I started by using a cylinder shape for the habaki. i decide to model the habaki separate for the katana as in my real life counterpart you can take the rubber habaki off as a separate piece for the wooden katana itself.

Next to get the curve shape of the rubber habaki i selected the edge of the cylinder and using the bevel tool bevel the edge, as to form the basis of the curve of the rubber habaki and its general shape.

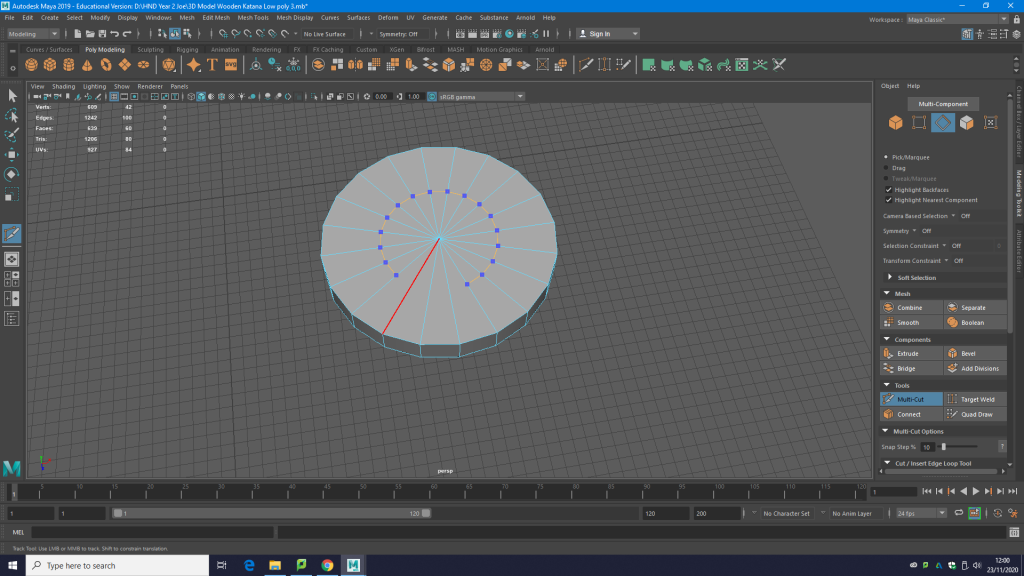
Next i went to the other face of the cylinder and using the multi cut and hold shift key made another circle of geometry round the middle face of the cylinder.

Then using the scale tool i salce the edge loop in the cylinders face to where i wanted it.
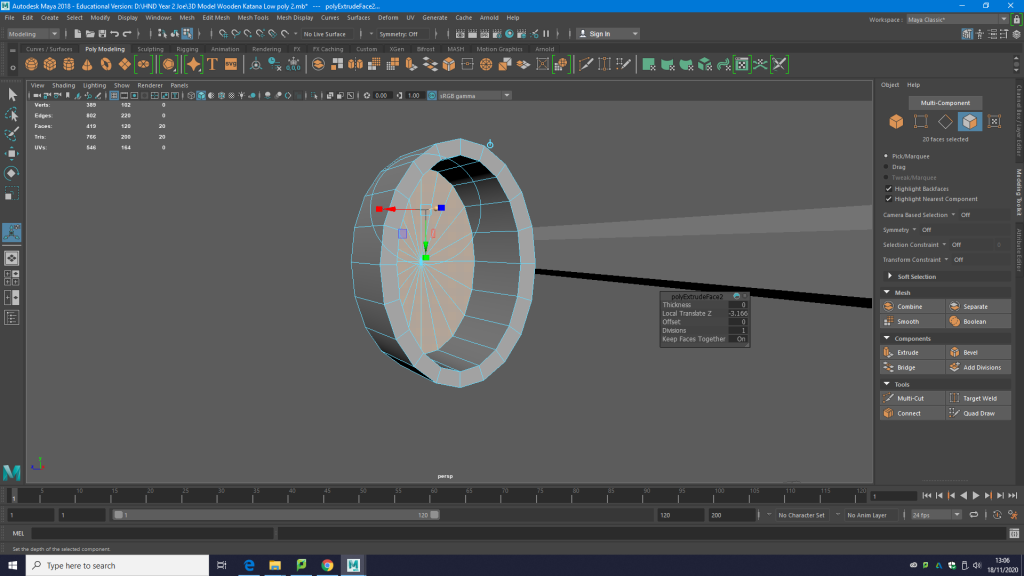
I selected the remain face in side the edge loop on the face, then i extruded (using extruded tool) inward to make a hole inside the cylinder.

I deleted the remain face of the cylinder i didn’t need.

Using the target weld tool i welded the vertices which was creativing to the plane to the beveled edge of the cylinder.
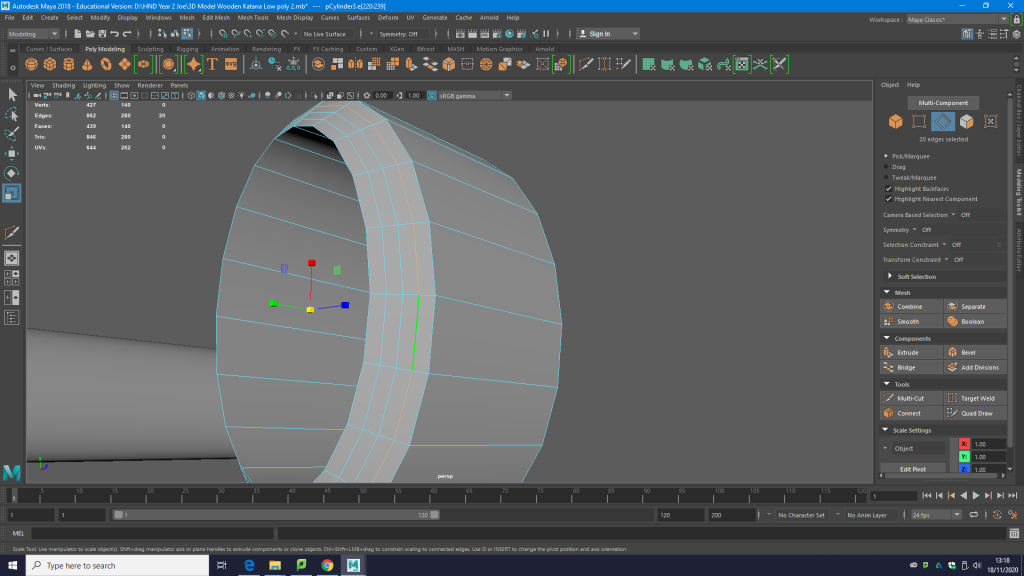
I then proceed to add edge loop around where i had beveled. At that point i use the scale tool to adjust the edge loops to get the curve around the lip of the rubber habaki.

i selected inner edge loop where it started to curve and bevel again to give that curve which the rubber habaki has in the reference images. I also bevel the edge loop which was near the lip of the habaki.

Here is the rubber Habaki part model for my Katana. After finish off the Rubber Habaki i moved on refining the shape of the Handle.

I change the shape of the cylinder/ Handel using the scale and move tool to get the shape of it found in the reference images i have taken.
I selected the end outer edge of the cylinder by selected edge mode and double clicking the edge to select all the edge loop.

I then bevel the selected edge loop and using the sub menu as displayed i added another 4 more Segments to get the curved edge shape of the end of the handle.

To mimic the hard edge around the handle as seen in my reference image, i selected the chosen edges i want to have a hard edge go to mesh display and selected harden edge to harden the edge on my handle so it sticks out.

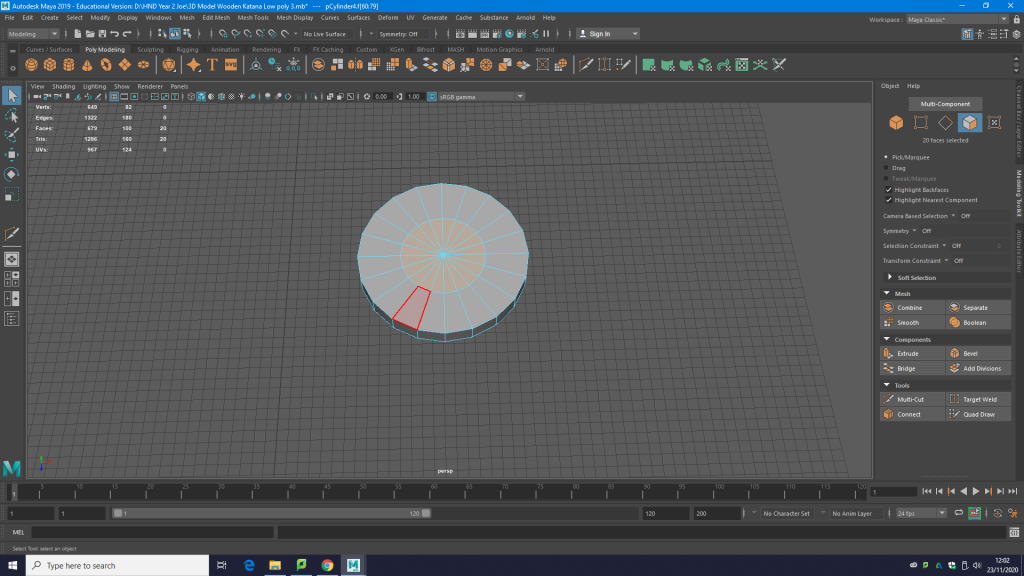
After finish the handle i started on the basis of the guard of the Katana to start off with a basic shape a cylinder which will be the bases to form the guard and its flower shape.
I used the scale tool to form the basis of the guard using a basic shape of a cylinder.

Using my main part of the katana as an sale estimate to how big the guard should be, in relation to the Katana and the Habaki.
Using the Multi-cut tool and hold shift i added and edge loop to both side of the cylinder.
Selecting the top of the faces of the geometry inside the cylinder surface.
I extrude inwards with the extrude tool to get to hole where the guard slides onto the wooden katana.

I manual Used Target weld tool to merge the vertices of the inward geometry to get rid of the turned inwards geometry i created by the extruded.

I selected the face of the unnecessary plan geometry and deleted it to get the hole where the guard slides on the Wooden katana.

Using the scale tool i shaped the hole of the guard to match the shape of the Katana and the rubber Habaki.
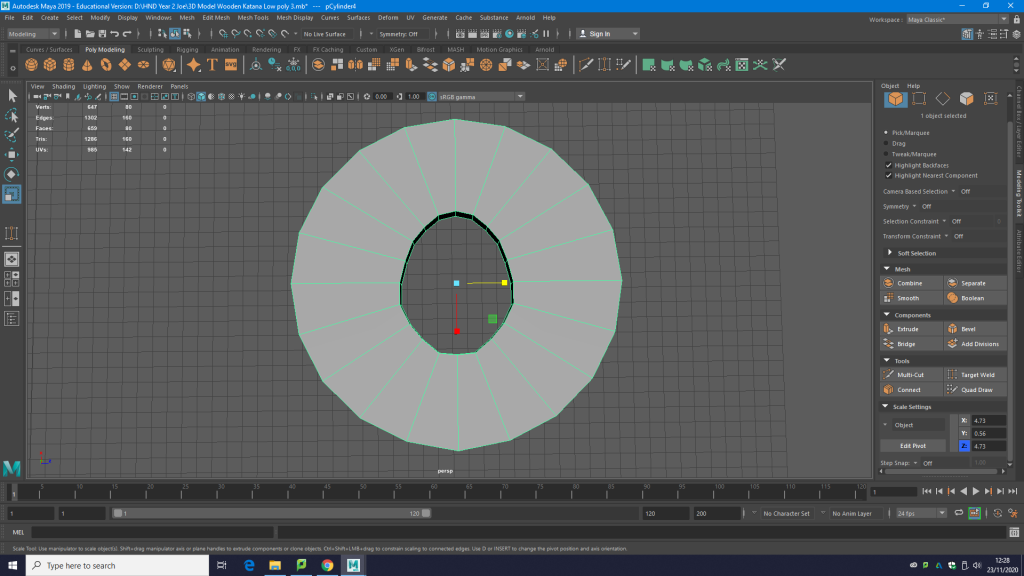
Here is the guard after get the shape of the hold like the reference using the scale tool and move tool.

I then selected the outer edges make sure they are symmetrical then using the scale tool move them inwards to create the flower guard shape as see in the above screenshot.

I then selected the remaining edges around the vicinity that gave the guard its distinctive shape.

I then proceeded to used the bevel tool to get more of a curved shape to the guard, added around 3 segments and using the fraction to space them out even and far apart. This bevel was preferable thought as i need the bevel to be far apart to get the more curved organic shape of the guard special around the perimeter.

I used multi-cut to manual add geometry and then used the scale tool of the selected added geometry to get the curve shape of the guards outer face.

I selected the large surface top and bottom edges of the Guard.

I then went into mesh displayed and selected soften edges as the edges on the two side of the surface were showing too much on what is supposed to be a flat surface.
Modeling High poly model of my Wooden Katana and Baking High poly on too Low poly.
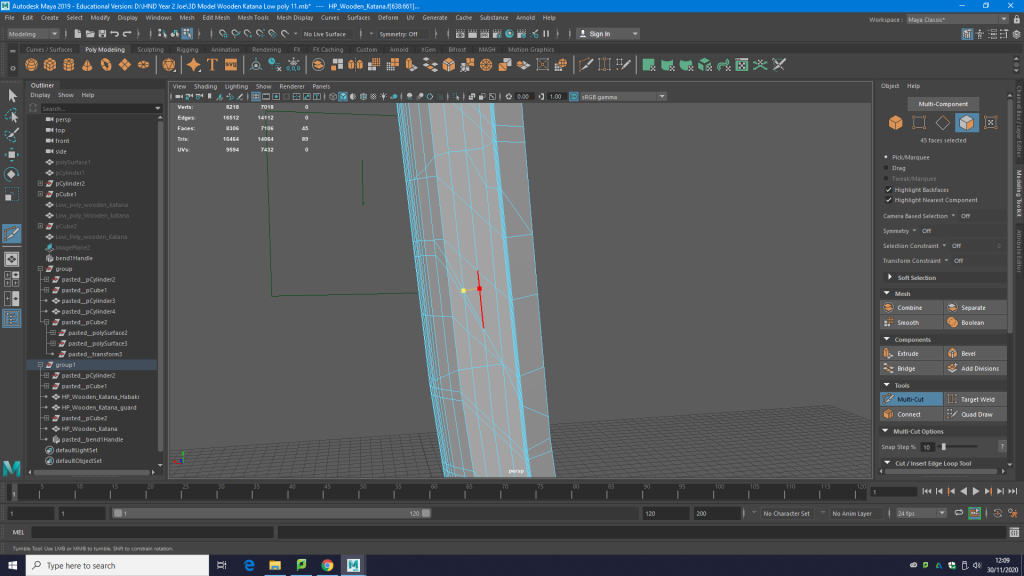
Using the Multi-cut tool i added the bandaged warp around the blade of the katana for my high poly model breaking it up to get the right look for it and to mimic the real life reference.

Finally to finish off my high poly model extruded the added geometry of the multi cut to get the depth of the bandages when it come to baking on the detail on the low poly.
Here is my end result of my high poly model and the detail of the bandage wrapped around the bladed of the katana model. i also extrude a face out to get the bandage trailing off the warp itself, as an added additional detail.
Unwrapping my Wooden Katana.

Open up UV editor in the top shelf under the drop down menu UV, to start to UV unwrap my Habaki for my katana. In the UV tool kit i went to the drop down menu create and went to camera based to get an good angle to start unwrapping my habaki. After getting an good angle shot in the 3D viewport for the camera base.

Went in to edge mode and selected the edge loop and the top of the habaki the bottom and the side and in cut and sew drop down menu in the uv tool kit click cut which cut the UV shell of the 3D object.

Next i holded right click, and went to the uv shells which allow me to select the UVs in the UV editor viewport.

After selecting the UV in the uv editor viewport on the right of the screen shot i continued to unfold them by going to the UV toolkit and under unfold drop down menu click the unfold along make sure to unfold U and the V and if necessary unfold option also. My unfold in the screenshot above turn out quite well as i put the seme in the necessary places and try not to use to many cuts of the UVs as you will be able to see the semes when it comes to texturing.
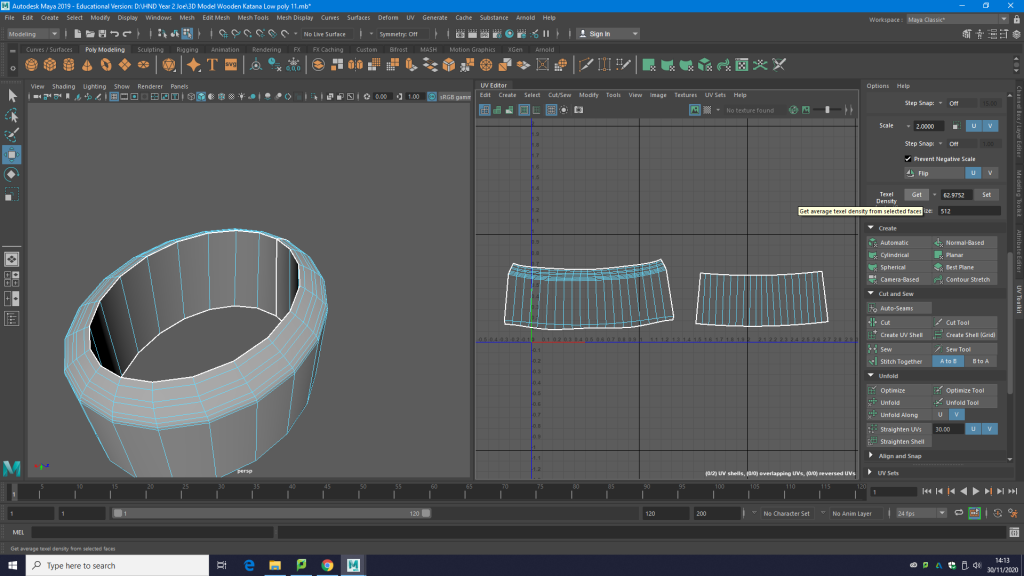
The next thing i did to make sure that the texture are not distorted when it come to texturing the 3D model is in the UV toolkit i went to drop down menu tool and get to texel density this maske the size of the texture the same so there is no distortion when texting. i get the texel density of the UVs shells and then selected all UV shells in the UV editor set them so that the are the same texel density for the UVs for the habaki.

I then made sure that the UV were not distorted i did this by clicking the checkered texture in the UV editor viewport and looking in the 3D viewport made sure all the UV are square and not distorted.

I layed out the UV in the 0 to 1 space in UV editor by going to UV tool kit then clicking the arrage and layout drop down menu and click the layout button. that my unwarp for my habaki for my katana done.

I did the same process with the guard of the katana. camera based the 3d object in the drop down menu create.

Go to edge mode on UV editor viewport via holding right click then went to the uv shells option as well so i could selected them.

I then used the cut tool found in uv toolkit under the drop down menu of cut and sew to cut the selected edges i have selected which allows the UVs sheel to detach in the UV editor viewport.

I separated the UV shells shell in the UV editor viewport using the move tool.
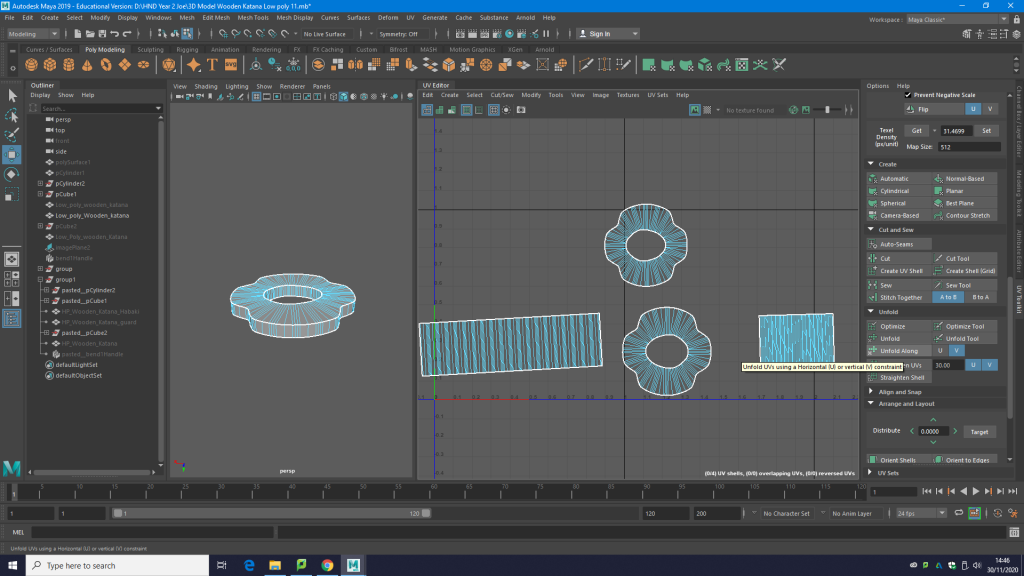
After the UV shell were detach i then unfold them using the unfold and unfold along tool found in the UV tool kit under the drop down menu unfold make sure to use unfold or along along with the U and V options too.

After unfold the guards UV shells i made sure the texel density were the same via going into UV toolkit and under the drop down menu tools going to texel density and get and setting all the texel density of the UV for the Guard

Finally i layout the UVs shells to the 0 to 1 space in the UV editor viewport. By going to UV tool kit and going to the drape down tab Arrange and Layout and click the layout button. This is my UV unwrap for the guard of the katana finish.

I camera base the main part of the katana first as seen in the above screenshot by going into UV modeling tool kit and click the drop down menu create then clicking the camera base button to get a good angle in the UV editor viewport.

I then right click and hold and went to edge mode to selected the edges of the model.

I selected the edge around the top of the handle and down the back of the blade to the tip and used the cut tool found in cut and sew drop down menu cut the selected edges.

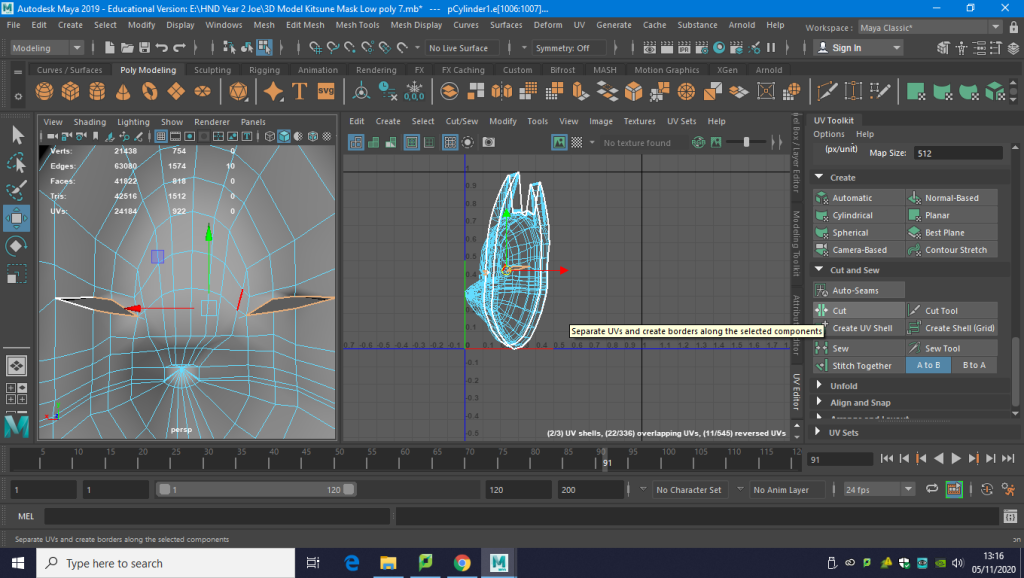
I went into UV shell mode on the UV editor viewport to separate the UV shells.

next i got the UV shell to the same texel density which is under the drop down menu Transform.

the texel density was at the bottom of the drop down menu i selected get texel density and in the UV editor viewport selected all and set them to the same texel density.
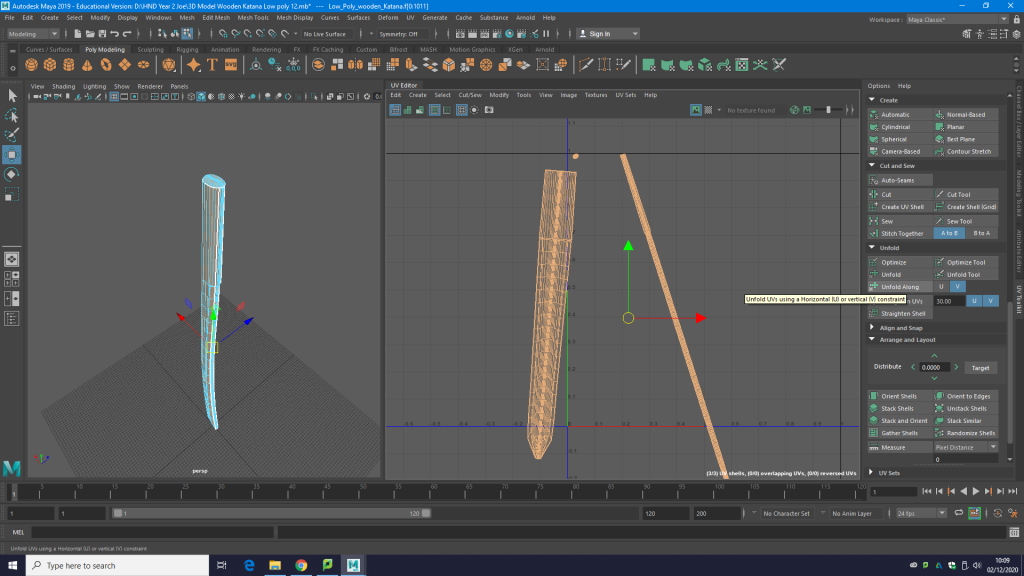
I unfolded the UV shells by going to the unfold drop down menu and using the Unfold Along, unfold and V and U buttons unfold the UV shells to get them square as seen in the UV editor viewport.

To check seen if the UV shell are straight and had no distortion i clicked the checkered texture in the UV editor viewport and looking in the 3D viewport made sure it was square. To make it more straight i went to the arrange and layout drop down menu and clicked orient shells to make the UV shell even straighter.

Before Screenshot Above.
To get an better unwartp and so their are less semes within the model i clicked the cutted edge of the UV shell ack of the blade/ handle and using shift key and right click to move and sew tool to sew the UV shell together to get rid of the semeas seen in the above and below screenshot before and after.
After Screenshot below.


I did the same for the cutted bottom of the handle. i selected two edges hold shift and right click move and sew. Make sure to change the texel density of the uv shells again before reattaching UV shells to each other, to get rid of unnecessary semes within the model this is important or the UV shell will be distorted when texturing.

Here is my UV unwrap and me reattached UV shell to get rid of semes that are not necessary within the model.

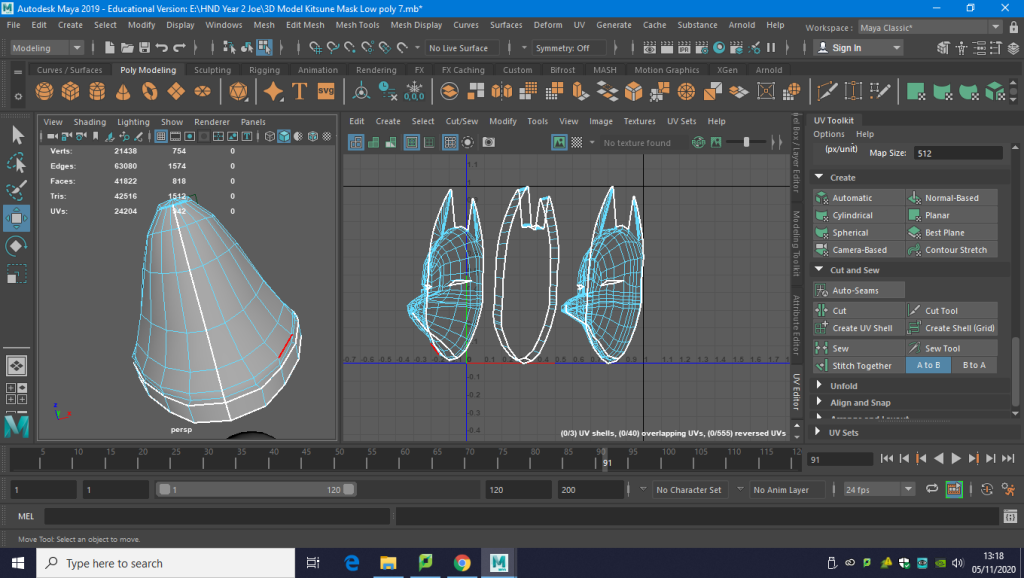
Finally i Layout my all my UV shell that make up my wooden katana by going to the drop down menu Arrange and Layout and click the Layout button at the bottom of the dope down menu to layout all my UVs shell in the 0 to 1 space.

This in me Layout all my UV shell with the layout button.

To conclude the UV process i shift left click the Layout button in the arrange and Layout in the drop menu. A sub menu pops up i changed the shell padding to the selected UV shells to make the UV shell not so close together when layout the UVs I apply this in the sub menu and re layout the UVs.
Colour ID for my Wooden Katana High poly.
I selected my high poly and colour ID it. This screenshot is full Colour ID for my high Poly model.

To colour ID my high poly model i went into face mode and selected what i want to colour ID like all the face of the handle as to keep it separated form the blade as that will be assigning different colour to that, so when it come to texturing and will be able to drag on the appropriate texture to the part of the model.

I hold right click then went down to assign new materials.

After click assign new Material a sub menu show come up i then selected Lambert in the sub Menu.

After creating the lambert and new assign material to change the colour of selected part of the model go to Attribute editor then selected the created lambert in attribute editor as shown in the screen shot then click the colour option to change the colour of the selected part of the model, i did this to all part of the model and given them all different colour ID’s.
Texturing my wooden Katana in Substance Painter.
High Poly to Low poly Bake of my Wooden Katana.
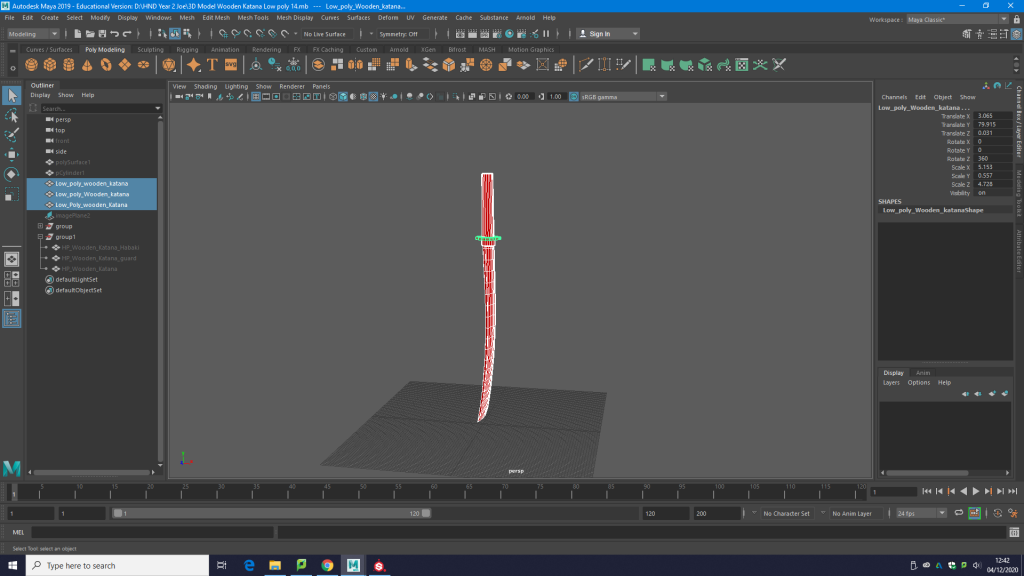
I selected the low poly model ready to export it into substance painter.

To export my low poly, i went to file then export selection a sub menu then pops up ,i change the file type to FBX file then save it in a place where it can be accessed.
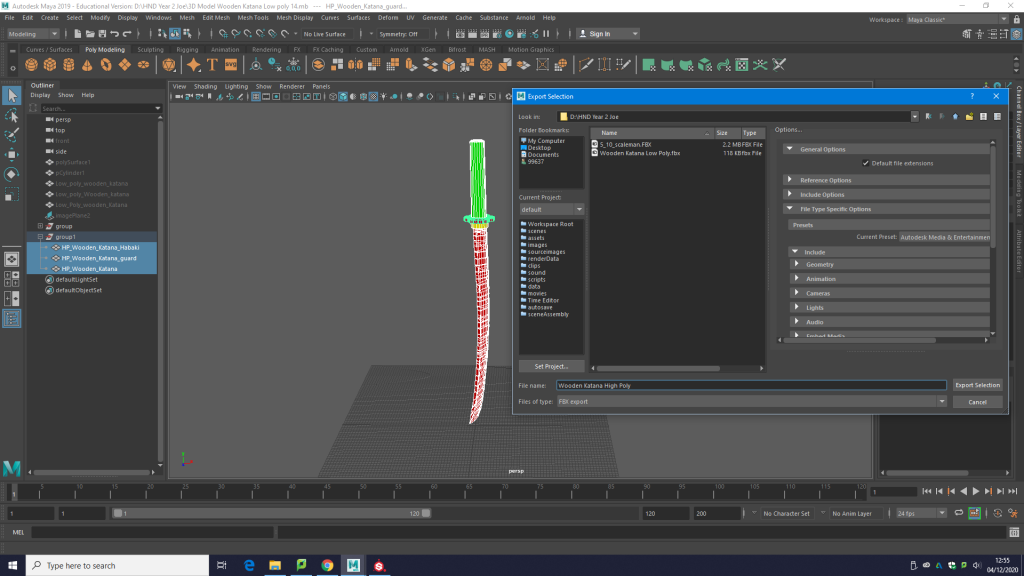
I did the same thing for the high poly model, file and export selection and change the file type to an FBX then saved the High poly.

I open up an new file in substance painter to export the low poly into substance painter i went to file and new a sub menu come up i can change the document resolution to 2K and then selected the low poly file of my wooden katana form where i saved it. when the low poly is selected click apply/ok button and your low poly model should appear in the 3D view port and UV viewport in substance painter as seen below.

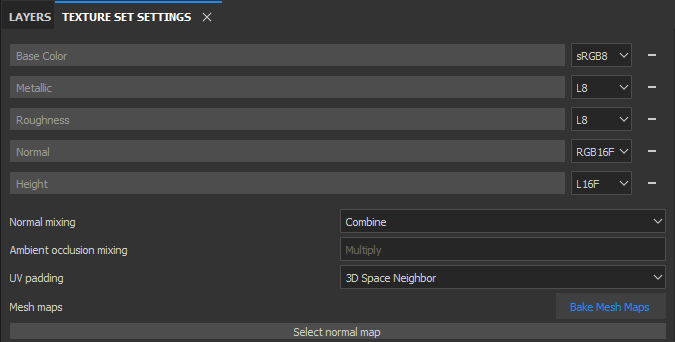
In substance painter when you have your Low exported, i then need to bake my high poly model on to the low poly. To do this i went to Texture Set Setting which is next to the layers tab.

The i Scrolled down and clicked the bake mesh maps button.

An sub menu show pop up like this, after click the bake mesh maps button. I change the parameter of the output size of the resolution of my texture to 2k.

Then went to ID option and change the colour source to material colour.
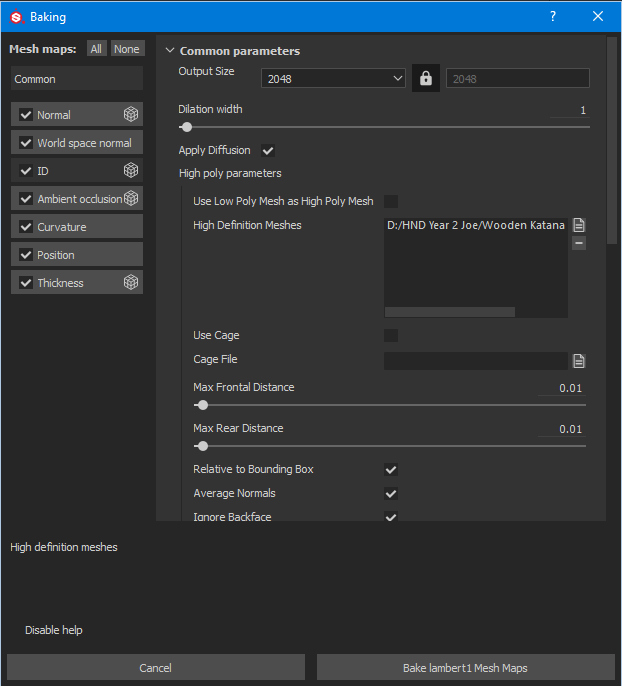
i went back to common parameters in bake mesh maps settings and where it say high definition meshes i click the file icon and selected my high poly model of my wooden Katana and it show appear in the black box under High definition meshes,

after all the settings are in place then click the bake mesh maps button in the sub menu window and my high poly was bake on to my low poly model. Here is a screenshot of my high to low poly bake.

i spotted on my guard on the handle their was a streak of light of my model in substance painter so i when back into maya to try fix it. I check the model moving the edges manual to see if it was the model and it edge loops also straight the edge loop again using the salcetool but it was not the edge loops of the model that was causing the light issue.

i went to face mode and selected the face that were shown the issue of lighting of the model and i deleted them, then i selected the edges in edge mode and using the bridge tool i bridged the face back on to the model where it was show that steck of light in the model.

This in me deleted the face of the model that was causing the issue of the lighted shadow in the geometry.

I used the bridge tool to fill back in the deleted face where the issue was showing up.

For some reason that fit the issue with the light and the model geometry as it was the faces of the model that were causing the the light issue of the model of the guard of the katana.
Draft Models.
Draft model of Kitsune mask Japanese Fox Mask.

Here is an early draft model of my mask which i did think that i got the right shape i wanted however the geometry in this unfinished version is lot clean compared to my other version. the other version however is the right shape and i have clean up the geometry and N Gons it may have had during final check before i imported it to substance painter.
Draft model of Chicago Chopper Gun e.g. Tommy Gun.
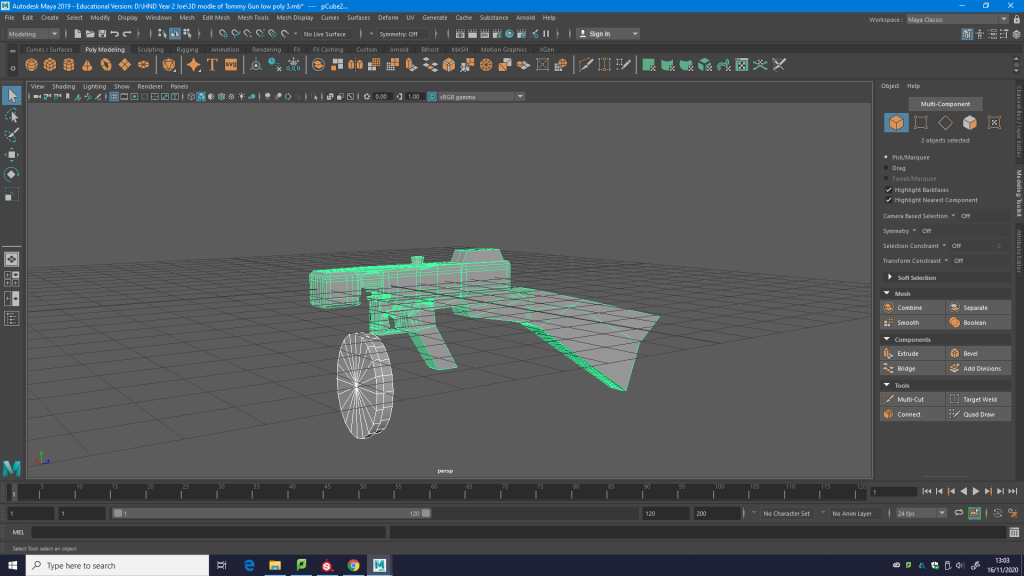
Here is an unfinished model of an submachine Tommy gun with the drum magazine. i thought about modeling something to this effect and got halfway through until i realized how complex the real life reference was and the amount of detail need to get it looking like a realistic prop that would be used in cutscene or by a character. I simply would not have enough time to model all the detail and UV unwrap and texture in time before the deadline and do a high ploy of the model aw well to bake on the detail as i want this to be 4k resolution an industry standard model and texture.
Draft model of my Wooden Katana.

This is a draft model of my katana, this did not end up being the final model as the model itself was to smooth and the shape was not right and the model did not match the reference at told, this was going to be original the basic of the model but drop it due to these reason. This model did take around 20 mins to do to test what the model would look like that is why this model is less defined and less structured in it overall shape, This draft model acted as a test.
What level of detail are you intending on achieving?
- Do you have enough time to produce a likeness to your reference? Around a few weeks to get draft model of both the props then to decide on an finalize model for the both props, then to make sure their are to the likeness of the reference material than an week or a few days to UV unwrapping both of the models then important them apply colour ID to model this is with the high ploy as well if I decided to model a high poly of just one of the models as that is more of an option for the main finalized module which would be most likely be the katana as to bake some fake detail on to the low poly prop. Then allowing an an day or two to test different textures set for both of the models to get high possible detail resolution as possible for the textures this would be along with the UV unwrapping process of both of the models then to export it in to substance paint ready to texture allowing rest of the time until deadline to test different textures of both props and get it close as possible to a realistic asset that you would see in game and that it resembles the likeness of the real life reference/ prop.
- How much detail do you really need? – Where will it be used? The detail on the kitsune mask in relation to modeling will be minimal as it is doesn’t have that much intricate detail though the middle itself .However when it come to texture i might be tempted to make a high poly with scratch and indentations as to it would be baked on the low poly to given it that detail this might also include apply different textures map one for inside of the mask and the other for the outside, as most of the detail would be on the outside on the of the mask than inside so apply different texture map to each of them would make it so that most of the detail would be save for the outside of the mask not the inside where the player will not see that detail and the character would be wearing the mask.As for my other prop the katana/ samurai sword most of the geometric detail would be put into the handle,guard end cap, ornaments and the curvature of the blade as not only will this asset be based off a real life reference but I will design and add a design/ theme to the overall design if the katana as I will also be taken other real reference as to implement them into the design of the/ theme of the katana of which would require most of the geometric detail being put into the model. The theme I have chosen for the katana is moon based with cherry blossom with the fruit cherry being a charm for the price or the ornaments. Out of the two the katana with have the most geometric detail. As for texture I will most probably do a high poly of the katana as to bake some detail on their to save Tris. I will additional be do different textures maps for each part of the katana as to get most of the hight detail resolution out the texture as this will be my main finalized piece. Most of the detail in texture maps will be placed in parts like the handle and the guard an endcap of the sword as that is where most of the detail lies with the weapon prop. Still nonetheless I might add detail up 1 quarter on the back of the blade as to appeal to the design of a Crescent moon shape however this will not be as detail as the guard, handle ,buttcap or ornament and charm of the sword.
Produce a project plan detailing what you will be doing each week until your submission deadline.
- My Project plan for realistic modeled asset and the rest of the Project.

- What is the purpose of a project plan? Consider games industry deadlines. The main purpose of the project plan is to keep colleagues on track to the deadline of their workload while making sure it is up to an industry standard and an continuous workflow between the department is maintained allowing the work to come together to make a comprehensive whole up until the game goes gold and it is ready to be released to the public. Allowing to schedule the workflow of department make things easier for production for the game to run and met clients and company deadline then for the game to get localized and rated upon its release.
Conclude what level of detail and quality of textures will be needed to produce a REALISTIC asset.
Tri count. For the Tri count for my my kitsune mask around 1000 to 1800 Tris for the low poly if I want to bake with a high poly my high poly would be 2000 to 4000 Tris for the high poly. The katana would be higher Tri that the other model as it has more detail overall so perhaps around 3000 to 4000 Tris for the low poly and high poly would be approximately 5000 to 6500 Tris this is the geometric detail I would want to reach and keep to when modeling my low poly. Especially it would be responsible if the high plow is a few thousand over as the high ploy is for the baking process. So it doesn’t matter about high poly to much as it preference and what the designer prefers.
- Not too much and neither too little tris. Suggest what could be considered ‘overkill’ and also what would be too low poly. For both of my module that I am choosing to model personal what would be considered overkill for a low poly asset such as my mask is 6000 Tris it is to much I say if I kept it around 2000 to 2500 or under that then that would be reasonable for a low poly for a mask. As for a more detail props such as my katana I would say overkill on the Tri count would be 20000 Tris I feel like 7500 to 11000 is a reasonable amount especially some do that detail any lower that this say like 1000 Tris would mean it not detail enough to get it look realistic same with the mask an low that 1000 Tri it would not look realistic and would look more of an stylish asset used for a mobile game.
Texture resolution as for the texture resolution of both my 3D props the mask would be ok with an 2K resolution texture while the katana an much or detail prop would probably need a 4k resolution texture as to achieve the realistic look that you would see in game like ghost of Tsushima as a lot of their textures are high resolution.
- What is the most suitable size to achieve realism in a game? 512, 1024, 2048, 4096…. I would say the most suitable size resolution to go for to achieve realism in a 3D asset for prop is any where around 1080 to 4k at max anything passed that is point less and a waste of time as the eyes can only see up to a certain resolution anyway.
How are you going to achieve a render which highlights the likeness to your real world reference? I will used natural light on both asset as to mimic the time period their were used in a real life scenario back in the 13th century Japan using unreal engine to render the model by make a scene form the feudal japan era to get an even more likeness of what you would see in a that time period, in order to highlight the real life reference and put in a real-life situation where it would be used within it render of the scene of the models find themselves in.
Lighting
- What lighting conditions would the asset normally be under? My katana an mask would be under natural light as to mimic the time period the weapons and mask would be used in which is 13th century Japan as they did not have artificial light as back then so the props would be under organic forms of light such as sun or moon light or that of a campfire or torches lit by samurais. As the katana would be used during battle general seeing outside use of where the sun light or moonlight would reflect on of the blade of the sword and the mask would be worn in traditional Japanese in afternoon and midnight during the festivals so more natural light would get to both props during the time that they were used that and open flamed candle and torched/ lanterns as another light condition as too mostly being natural light for the moon or sun.
- Analyse the lighting in your reference images.
The light in the reference of the kitsune mask is focus on the mask itself with a black background to absorb the surrounding light as not to reflect it can cause high exposure of the photo this is why it taken in a dark conditions as it would effect the photo if it did not have an decent exposure and the darker background then the light would reflex back to the camera leaving high light exposure the the photo would have blind contrasts of white obscuring the image. It would be even wider if the object was white also as it would reflect more of the light given an even high exposure. That is why in the reference image of the mask the light if purely forcing on the prop and it has that black background. The mask is posed in a way side on view, a straight on view and 3/4 quarter view perspective as to provide a detailed look of the mask for it key angle so all feature can be seen as shown in the reference images. The camera in the shot is purely focus on the mask for different angle and paned shots around the mask with a eye level shot for a front view of the mask. With other angled low angle shot point up at the prop mask as it is the vocal point in the shot. The shot themselves are of a close up shot of the mask.
Posing
How is your animal, or prop, posed?Where is the camera placed and pointing in your reference images? perhaps focus on one) (Done)
level of detail (LOD) the level of detail in terms of realistic asset would have a high texture resolution like 8K textures especial in realistic assets, however stylistic will alway be lower both in textures and tri count. the level of detail would depend on the port and hardware of what the game would run on for example take a model of a main character in a game would have more tri count and high texture resolution compared to environment asset within the game would be alot less. Every generation they can scale up the LOD of game both in the main asset like characters and weapons that will be used and seen often would be 8k textures resolution and environment asset would be 1080p resolution as the LOD would get better every generation as hardware would advance allowing much more detail texture and poly count unfortunately environment asset would alway be behind LOD the main seen asset such as characters or props that would be constantly seen on screen. Therefore though the level of detail in less detail asset would advance up in detail but the front runners will be the most seen asset would have more high resolution and an high level poly count.
Different 3D modeling software such as maya and 3ds Max are both similar to each other in premise of how the work and are the same company however 3ds Max is more open source update which a
Feedback from my model Pros & Cons Kitsune Mask (Fox mask).
Edward Marzetti-Ames Pros – Well Modeled, No engons. Good UVs Con – Fix bridge of nose, its flat unlike the rest of the model. Edited.
Feedback for Blog from Colleague Cheyenne.
- Very detailed references, just the tip we already discussed about grouping your photos together. You can then place them underneath your writing instead of at the bottom of the page.
- Finish the Alaskan malamute reference. Other references are very descriptive.
- You’ve written what you haven’t already completed, such as your project plan, distinction criteria for planning which is a good way of keeping track.
- You go into so much detail when answering every part of the brief, I’m sure you’ve met Pass, Merit and Distinction throughout all of your blog.
Upload.
Tri count.
Finalized model Kitsune mask Low poly: Tri count at 1512 Tris.

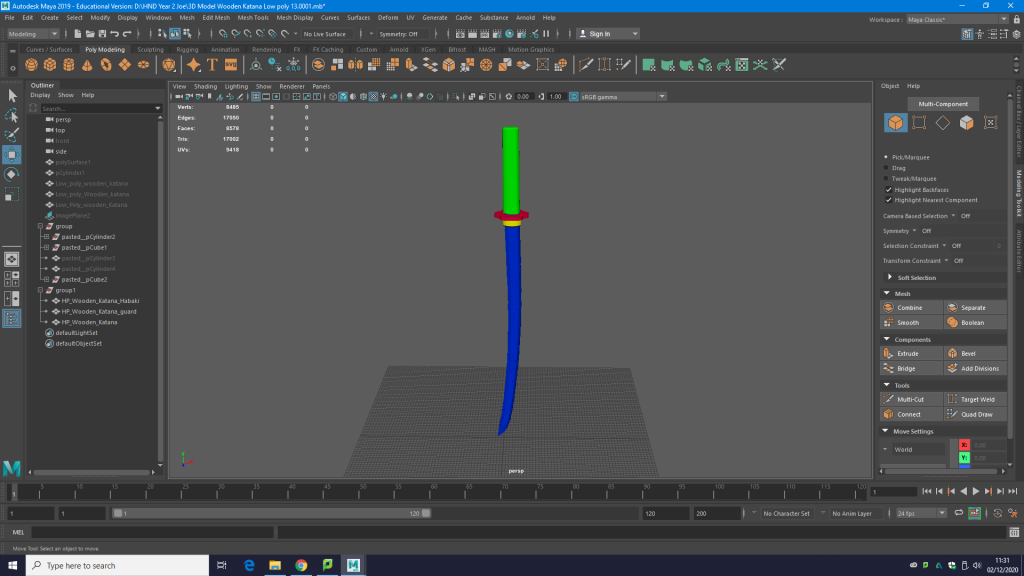
Finalized model of wooden katana Low poly: Tri count at 3180 Tris.

Texture Resolution.
Finalized Texture Resolution for Kitsune mask low poly: The Resolution Texture is 2k for my Kitsune mask in substance painter and when exporting it to sketchfab.

Finalized texture resolution for wooden katana Low Poly with a high poly bake: The resolution texture of my wooden katana is
My final beaty shot of my Wooden Katana rendered in substance painter.
My final beauty shot of my Kitsune Mask rendered in Substance.
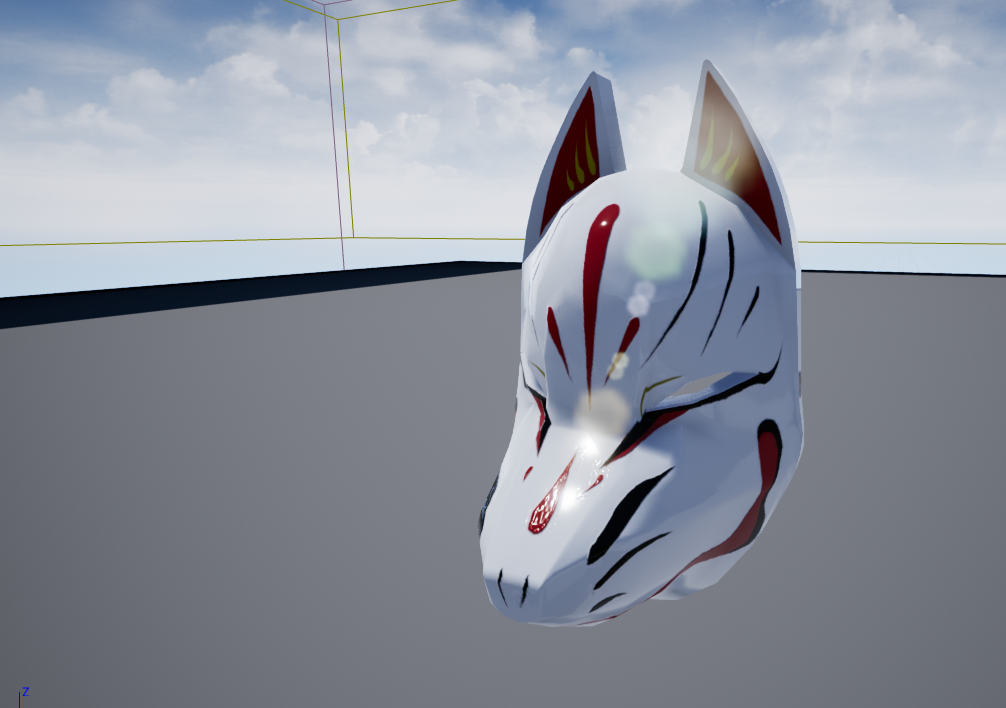
- Final ‘beauty shot’ render in UE4.
Here is the final beauty shot of my model rendered in Unreal Engine 4.
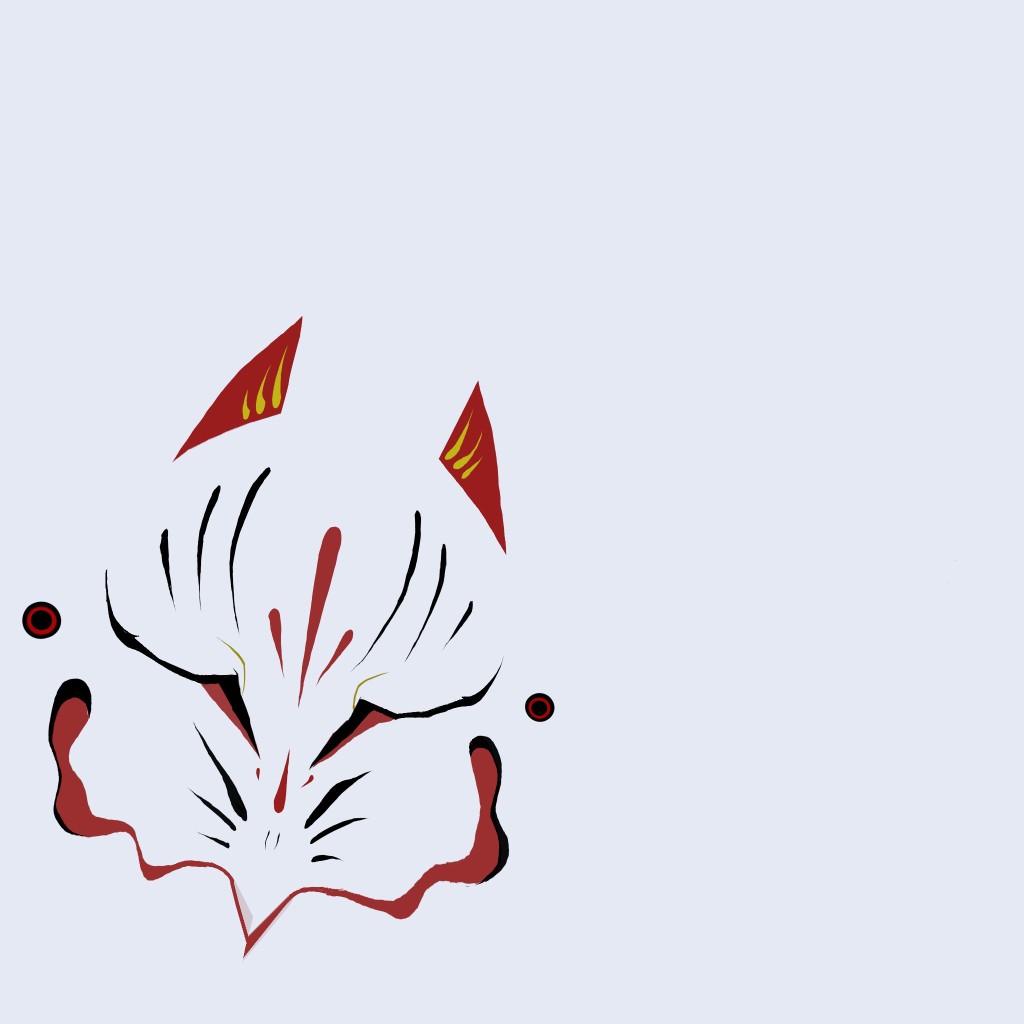
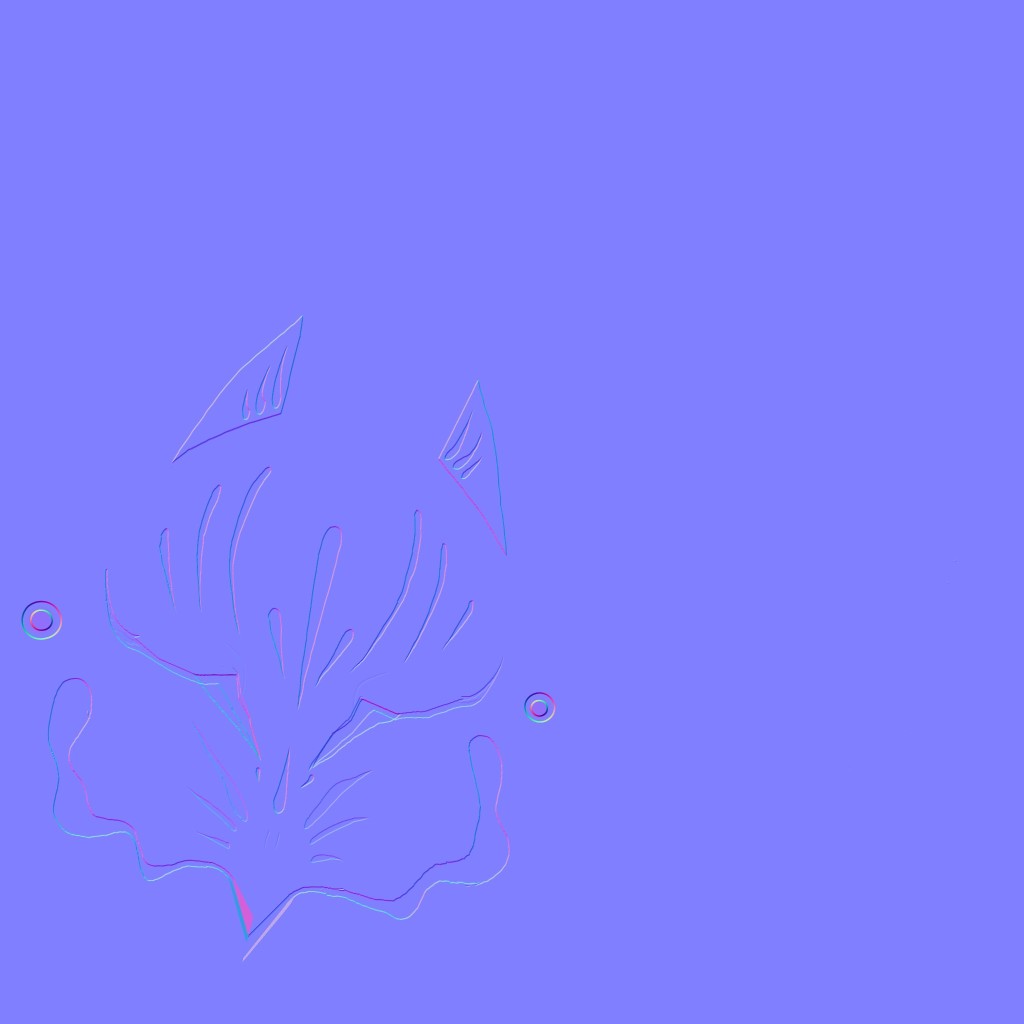
My Texture maps for the Kitsune Mask.


- Is your asset’s axis placed appropriately? No, i have not place either my model to the appropriate place in the accese, my Kitsune mask and wooden katana axis is placed above the grid, i need to go back in maya and adjust both my model axis and the pivot points of my models. Here is a screenshot of me fix the axis and placing it appropriately in maya for my kitsune mask.
- What is your 3D model format? I have render my model in substance paint and exported it in to Unreal engine and exported the model of my kitsune mask as an OBJ file type and have also exported my 3D model of my wooden katana as the same file type an OBJ file.
- What are your textures’ format? My texture format for my kitsune mask are PNG files same with my low poly model of my wooden katana.
- Here is a link to my sketchfab for my Kitsune mask and my wooden katana.Kitsune mask: https://sketchfab.com/3d-models/japanese-kitsune-mask-8362ad8a28184fd6a9953bb53871b878
- Here the link in sketchfab for my wooden katana: Wooden Katana:

here is my low poly model of my wooden katana finished unwrapping and bake of high poly model on to the low poly and exsported to substance ready to start texturing. However i did get a change to texture my second model due to time constraints of the project. But however i will go back during my own time to texture it seen as the model turned out quite well and the bake turn out quite well too. I will come back as it will make a good portfolio pieces.
Evaluation.
Do you feel that you have achieved a REALISTIC likeness to your references? For my kitsune mask i feel like i have got the realistic likeness of the mask similar to mask in reference images which i am very happy with get the overall shape of the mask and the texture how i wanted it on the mask.
What looks good? The 3D model itself and the shape plus the finalized texture on the model like for example the stampede on alphas special the face pattern of the mask.
What would you work on further, if you had more time? I would add further improvement of the feedback i got from a colleague state that the part of the mask was abit to block around the top of the nose and forehead. i would make this part of the mask more smooth as it stick out of the mask alot. I would also do alterations of the kitsune mask such as it being broken, cracked and blood over the mask and put them in a showcase side by side show the different alterations of the mask i had done.
- What, specifically, do you feel that you achieved well, in the development process?Level of detail, texture quality and likeness etc.A particular part of the model. The modeling process of my mask as i got it to the shape i want and very similar to the reference images and the texture quality as it is a very simple texture the texture was clean and looked even better on the model looked even more of the like to the reference images as i created my own texture and alphas for the model which contribute to the overall lightness of my reference.
- What platform would you imagine your asset being used on/in?Console, PC, Mobile, VR, Film or TV, Animation? I would imagine my kitsune mask being used in games like Ghost of Tsushima, Sekiro and on platform like console and PC and maybe even used for an animation scene for example the mask could morph into a fox spirit/god in the animated cutscenes.
- Is your finalised asset fit for it’s purpose in a game, which you began to outline in your Planning task? My finalized model of my mask is fit for purpose and could be used in game however i would if i had time would go back and make alterations to my Texture like for example giving it smart material and grunges to give it an even more realistic look and experiment with the look a bit more with the texture itself as On the planning stage of the model of the kitsune i did not take into consideration of the texture until late in the planning process they is room for improving on the model and what i planned for it. But how it look even without the impoves in like my reference and is fit for purpose in game i would like to expand on the texture and make alternative model, and texture for the model.
- Have you achieved the level of detail that you intended? The level of detail of my kitsune mask is how i intended and turn out better than expected as seen in the rendered screenshot however i would have made the texture more detailed if i was to do another texture of the model of the kitsune mask.
Did you adhere to your project plan? original i wanted to model guns, to be specific a tommy gun as i got halfway through modeling an i decided not to continue on with it. I change my mind to the traditional kitsune mask and i suck with it. I managed to get it modeled, UV unwrapped and textured which was easy for my skill i have learnt and acquired throughout my few years of model, with a very good modeled asset texture i decided to move on and do another model of which i decided to model wooden katana of which i took my own reference image of the real life object and started model the low and the high poly and get it UV unwrapped and textured. Thought this all i really did not stick with a solid plan instead alternating on what i wanted to do for my finalized realistic model and managed to produced two realistic model in the process, of which i am quite happy with.
Reference images of bruce lee statue in hong hong.


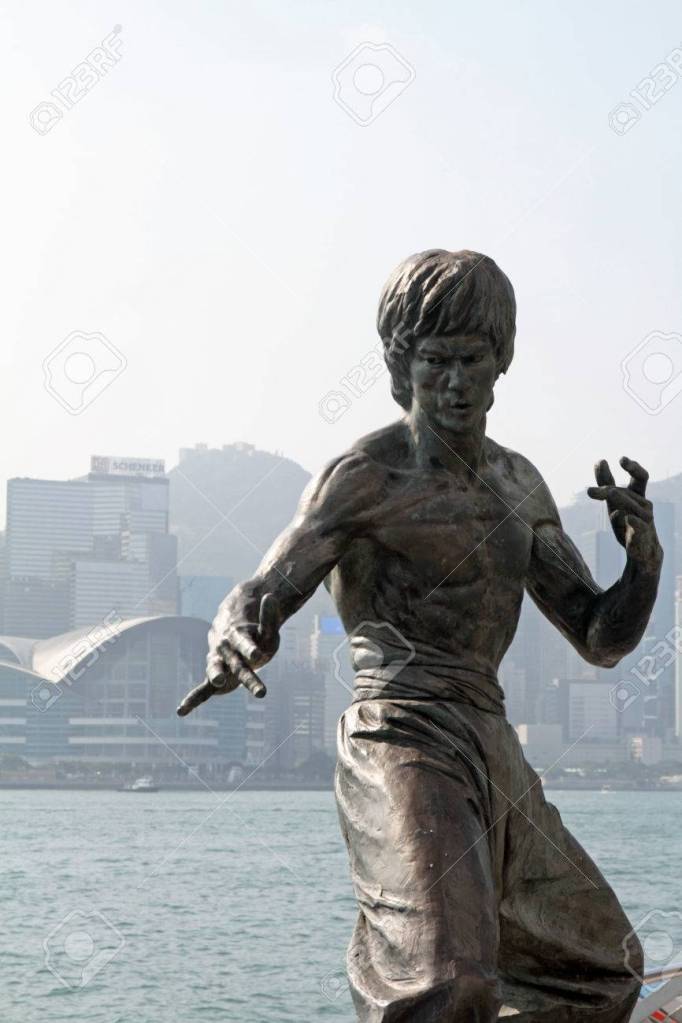


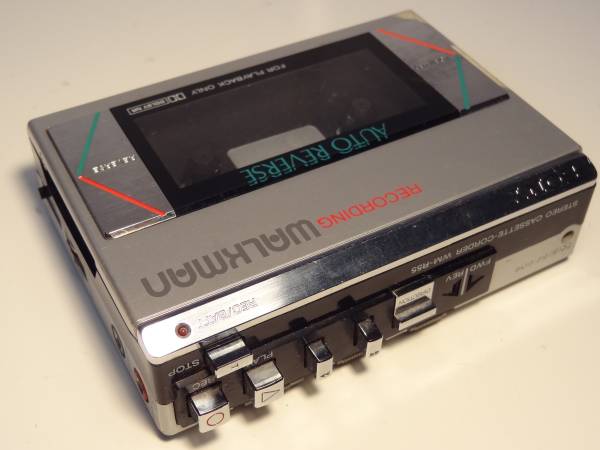


(Fox) Kitsune mask reference.


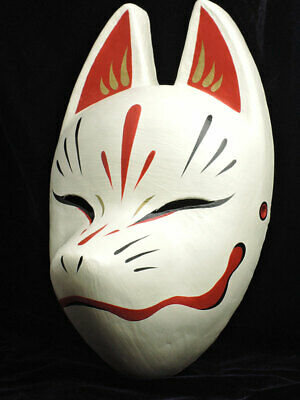


My own reference image for my wooden katana with Guard and habaki.


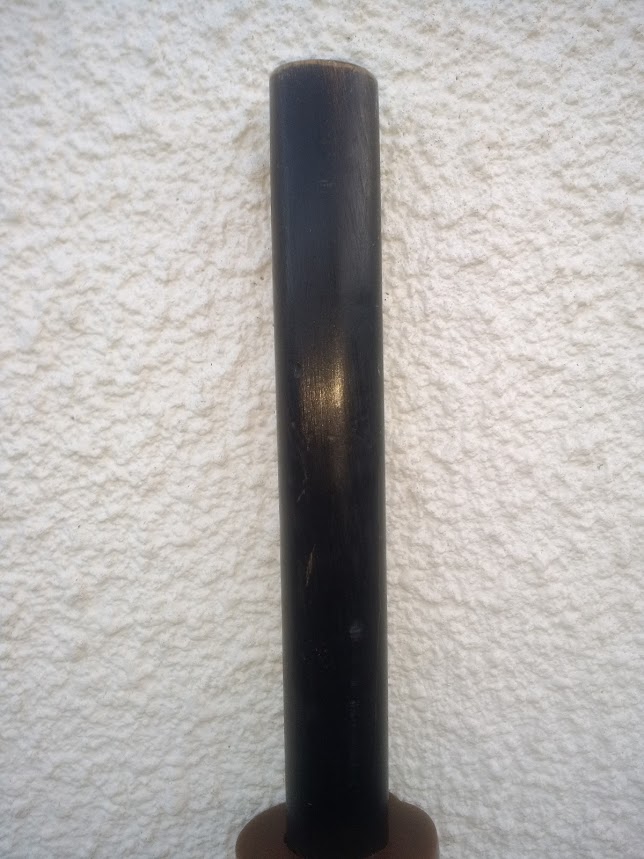
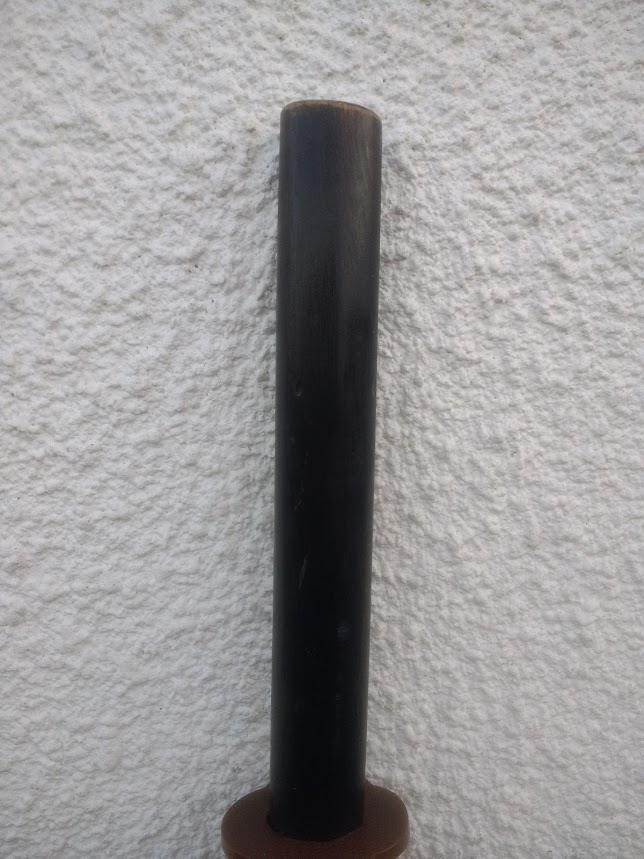


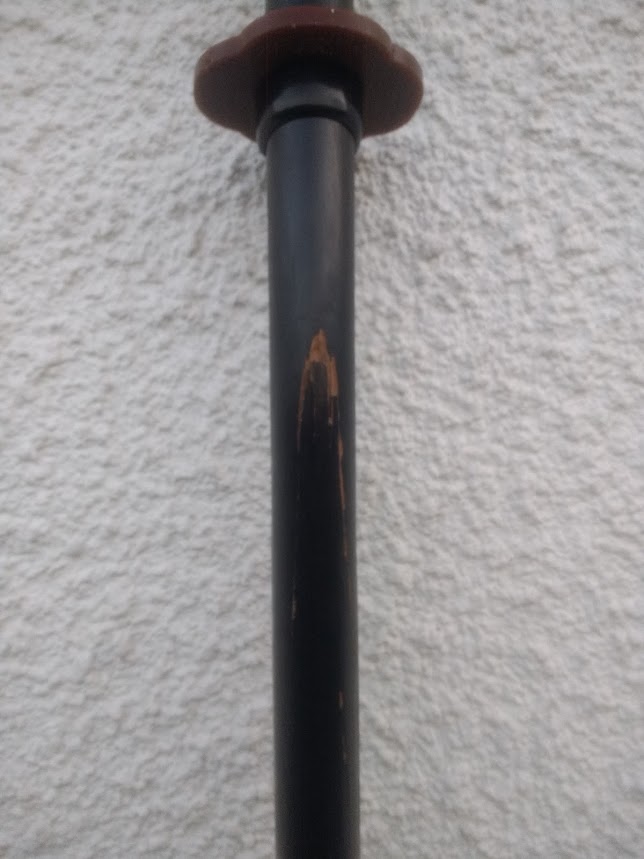


link for Kitsune mask reference: https://picclick.com/Komendo-Full-Face-Hand-Painted-Fox-Mask-Cosplay-174235709443.html
katana refrence not final refrence https://preppersshop.co.uk/minamoto-hand-made-ascending-red-dragon-katana-sword-15354-p.as
